13 Budget-Friendly Healthy Snack Recipe Ideas That Don’t Sacrifice Flavor


13 Budget-Friendly Healthy Snack Recipe Ideas That Don’t Sacrifice Flavor

Eating healthy on a budget doesn't have to mean sacrificing taste! Dive into these budget-friendly snack ideas that pack a punch of flavor without breaking the bank. Whether you're looking for something crunchy, sweet, or savory, there's a delicious option for everyone. Let’s get into these tasty recipes!

Nutty And Fruity Energy Bites For Quick Energy

A plate of nutty and fruity energy bites, surrounded by bowls of nuts and seeds.

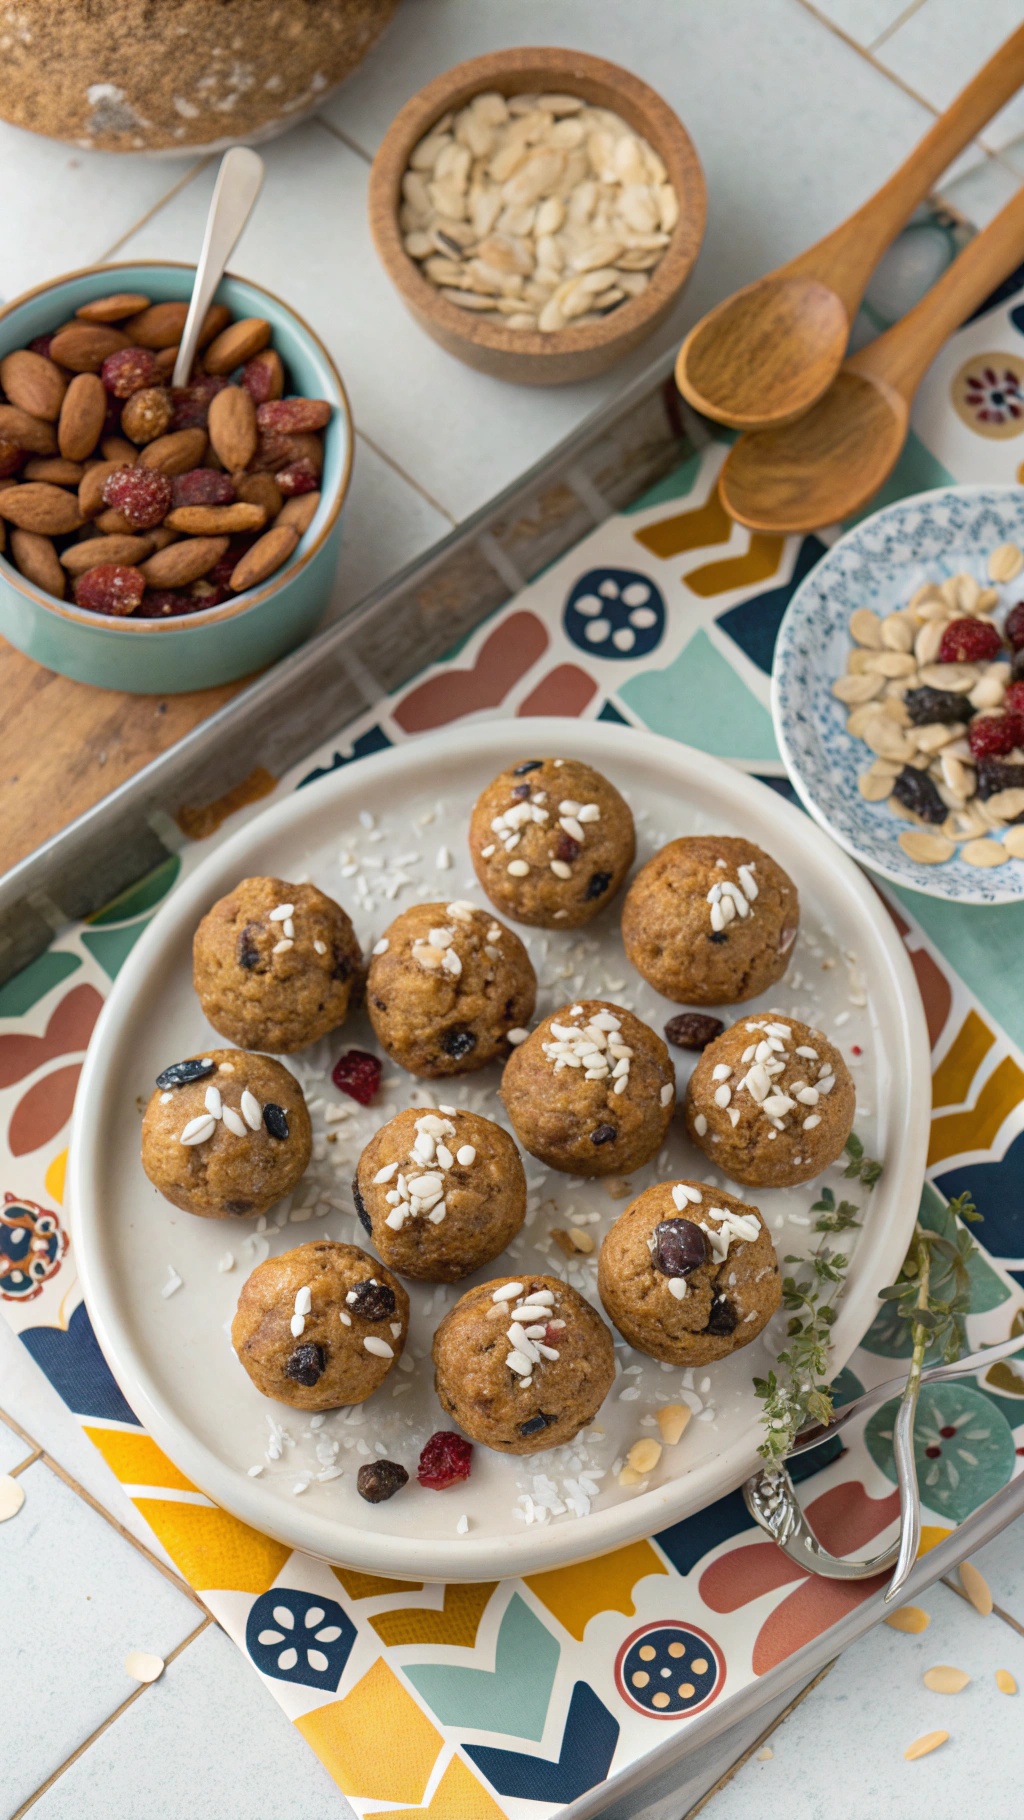
Energy bites are a fantastic way to fuel your day without breaking the bank. These little snacks are packed with nutrients and flavor, making them perfect for a quick pick-me-up. The image shows a delightful assortment of nutty and fruity energy bites, beautifully arranged on a plate. Each bite is a blend of wholesome ingredients, topped with seeds and dried fruits, adding a pop of color and texture.

Making these energy bites is simple and fun. You can customize them with your favorite nuts and dried fruits. They are great for busy days when you need a healthy snack on the go. Just grab a few, and you’re set!

Ingredients

  • 1 cup rolled oats
  • 1/2 cup almond butter
  • 1/4 cup honey or maple syrup
  • 1/2 cup mixed nuts (chopped)
  • 1/2 cup dried fruits (like cranberries or raisins)
  • 1/4 cup seeds (like sunflower or pumpkin)
  • 1/2 teaspoon vanilla extract
  • Pinch of salt

Instructions

  1. Mix Ingredients: In a large bowl, combine oats, almond butter, honey, and vanilla extract. Stir until well mixed.
  2. Add Nuts and Fruits: Fold in the chopped nuts, dried fruits, seeds, and salt. Mix until everything is evenly distributed.
  3. Form Bites: Using your hands, roll the mixture into small balls, about 1 inch in diameter.
  4. Chill: Place the energy bites on a baking sheet and refrigerate for at least 30 minutes to firm up.
  5. Store: Keep the bites in an airtight container in the fridge for up to a week.

Refreshing Cucumber And Hummus Bites

A colorful plate of cucumber slices arranged around a dollop of hummus, garnished with paprika and parsley.

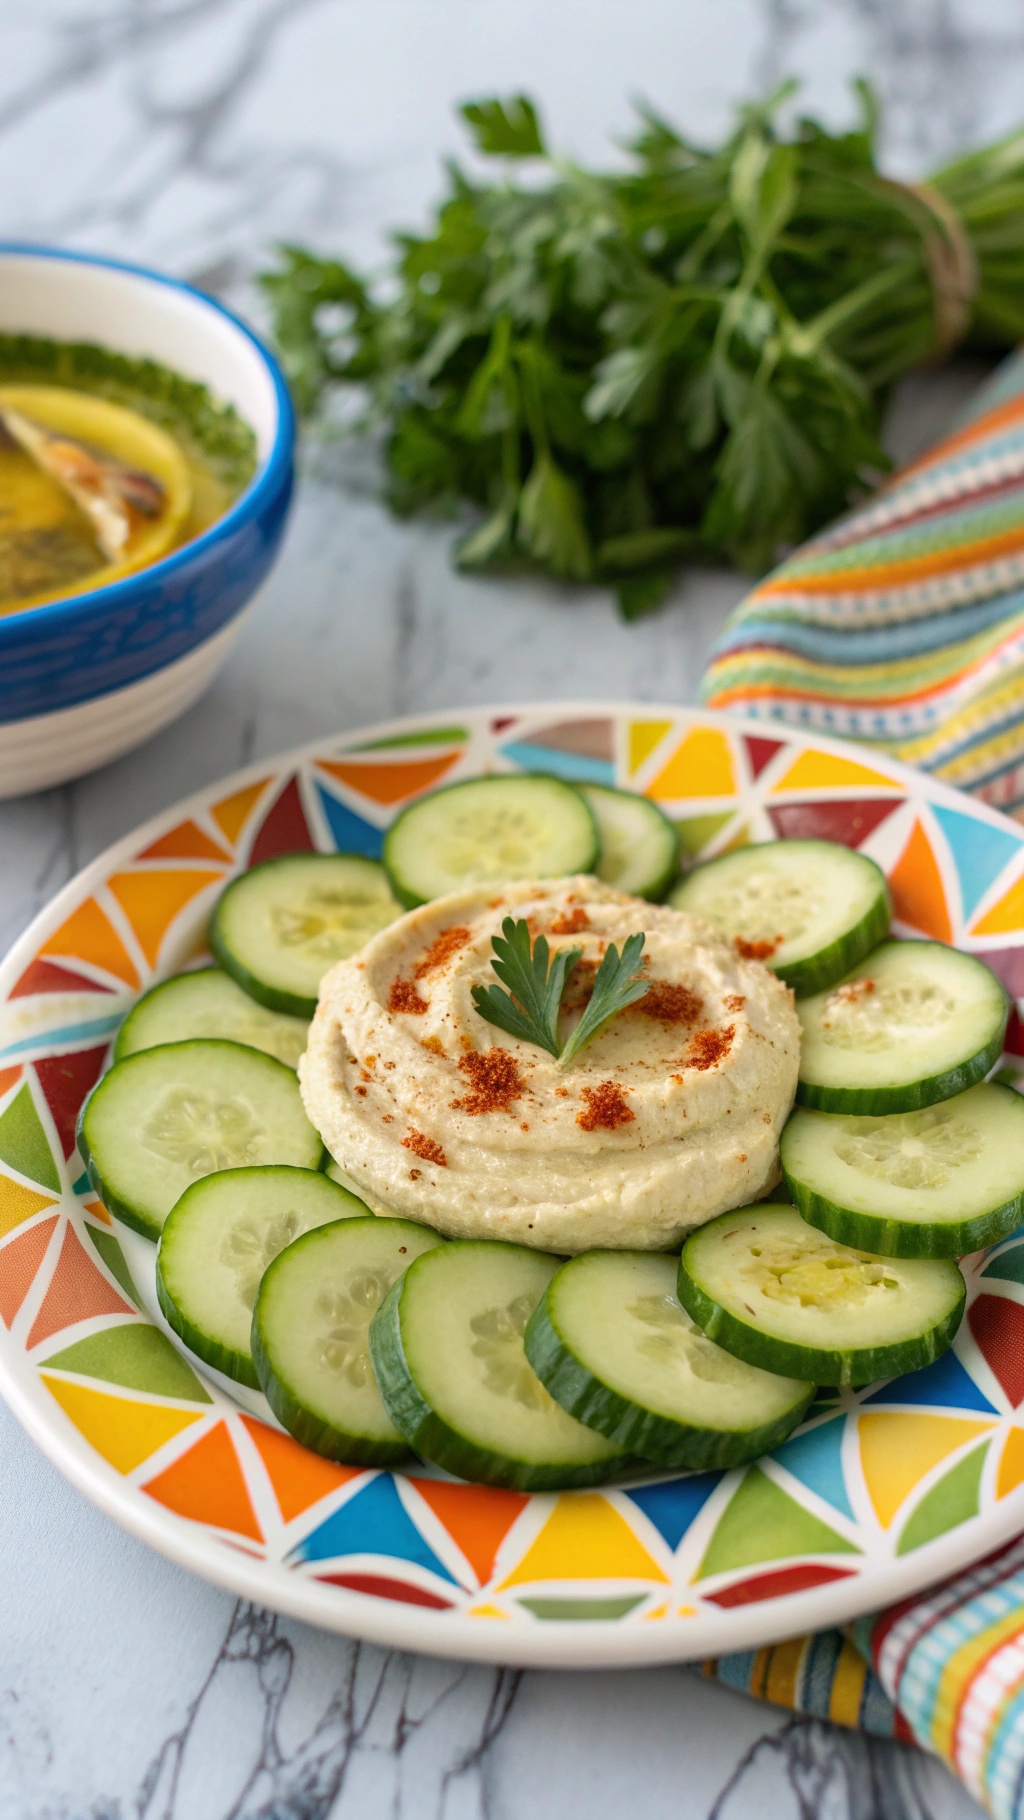
Looking for a snack that’s both healthy and easy to make? Cucumber and hummus bites are a perfect choice! This snack is light, refreshing, and packed with nutrients. The cool crunch of cucumber pairs wonderfully with the creamy texture of hummus, making it a delightful treat.

To prepare this snack, simply slice fresh cucumbers into rounds. Arrange them on a plate and top each slice with a dollop of your favorite hummus. A sprinkle of paprika or a fresh herb like parsley adds a pop of color and flavor. This snack is not only visually appealing but also incredibly satisfying.

These bites are great for parties, picnics, or just a quick afternoon snack. They’re budget-friendly and can be made in just a few minutes. Plus, you can customize them with different flavors of hummus to keep things interesting!

Ingredients

  • 1 large cucumber
  • 1 cup hummus (store-bought or homemade)
  • 1 teaspoon paprika (optional)
  • Fresh parsley for garnish (optional)

Instructions

  1. Wash the cucumber and slice it into thin rounds.
  2. On a serving plate, arrange the cucumber slices in a circular pattern.
  3. Top each cucumber slice with a generous dollop of hummus.
  4. If desired, sprinkle paprika over the hummus for added flavor and color.
  5. Garnish with fresh parsley for a touch of freshness.
  6. Serve immediately and enjoy your refreshing snack!

Savory Popcorn With Exotic Spices

A bowl of savory popcorn topped with spices, with oil being drizzled over it.

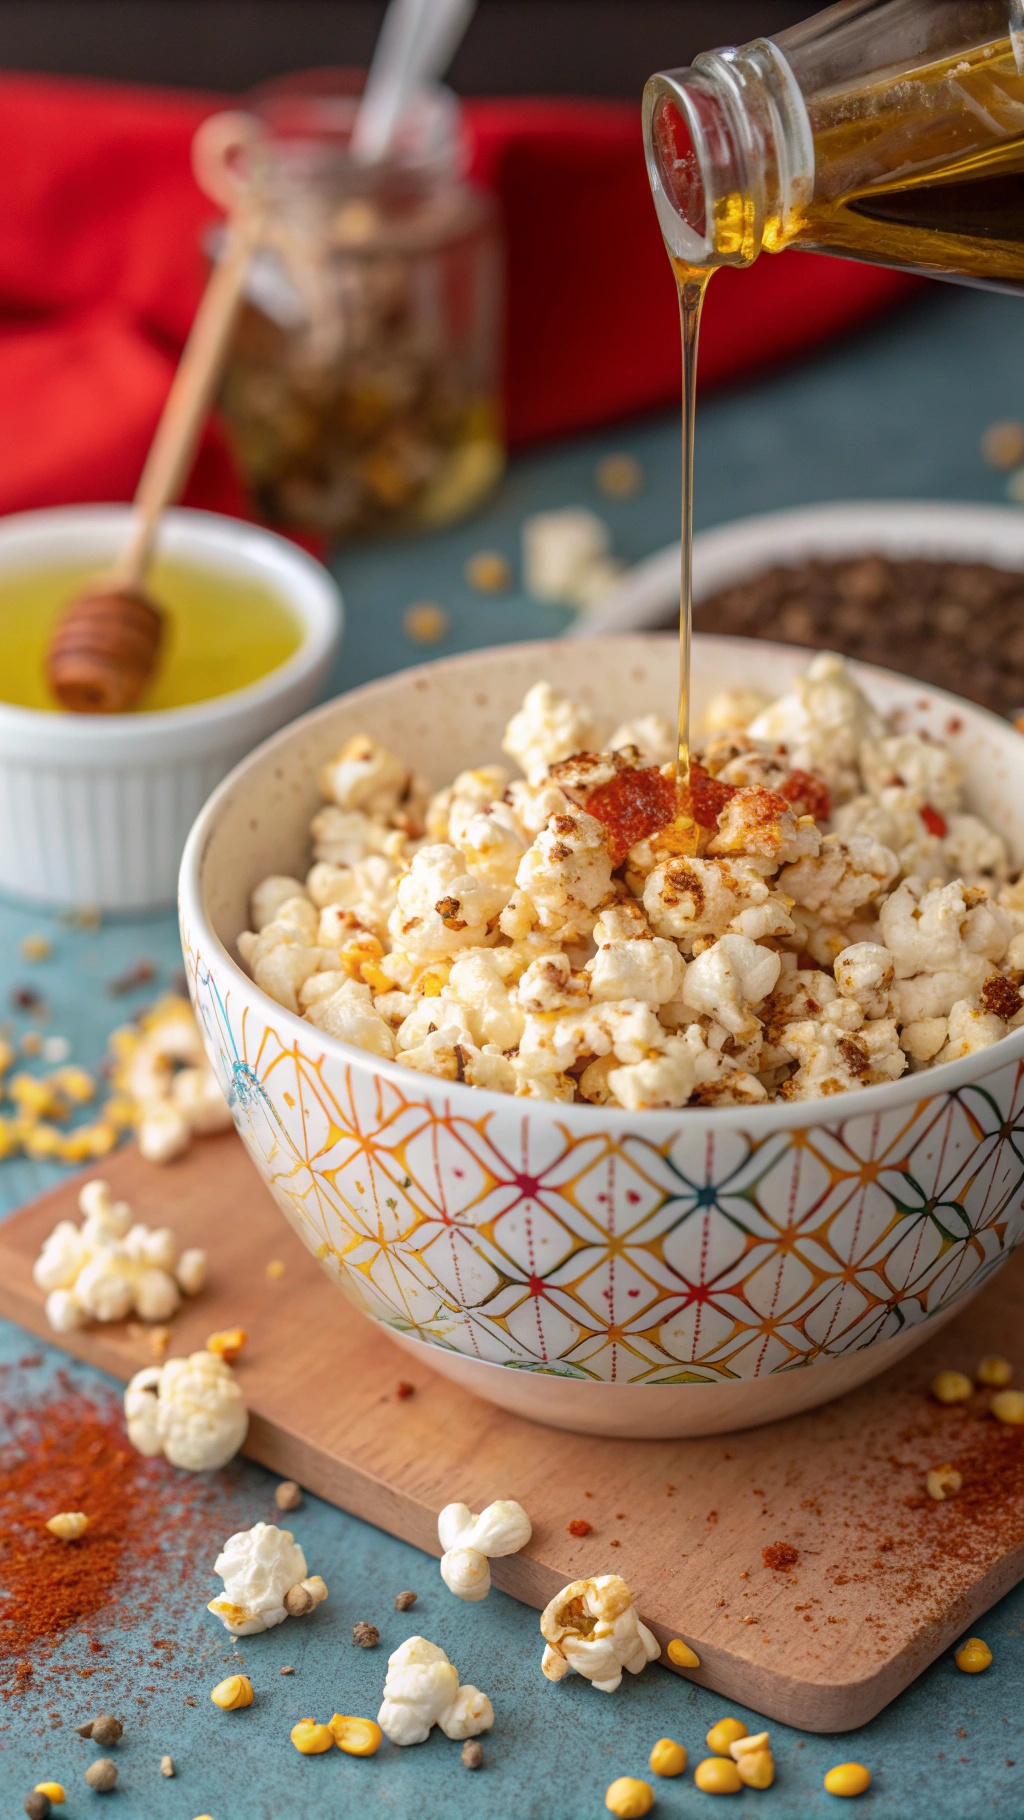
Popcorn is a classic snack that can be dressed up in so many ways. This savory popcorn recipe takes your usual movie-time treat and gives it a flavorful twist. The image shows a bowl of freshly popped popcorn, generously sprinkled with exotic spices. You can see the vibrant colors of paprika and other spices, making it look as appealing as it tastes.

To make this snack, you don’t need to break the bank. Just a few simple ingredients can transform plain popcorn into a gourmet experience. The best part? It’s quick and easy to whip up, perfect for when you want something delicious without the fuss.

Let’s get into the details of how to make this savory popcorn. You’ll be amazed at how a few spices can elevate your snack game!

Ingredients

  • 1/2 cup popcorn kernels
  • 2 tablespoons olive oil
  • 1 teaspoon paprika
  • 1/2 teaspoon garlic powder
  • 1/4 teaspoon cayenne pepper (optional for heat)
  • Salt to taste

Instructions

  1. Pop the Corn: In a large pot, heat the olive oil over medium heat. Add the popcorn kernels and cover the pot. Shake occasionally until the popping slows down.
  2. Season: Once the popping stops, remove the pot from heat. Transfer the popcorn to a large bowl.
  3. Mix the Spices: In a small bowl, combine paprika, garlic powder, cayenne pepper, and salt. Sprinkle this mixture over the popcorn while tossing to coat evenly.
  4. Serve: Enjoy your savory popcorn warm, or store it in an airtight container for later snacking!

Delightful Fruit And Nut Trail Mix

A jar filled with colorful trail mix containing nuts, seeds, and dried fruits.

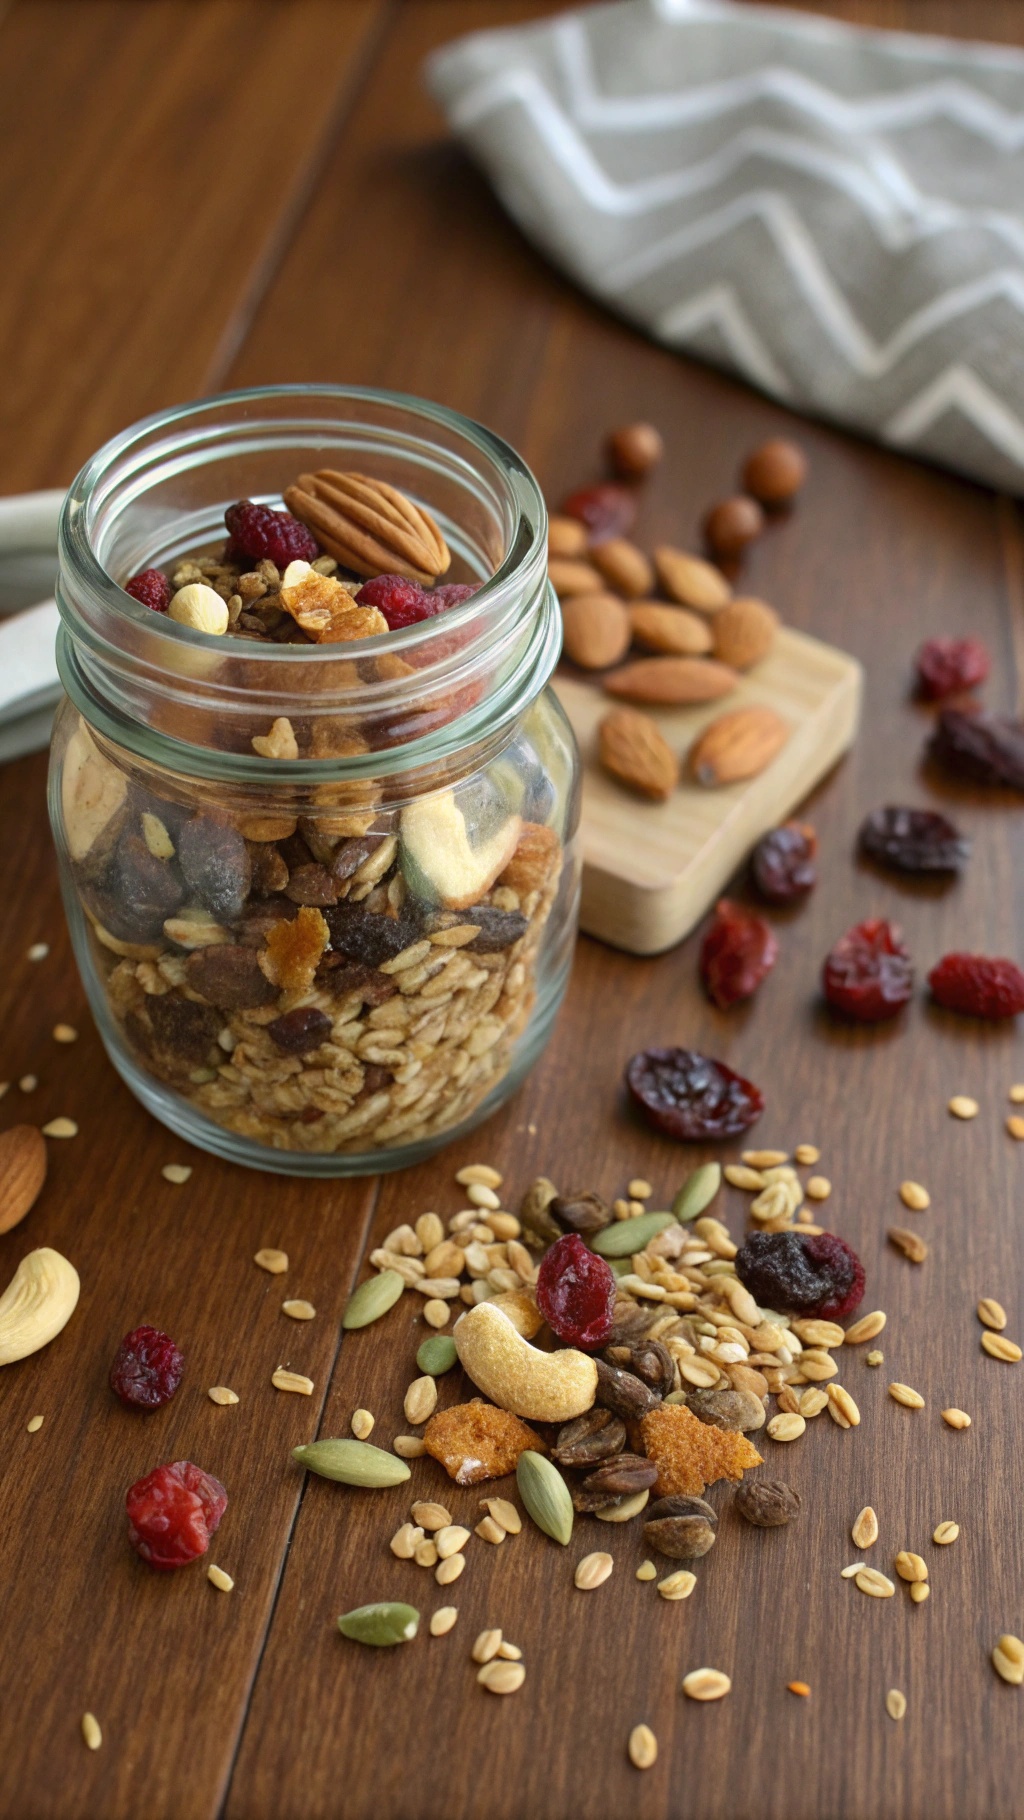
Trail mix is a fantastic snack that combines health and flavor without breaking the bank. The image shows a vibrant mix of nuts, seeds, and dried fruits, all packed into a glass jar. This colorful combination not only looks appealing but also offers a variety of textures and tastes. You can easily customize it to suit your preferences or dietary needs.

Making your own trail mix is simple and fun. You can choose your favorite nuts, seeds, and dried fruits, ensuring that every handful is packed with nutrients. Plus, it’s a great way to control the ingredients and avoid added sugars or preservatives often found in store-bought mixes.

To prepare your delightful fruit and nut trail mix, gather your ingredients and mix them in a bowl. Store it in an airtight container for a quick snack on the go. This trail mix is perfect for hiking, road trips, or just a midday pick-me-up at your desk.

Ingredients

  • 1 cup almonds
  • 1 cup walnuts
  • 1/2 cup cashews
  • 1/2 cup pumpkin seeds
  • 1 cup dried cranberries
  • 1 cup dried apricots, chopped
  • 1/2 cup sunflower seeds
  • 1/2 cup oats

Instructions

  1. In a large bowl, combine all the ingredients: almonds, walnuts, cashews, pumpkin seeds, dried cranberries, dried apricots, sunflower seeds, and oats.
  2. Mix everything together until well combined.
  3. Transfer the mixture into an airtight container or jar for storage.
  4. Enjoy your trail mix as a snack or pack it for your next outing!

Creamy Peanut Butter Banana Wraps

Plate of creamy peanut butter banana wraps with strawberries and apple slices

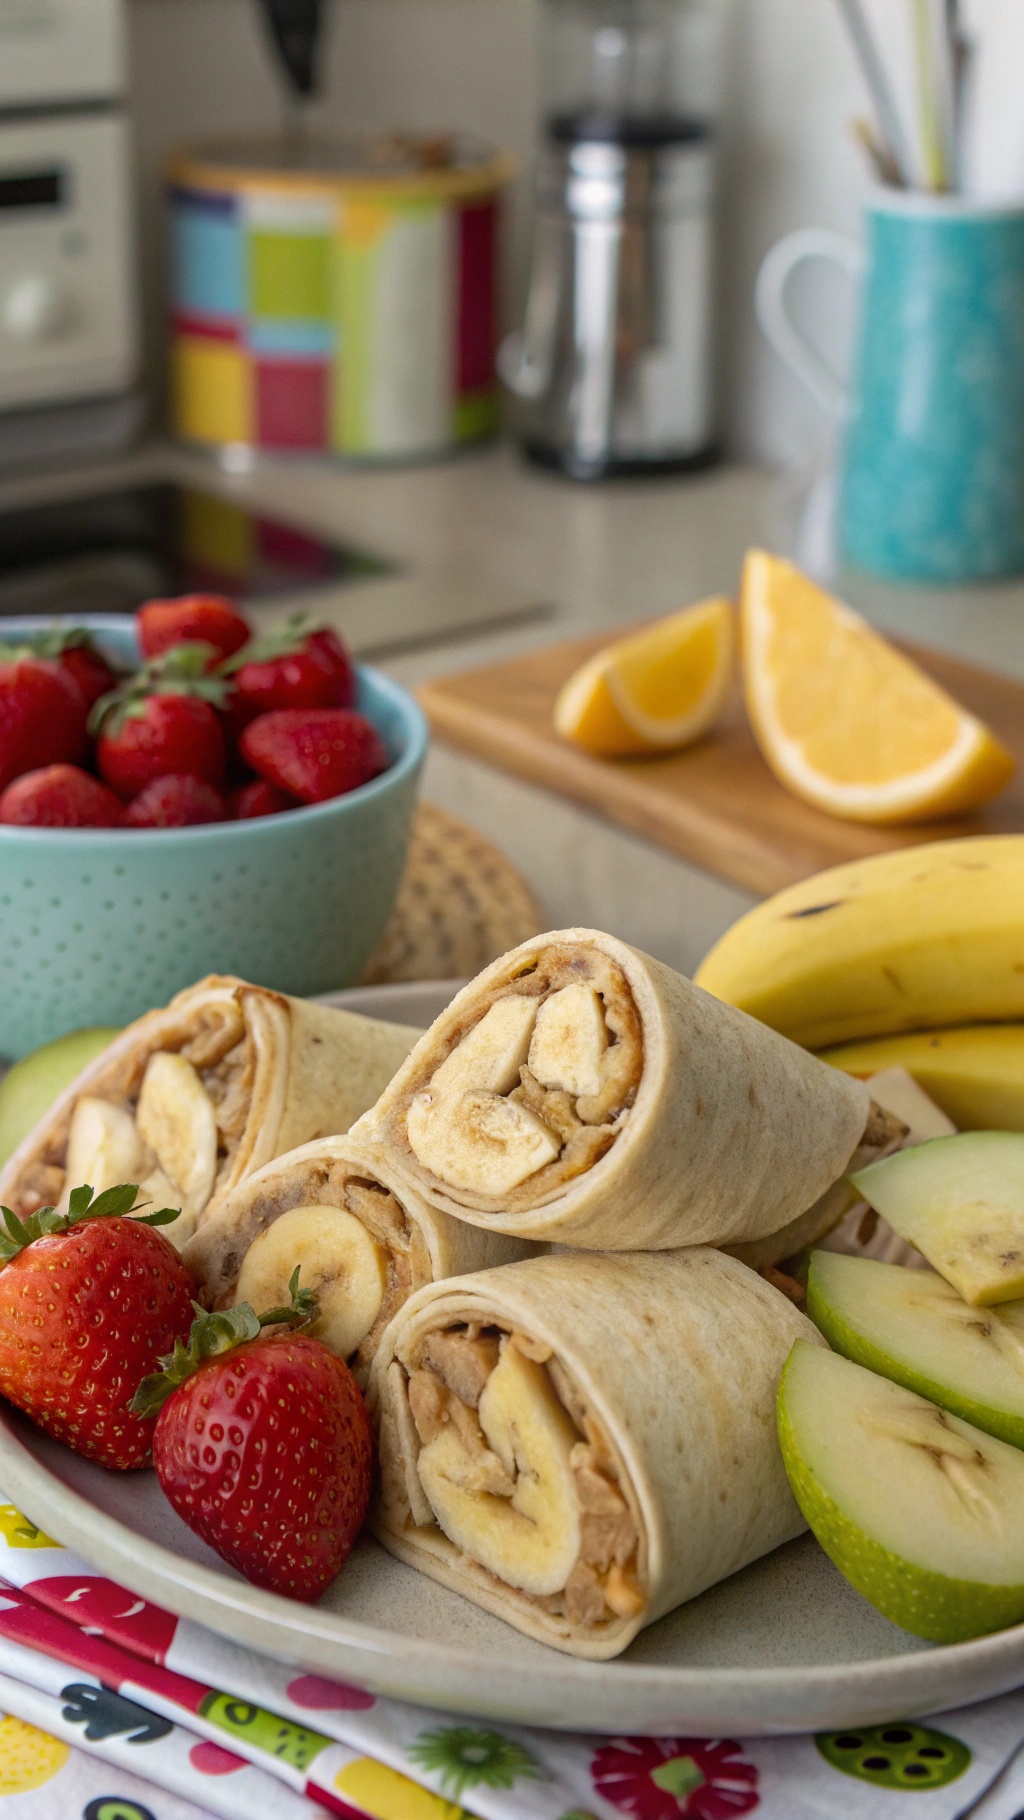
Creamy Peanut Butter Banana Wraps are a delightful snack that combines taste and nutrition. These wraps are easy to make and perfect for any time of day. The image shows a plate filled with these wraps, neatly sliced to reveal the banana and peanut butter filling. Fresh strawberries and green apple slices accompany the wraps, adding a pop of color and extra flavor.

To make these wraps, you’ll need a few simple ingredients. The combination of peanut butter and banana is not only delicious but also provides a good dose of energy. This snack is budget-friendly and can be made in just a few minutes.

Ingredients

  • 2 whole wheat tortillas
  • 1/2 cup creamy peanut butter
  • 2 ripe bananas
  • 1 tablespoon honey (optional)
  • 1/4 teaspoon cinnamon (optional)
  • Fresh strawberries and apple slices for serving

Instructions

  1. Spread peanut butter evenly over each tortilla.
  2. Slice the bananas and place them on top of the peanut butter.
  3. If desired, drizzle honey and sprinkle cinnamon over the bananas.
  4. Roll the tortillas tightly and slice them into bite-sized pieces.
  5. Serve with fresh strawberries and apple slices on the side.

Satisfying Oatmeal Cookies Loaded With Goodness

A plate of oatmeal cookies with chocolate chips and dried fruits, accompanied by a glass of milk.

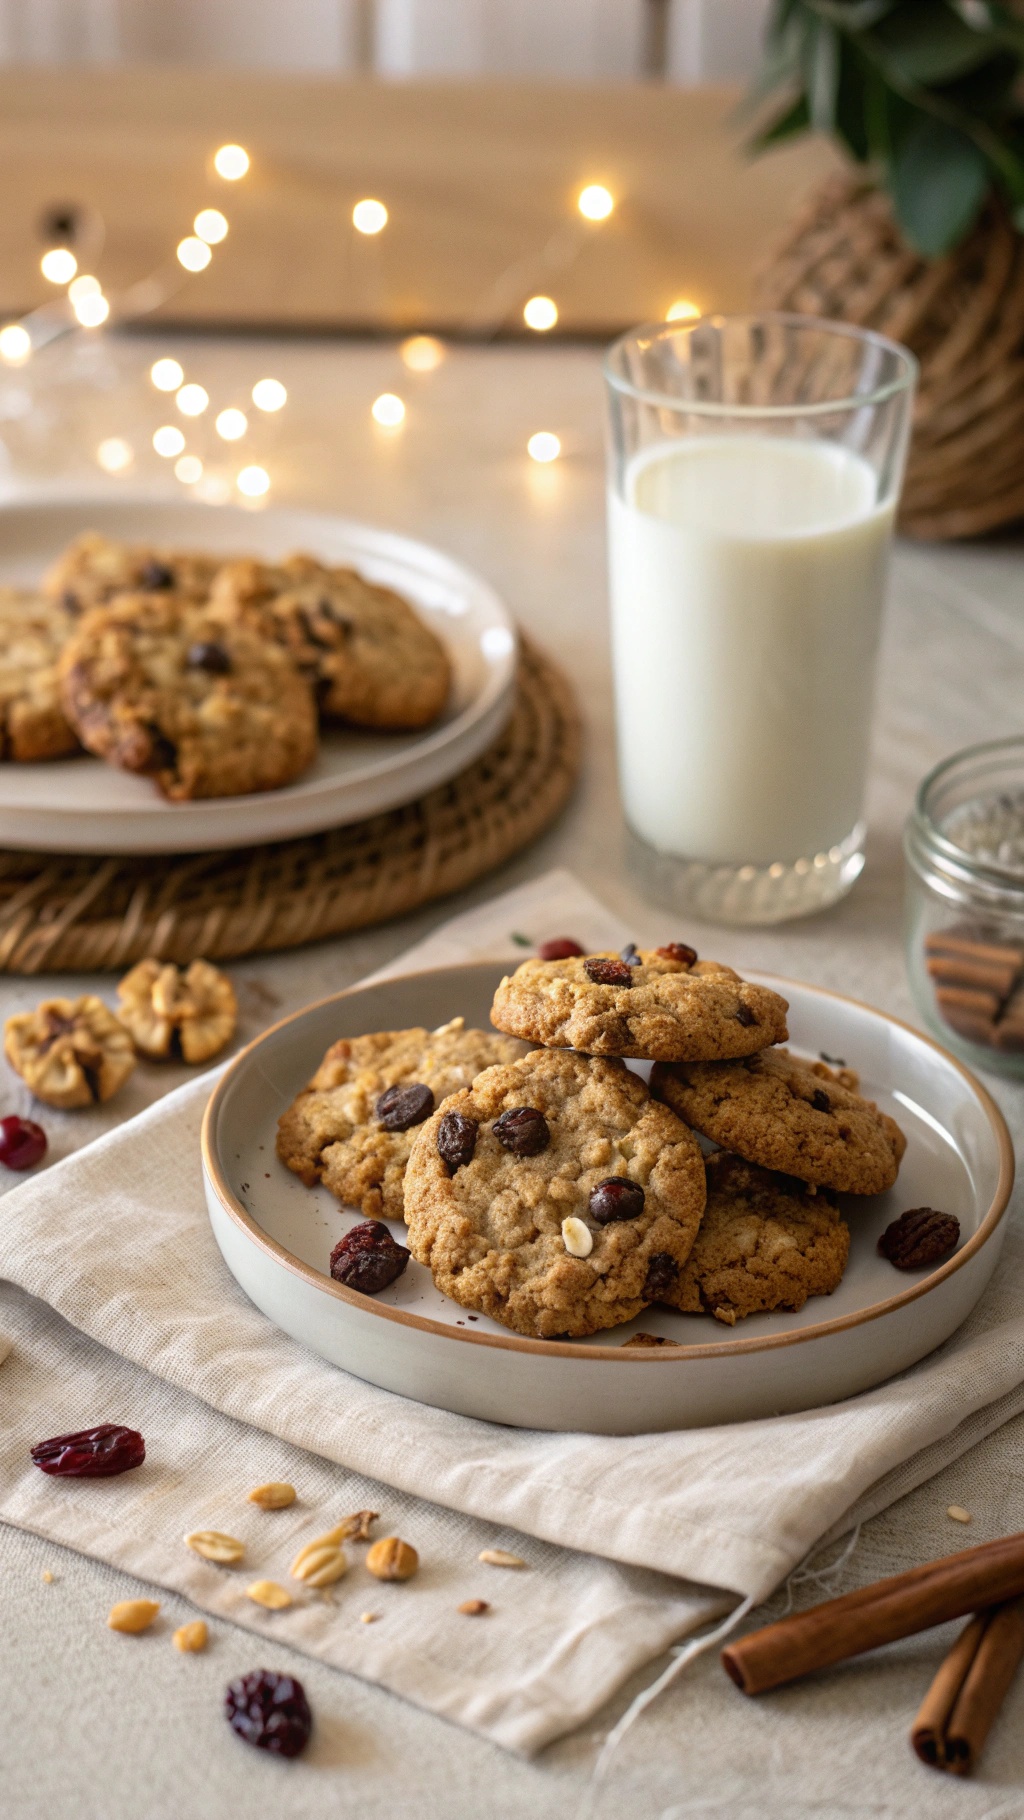
Oatmeal cookies are a classic treat that can be both delicious and nutritious. These cookies are packed with wholesome ingredients, making them a perfect snack for any time of the day. The image shows a delightful spread of oatmeal cookies, beautifully arranged on a plate, with a glass of milk nearby. The cookies are studded with chocolate chips and dried fruits, adding a pop of color and flavor.

These cookies are not just tasty; they are also budget-friendly. Using oats, flour, and simple sweeteners, you can whip up a batch without breaking the bank. Plus, they are easy to customize. Feel free to add nuts, seeds, or your favorite dried fruits. The combination of textures and flavors makes every bite satisfying.

Now, let’s get into the recipe so you can enjoy these delightful cookies at home!

Ingredients

  • 1 cup rolled oats
  • 1 cup whole wheat flour
  • 1/2 cup brown sugar
  • 1/4 cup granulated sugar
  • 1/2 cup unsalted butter, softened
  • 1/4 cup honey or maple syrup
  • 1 large egg
  • 1 teaspoon vanilla extract
  • 1/2 teaspoon baking soda
  • 1/2 teaspoon salt
  • 1/2 cup chocolate chips
  • 1/2 cup dried cranberries or raisins
  • 1/4 cup chopped nuts (optional)

Instructions

  1. Preheat the oven to 350°F (175°C) and line a baking sheet with parchment paper.
  2. In a large bowl, cream together the softened butter, brown sugar, and granulated sugar until smooth.
  3. Add the egg and vanilla extract, mixing until well combined.
  4. In another bowl, whisk together the rolled oats, flour, baking soda, and salt.
  5. Gradually add the dry ingredients to the wet mixture, stirring until just combined.
  6. Fold in the chocolate chips, dried cranberries, and nuts if using.
  7. Drop spoonfuls of dough onto the prepared baking sheet, spacing them about 2 inches apart.
  8. Bake for 10-12 minutes or until the edges are golden brown. Let them cool on the baking sheet for a few minutes before transferring to a wire rack.

Enjoy these oatmeal cookies with a glass of milk or as a quick snack on the go!

Sweet And Savory Apple Nachos

A colorful platter of apple nachos topped with peanut butter, chocolate chips, nuts, and coconut flakes.

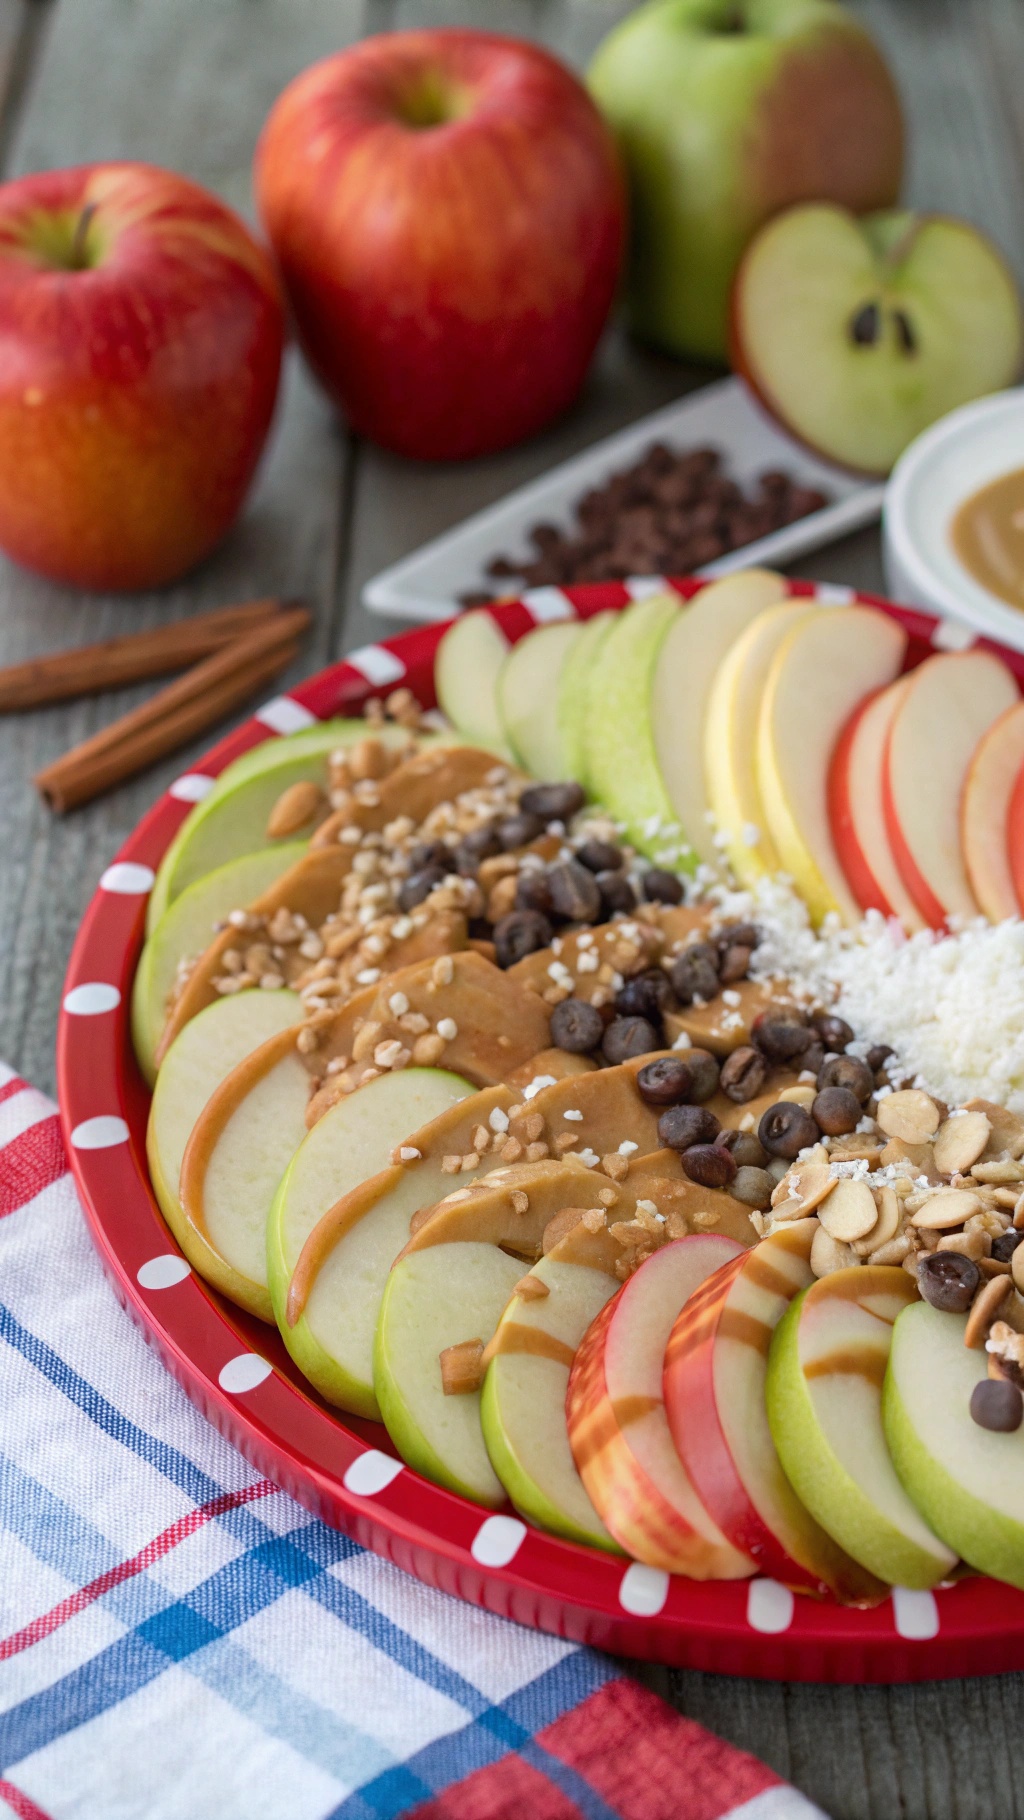
Apple nachos are a fun and healthy snack that brings together the sweetness of apples with a variety of toppings. This dish is perfect for any time of day, whether you need a quick breakfast, an afternoon pick-me-up, or a dessert that won’t weigh you down. The image shows a colorful platter filled with sliced apples drizzled with peanut butter, sprinkled with chocolate chips, nuts, and coconut flakes. It’s a feast for the eyes and the taste buds!

Making apple nachos is simple and allows for creativity. You can use any type of apple you like, whether it’s tart Granny Smith or sweet Fuji. The toppings can be adjusted to suit your taste, making it a versatile option for everyone. Plus, it’s budget-friendly, using everyday ingredients that you might already have at home.

To prepare, just slice the apples and arrange them on a plate. Drizzle with your favorite nut butter, sprinkle on some chocolate chips, nuts, or even granola. The combination of flavors and textures is delightful, giving you a sweet and savory experience in every bite.

Ingredients

  • 2 large apples (any variety)
  • 1/4 cup peanut butter (or almond butter)
  • 2 tablespoons chocolate chips
  • 2 tablespoons chopped nuts (almonds, walnuts, or peanuts)
  • 2 tablespoons shredded coconut (optional)
  • Honey or maple syrup (for drizzling, optional)

Instructions

  1. Wash and slice the apples into thin rounds, removing the core.
  2. Arrange the apple slices on a large plate or platter.
  3. Drizzle peanut butter over the apple slices.
  4. Sprinkle chocolate chips and chopped nuts on top.
  5. If desired, add shredded coconut and a drizzle of honey or maple syrup.
  6. Serve immediately and enjoy your sweet and savory apple nachos!

Nutritious Homemade Granola Bars

Homemade granola bars stacked on a wooden board with oats and nuts around them.

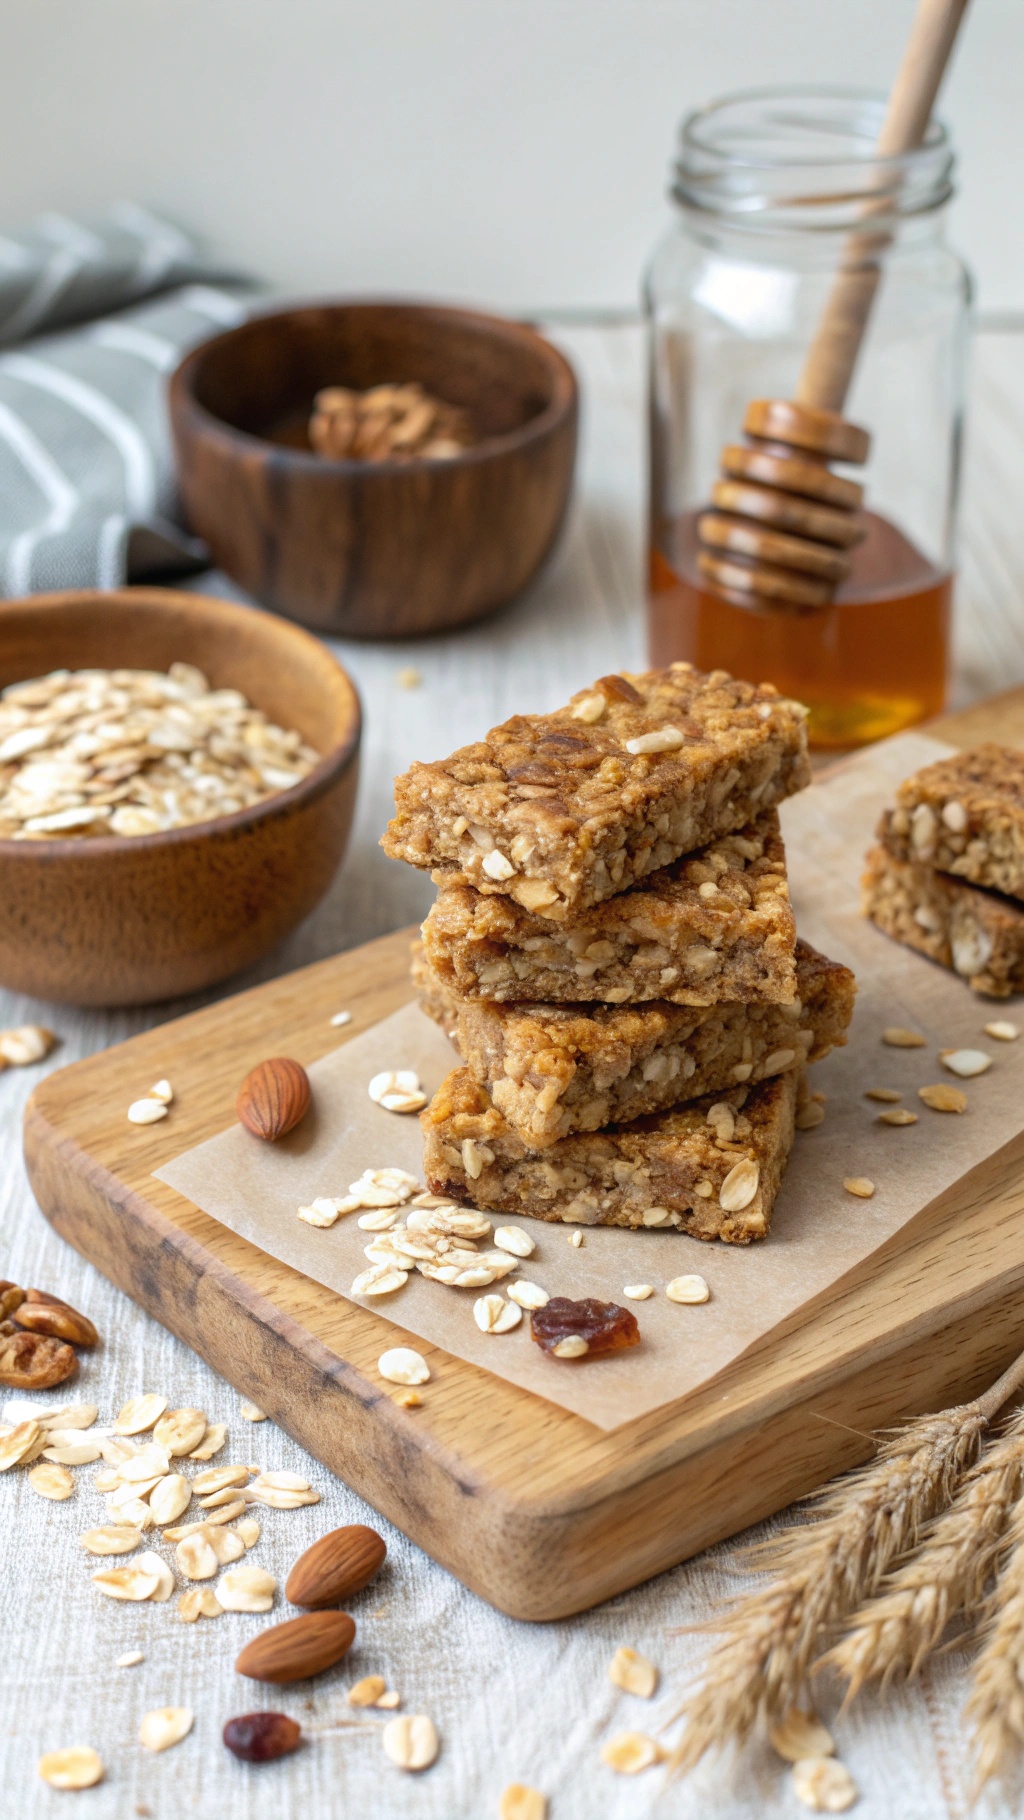
Granola bars are a fantastic snack that combines convenience with nutrition. They’re perfect for busy days when you need a quick pick-me-up. The image shows delicious homemade granola bars stacked on a wooden board, surrounded by ingredients like oats, nuts, and honey. These bars are not only easy to make but also customizable to suit your taste.

Making granola bars at home means you can control the ingredients, ensuring they are healthy and budget-friendly. You can add your favorite nuts, seeds, or dried fruits to create a unique flavor. Plus, they’re great for kids and adults alike!

Ingredients

  • 2 cups rolled oats
  • 1 cup mixed nuts (almonds, walnuts, etc.)
  • 1/2 cup honey or maple syrup
  • 1/4 cup peanut butter or almond butter
  • 1/2 cup dried fruits (raisins, cranberries, etc.)
  • 1/2 teaspoon vanilla extract
  • 1/4 teaspoon salt

Instructions

  1. Preheat your oven to 350°F (175°C) and line a baking dish with parchment paper.
  2. In a large bowl, mix the oats, chopped nuts, and dried fruits.
  3. In a small saucepan, heat the honey and nut butter over low heat until melted and combined. Stir in the vanilla extract and salt.
  4. Pour the honey mixture over the oat mixture and stir until everything is well coated.
  5. Spread the mixture evenly in the prepared baking dish and press down firmly.
  6. Bake for 20-25 minutes until golden brown. Let cool completely before cutting into bars.

Delicious Mini Caprese Skewers

Mini Caprese skewers with cherry tomatoes, mozzarella balls, and basil leaves on a plate.

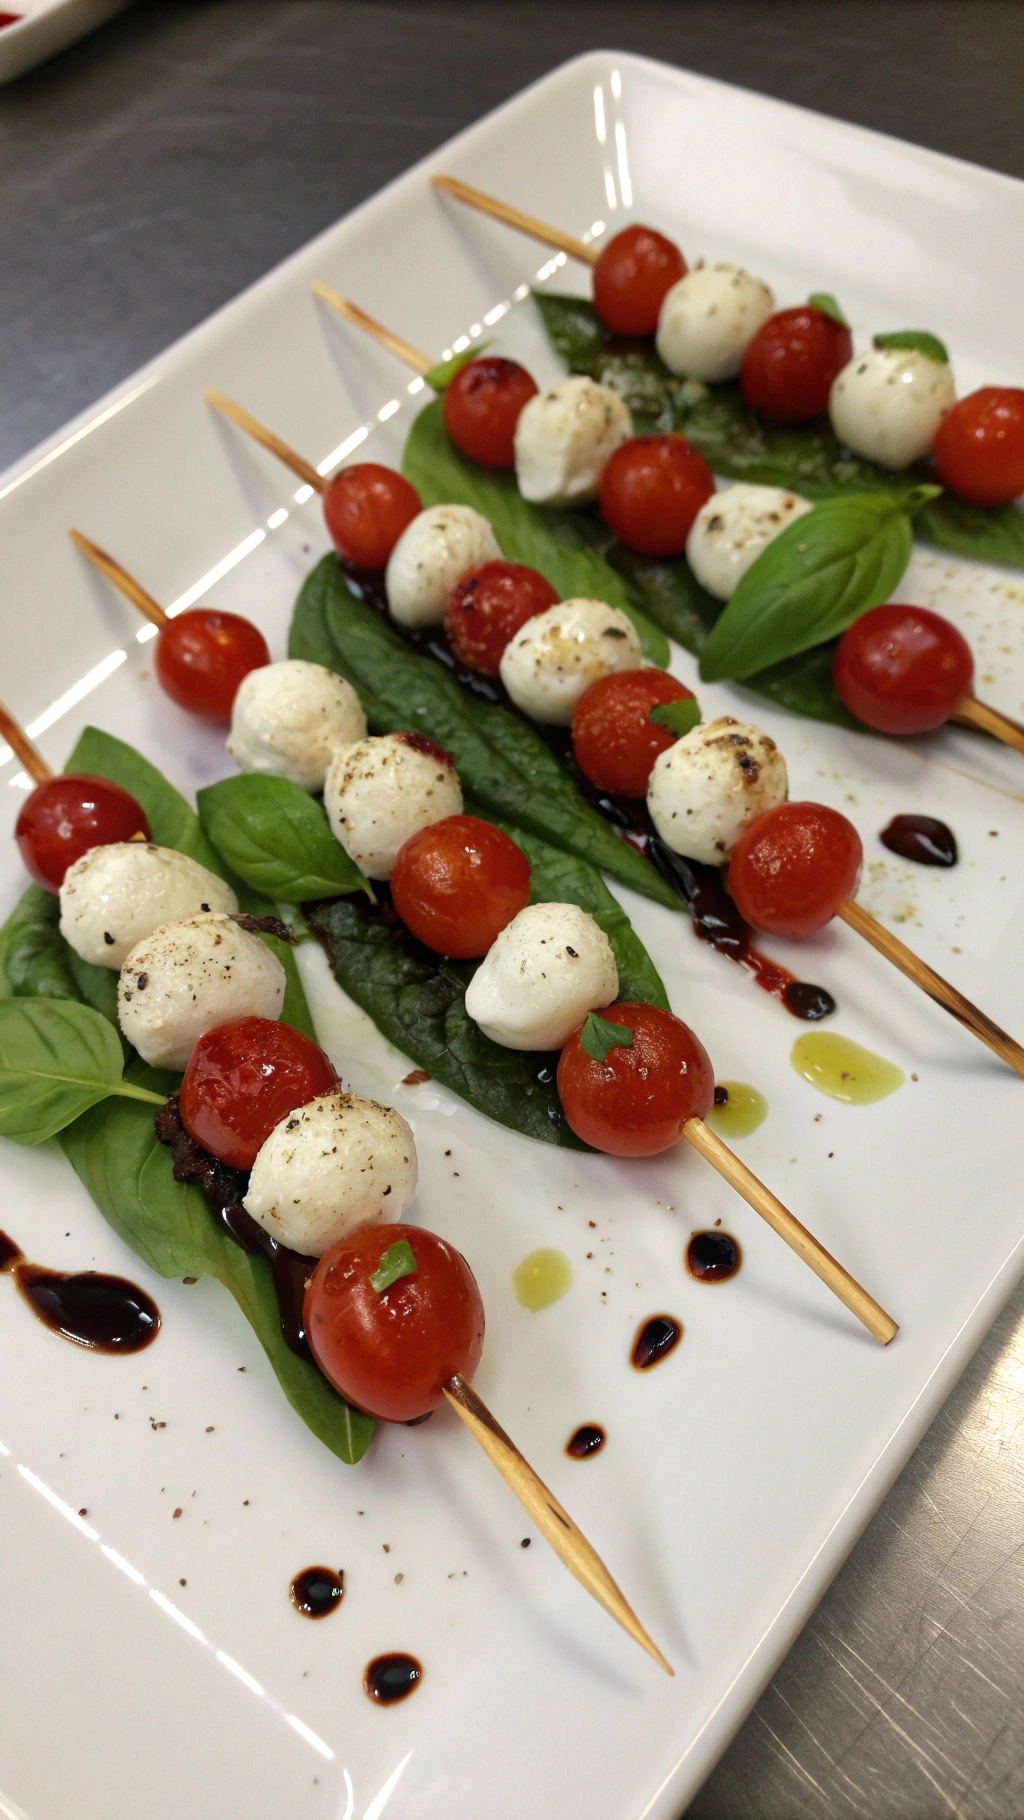
Mini Caprese skewers are a fantastic snack that packs a punch of flavor without breaking the bank. These little bites combine fresh mozzarella balls, juicy cherry tomatoes, and fragrant basil leaves, all drizzled with a touch of balsamic glaze. They’re not just tasty; they’re also visually appealing, making them perfect for gatherings or a quick snack at home.

Making these skewers is super simple. Just thread the ingredients onto small skewers or toothpicks, and you’re ready to go! They’re fresh, healthy, and can be enjoyed by everyone. Plus, they’re a great way to get your daily dose of veggies and protein.

Ingredients

  • 1 cup cherry tomatoes
  • 1 cup fresh mozzarella balls
  • 1 cup fresh basil leaves
  • Balsamic glaze (for drizzling)
  • Salt and pepper (to taste)
  • Wooden skewers or toothpicks

Instructions

  1. Prepare the Skewers: Take a wooden skewer or toothpick and start by threading a cherry tomato onto it.
  2. Add Mozzarella: Next, add a mozzarella ball to the skewer.
  3. Include Basil: Follow with a fresh basil leaf.
  4. Repeat: Continue this pattern until the skewer is filled, leaving space at the end for easy handling.
  5. Season: Once all skewers are assembled, drizzle with balsamic glaze and sprinkle with salt and pepper.
  6. Serve: Enjoy immediately or chill in the fridge for a refreshing snack later!

Flavorful Spinach And Feta Stuffed Mushrooms

A plate of spinach and feta stuffed mushrooms garnished with parsley.

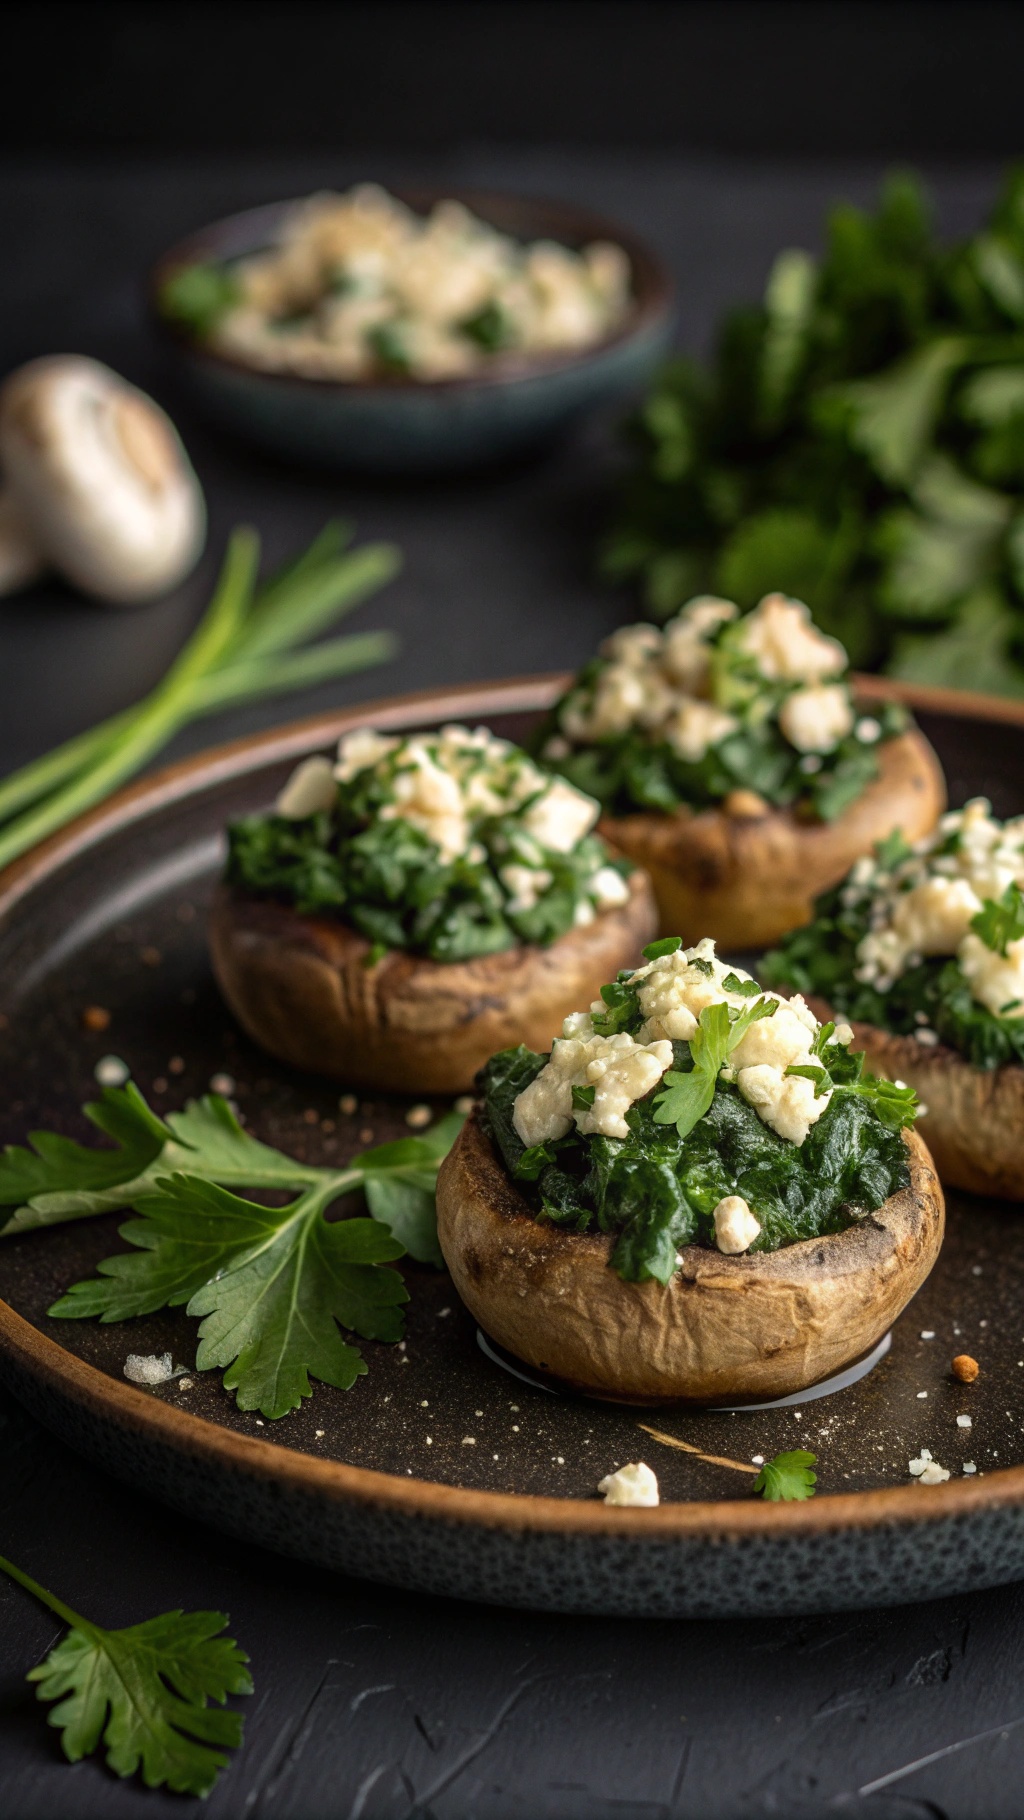
Spinach and feta stuffed mushrooms are a delightful snack that packs a punch of flavor without breaking the bank. These little bites are not only budget-friendly but also healthy, making them perfect for any occasion. The earthy taste of mushrooms pairs beautifully with the creamy feta and vibrant spinach, creating a satisfying treat.

To make these stuffed mushrooms, start with fresh, plump mushrooms. Remove the stems and set them aside. Sauté some chopped spinach in a pan until wilted, then mix in crumbled feta cheese, garlic, and herbs for added flavor. Fill each mushroom cap generously with this mixture and bake until golden. The result is a delicious snack that everyone will love!

Ingredients

  • 12 large mushrooms
  • 2 cups fresh spinach, chopped
  • 1 cup feta cheese, crumbled
  • 2 cloves garlic, minced
  • 2 tablespoons olive oil
  • 1 teaspoon dried oregano
  • Salt and pepper to taste
  • Fresh parsley for garnish

Instructions

  1. Preheat your oven to 375°F (190°C).
  2. Clean the mushrooms and remove the stems. Finely chop the stems and set aside.
  3. In a skillet, heat olive oil over medium heat. Add the chopped mushroom stems and garlic, cooking until soft.
  4. Add the chopped spinach to the skillet and cook until wilted. Stir in the feta cheese and oregano. Season with salt and pepper.
  5. Fill each mushroom cap with the spinach and feta mixture.
  6. Place the stuffed mushrooms on a baking sheet and bake for 20-25 minutes, or until the mushrooms are tender and the tops are golden.
  7. Garnish with fresh parsley before serving. Enjoy your tasty, healthy snack!

Homemade Pita Chips With Herbed Dip

A bowl of herbed dip with pita chips on a wooden board, garnished with fresh herbs and a lemon slice.

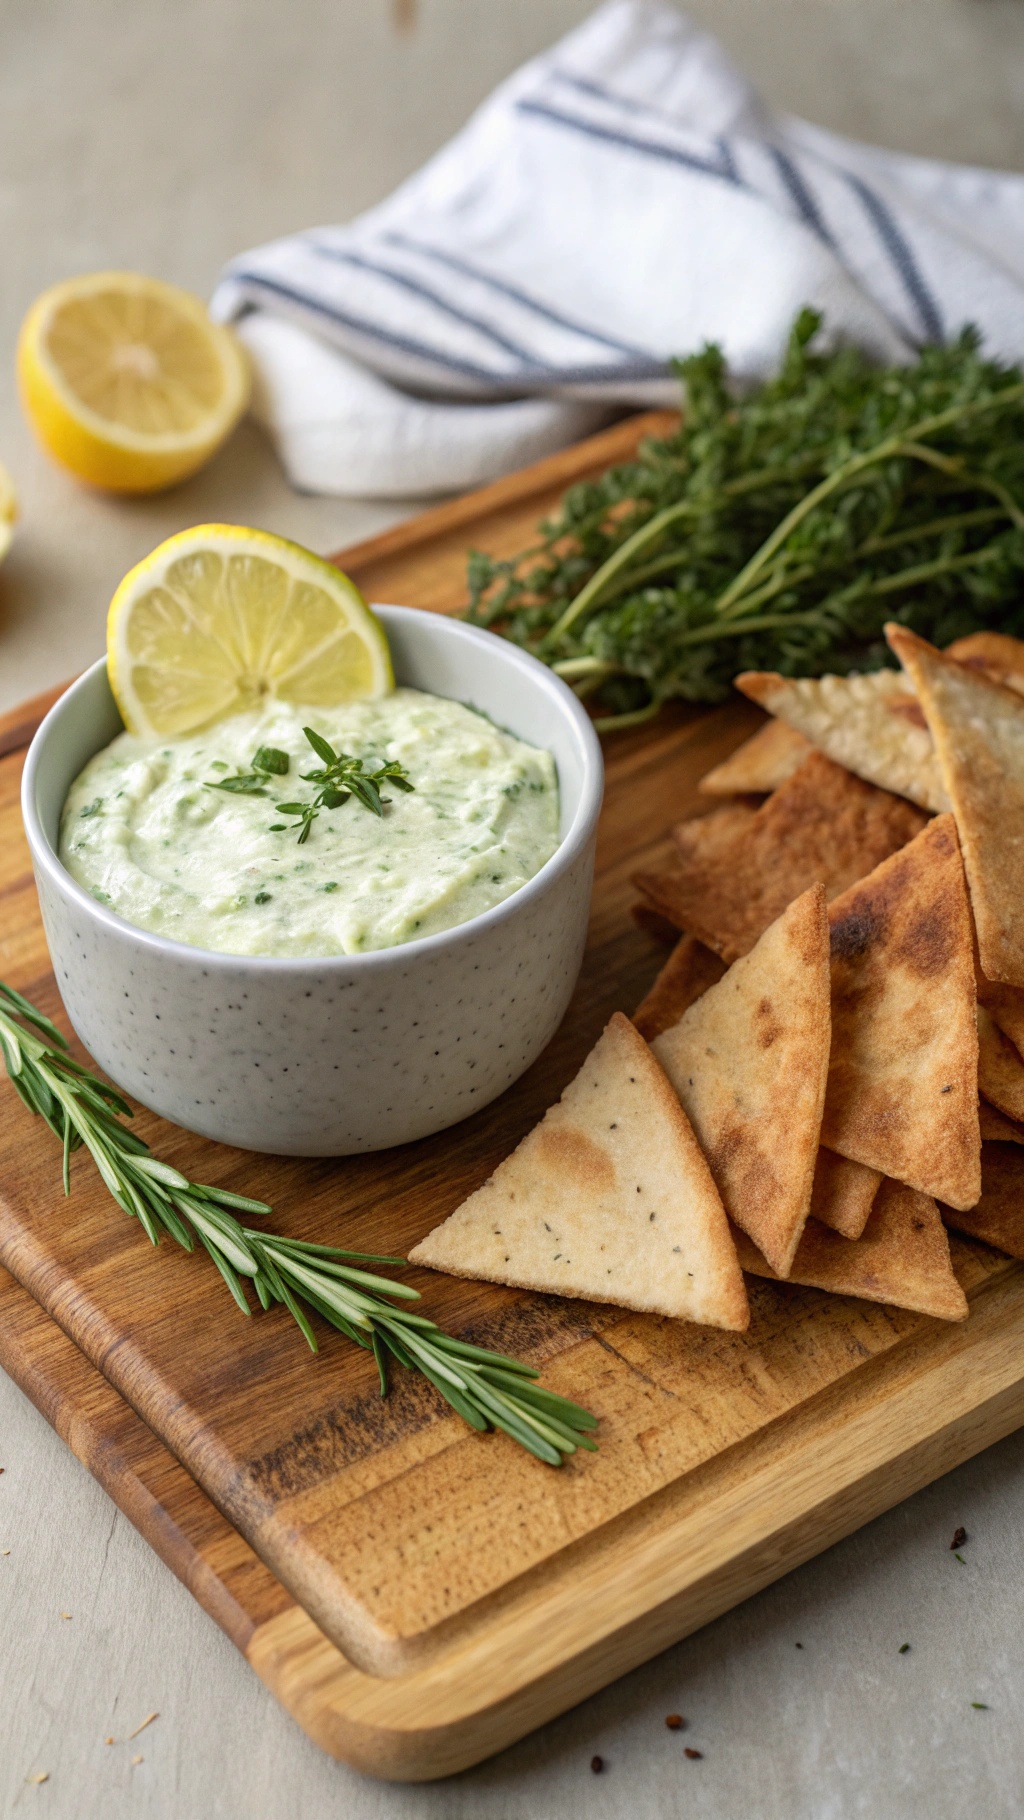
Homemade pita chips are a fantastic snack that’s easy to make and packed with flavor. They’re crispy, crunchy, and perfect for dipping. Pair them with a herbed dip, and you’ve got a delicious treat that won’t break the bank.

The image shows a bowl of creamy herbed dip, garnished with fresh herbs and a slice of lemon, sitting next to a generous pile of golden-brown pita chips. The chips are perfectly toasted, with a hint of seasoning, making them irresistible. Fresh herbs like rosemary and thyme add a vibrant touch, enhancing the overall presentation.

This snack is not only budget-friendly but also a healthier alternative to store-bought chips. You can customize the dip with your favorite herbs, making it a versatile option for any gathering or a cozy night in.

Ingredients

  • 4 whole wheat pita breads
  • 2 tablespoons olive oil
  • 1 teaspoon garlic powder
  • 1 teaspoon salt
  • 1 teaspoon paprika
  • 1 cup Greek yogurt
  • 1 tablespoon fresh lemon juice
  • 1 tablespoon chopped fresh herbs (like dill, parsley, or chives)
  • Salt and pepper to taste

Instructions

  1. Preheat your oven to 375°F (190°C).
  2. Cut the pita breads into triangles.
  3. In a bowl, mix olive oil, garlic powder, salt, and paprika. Brush this mixture onto both sides of the pita triangles.
  4. Arrange the pita chips on a baking sheet in a single layer. Bake for about 10-12 minutes or until golden and crispy.
  5. While the chips are baking, prepare the dip. In a bowl, combine Greek yogurt, lemon juice, and chopped herbs. Season with salt and pepper to taste.
  6. Once the pita chips are done, let them cool slightly. Serve them warm alongside the herbed dip.

Refreshing Watermelon And Feta Salad

A bowl of watermelon and feta salad garnished with mint leaves, sitting on a picnic table.

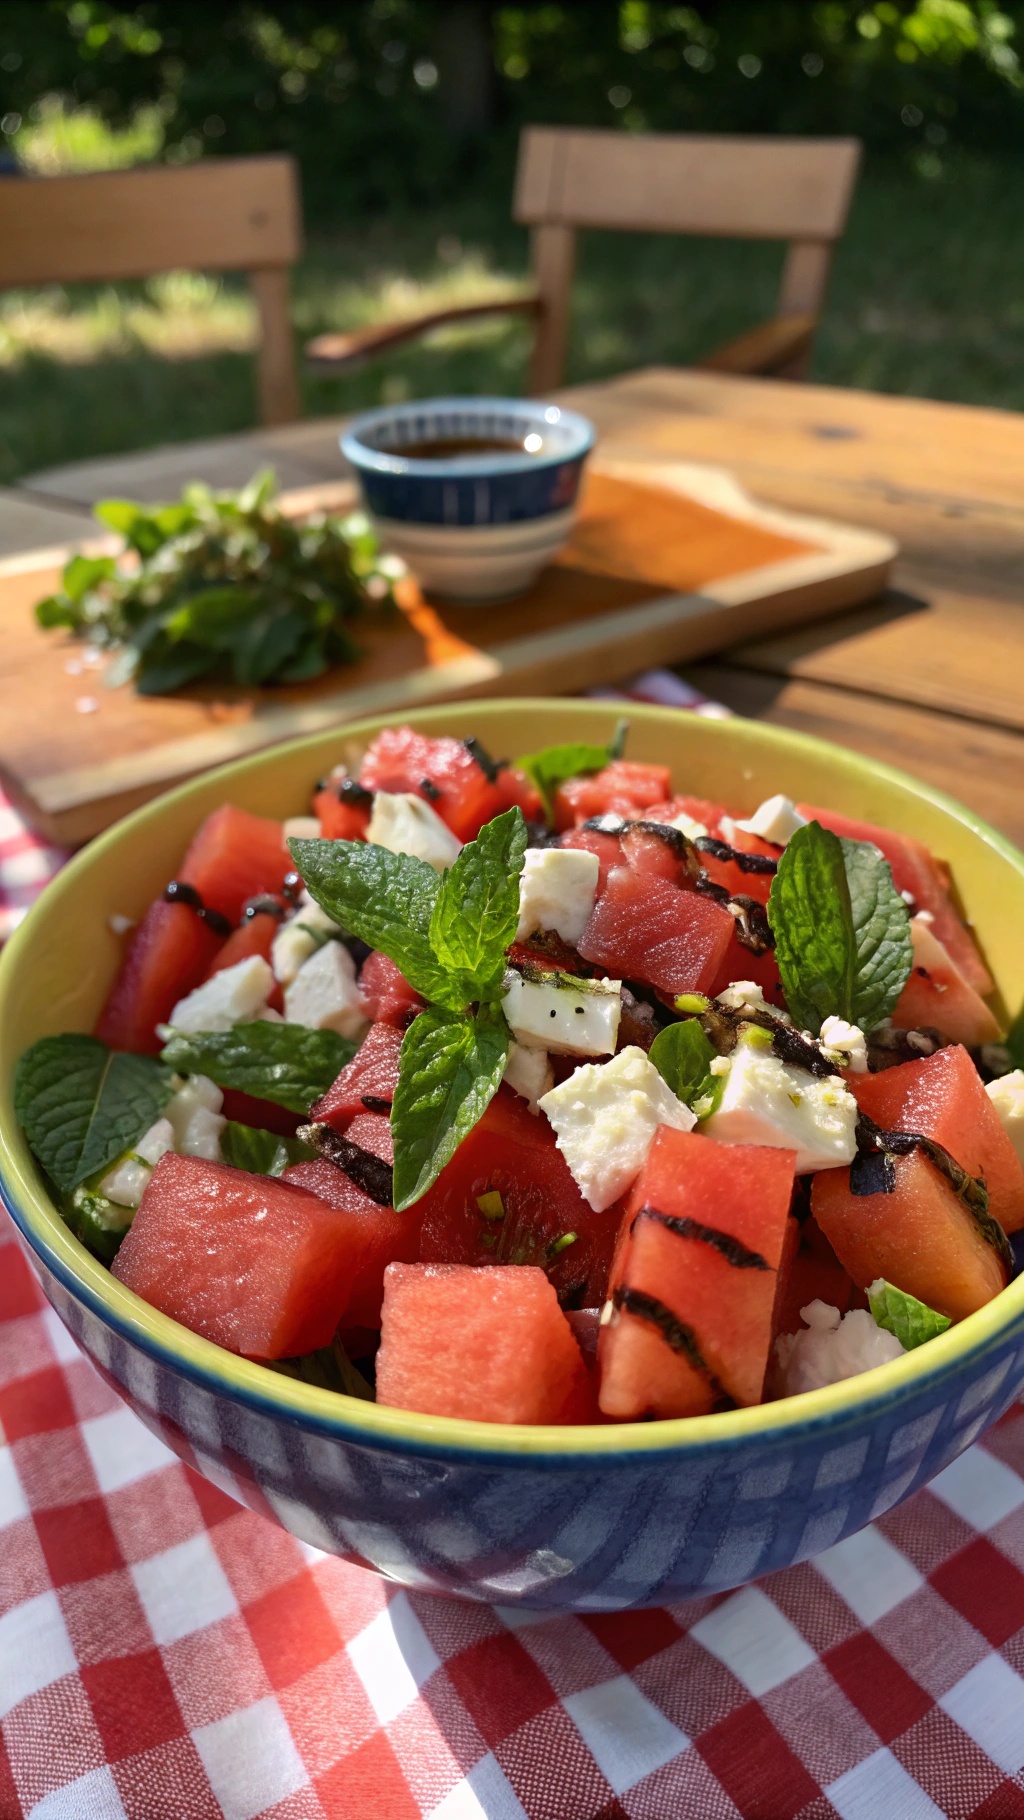
This Watermelon and Feta Salad is a delightful blend of sweet and savory flavors. The juicy watermelon cubes pair perfectly with the creamy feta cheese, creating a refreshing dish that’s perfect for warm days. The vibrant colors make it visually appealing, while the addition of fresh mint adds a burst of freshness.

To make this salad, you’ll need just a few simple ingredients. It’s quick to prepare, making it an ideal snack or side dish for any occasion. Whether you’re hosting a barbecue or just looking for a light snack, this salad is sure to impress.

Here’s how to whip up this tasty treat:

Ingredients

  • 4 cups watermelon, cubed
  • 1 cup feta cheese, crumbled
  • 1/4 cup fresh mint leaves, chopped
  • 2 tablespoons balsamic glaze
  • Salt and pepper to taste

Instructions

  1. Combine the watermelon cubes and crumbled feta in a large bowl.
  2. Add the chopped mint leaves and gently toss to mix.
  3. Drizzle the balsamic glaze over the salad and season with salt and pepper.
  4. Serve immediately or chill for about 30 minutes to let the flavors meld.

Creative Yogurt Dipped Frozen Grapes

A bowl of yogurt topped with frozen grapes and granola, with fresh grapes in the background.

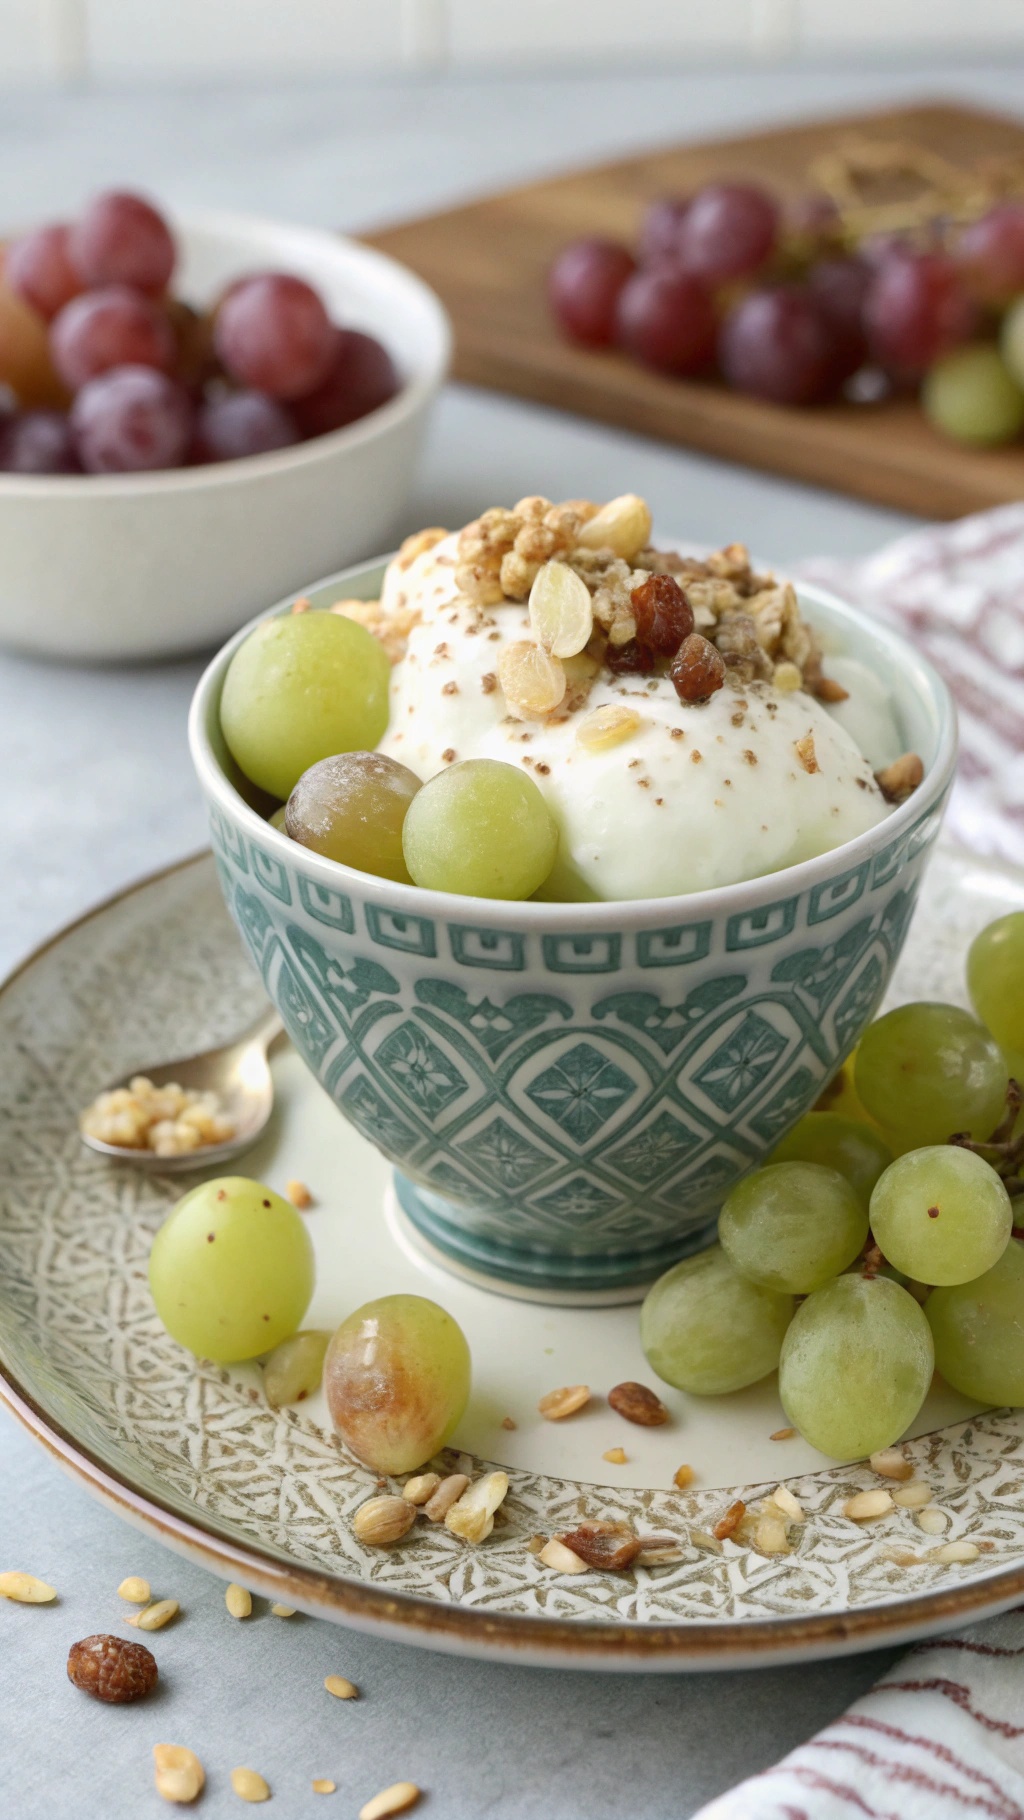
Yogurt dipped frozen grapes are a fun and tasty snack that’s perfect for any time of day. These little bites are not just refreshing but also packed with nutrients. The combination of sweet grapes and creamy yogurt makes for a delightful treat that feels indulgent without the guilt.

To make this snack, start by choosing your favorite grapes. Both red and green grapes work well. Wash them thoroughly and then dry them off. Dip each grape into your choice of yogurt—plain, Greek, or even flavored yogurt can add a twist. After dipping, place them on a baking sheet lined with parchment paper.

Once all the grapes are coated, pop the baking sheet into the freezer. Let them freeze for a few hours until they are solid. When you’re ready to enjoy, simply take them out and serve! These yogurt dipped frozen grapes are not only easy to make but also a great way to satisfy your sweet tooth in a healthy way.

Here’s how you can whip up this delicious snack:

Ingredients

  • 2 cups seedless grapes (red or green)
  • 1 cup plain or flavored yogurt (Greek or regular)
  • 1 tablespoon honey or maple syrup (optional)
  • 1/4 cup granola or chopped nuts for topping (optional)

Instructions

  1. Prep the Grapes: Wash the grapes thoroughly and remove any stems. Pat them dry with a paper towel.
  2. Mix Yogurt: In a bowl, combine yogurt with honey or maple syrup if using, and mix until smooth.
  3. Coat the Grapes: Dip each grape into the yogurt mixture, ensuring they are fully coated. Use a fork to help with the dipping.
  4. Freeze: Place the coated grapes on a baking sheet lined with parchment paper. Make sure they are spaced apart. Freeze for at least 2 hours or until solid.
  5. Serve: Once frozen, remove the grapes from the freezer and let them sit for a few minutes before serving. If desired, sprinkle with granola or chopped nuts before enjoying.

Comments