10 Healthy Snacks Perfect for Your Next Road Trip


10 Healthy Snacks Perfect for Your Next Road Trip

Planning a road trip? Don’t forget to pack some tasty and nutritious snacks that keep energy levels high without the sugar crash. Healthy munchies can make those long hours in the car much more enjoyable, and they’re a great way to stay satisfied between rest stops. Here’s a quick roundup of some of the best options that are easy to grab and go!

Nutritious Trail Mix For Endless Energy

A wooden bowl filled with colorful trail mix on a picnic blanket in a green park.

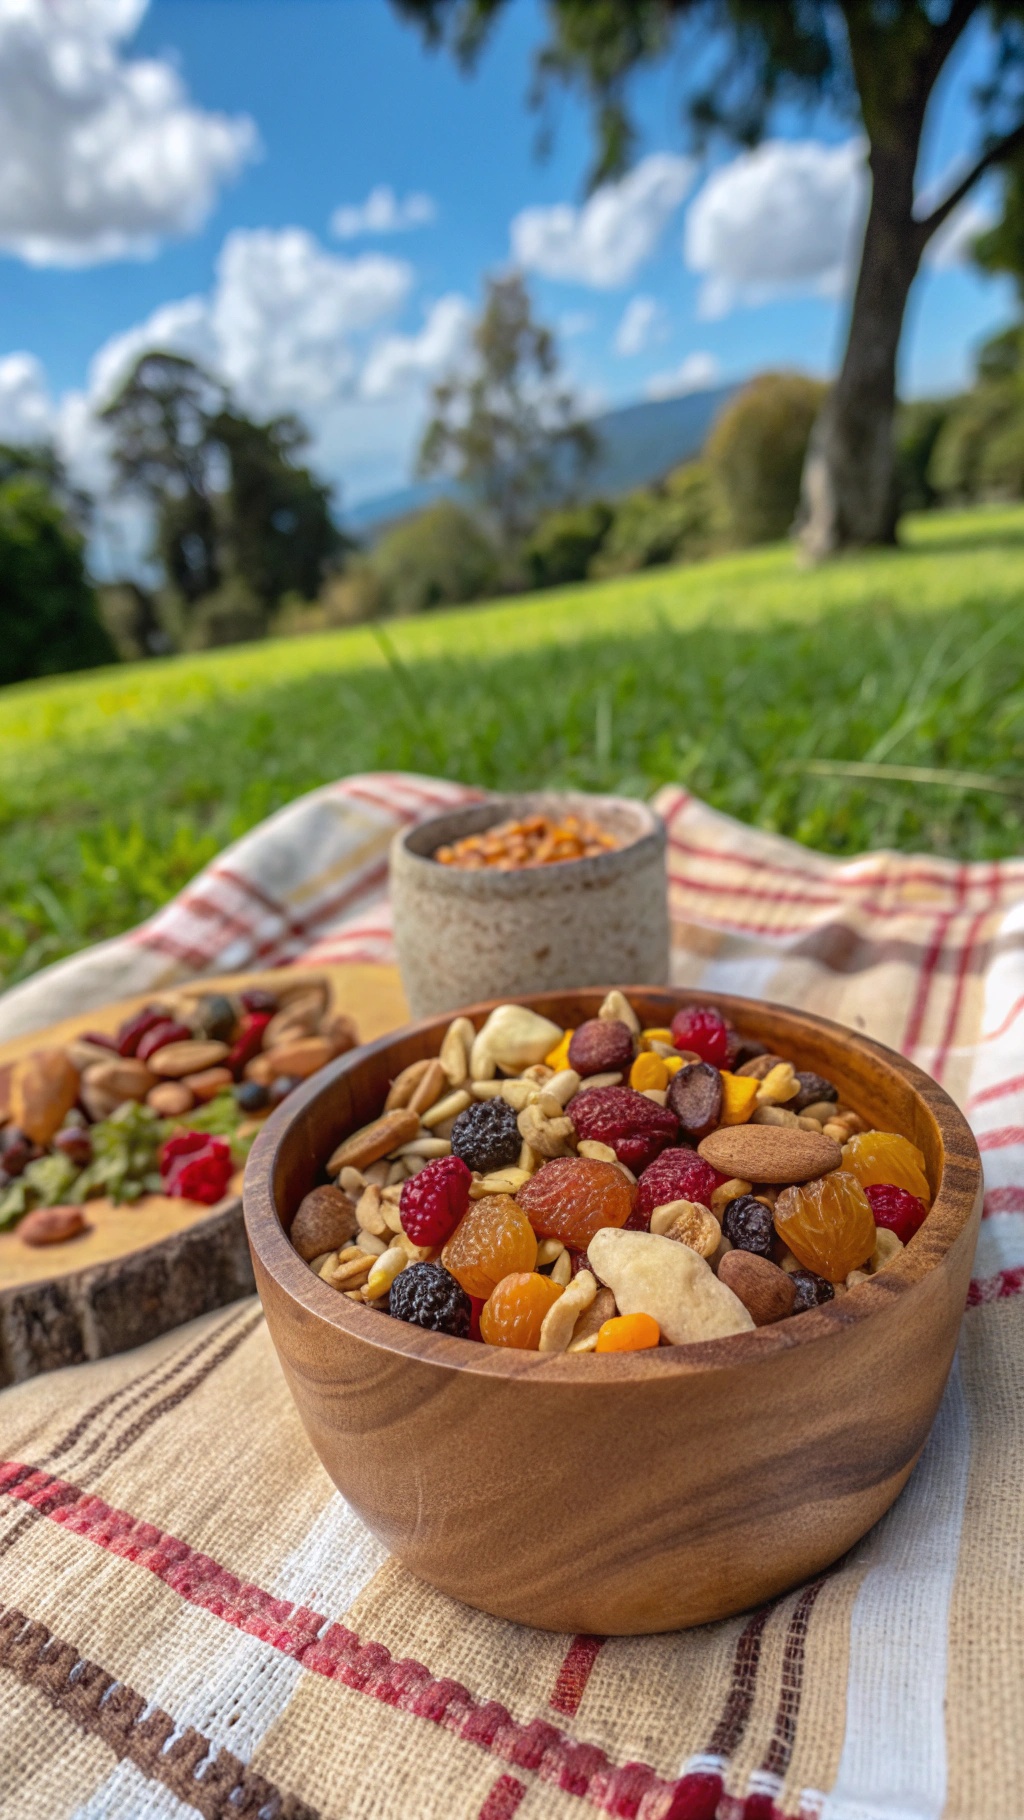
Trail mix is a fantastic snack for road trips. It’s packed with energy and easy to munch on while driving. The image shows a beautiful wooden bowl filled with a colorful mix of nuts, seeds, and dried fruits. This combination not only looks appealing but also provides a great balance of nutrients.

Nuts are a great source of healthy fats and protein, while dried fruits add natural sweetness and fiber. This mix can keep you energized and satisfied during long drives. Plus, it’s super easy to customize based on your preferences!

Making your own trail mix is simple. You can choose your favorite nuts like almonds, walnuts, or cashews. Add in some dried fruits such as raisins, apricots, or cranberries for a sweet touch. A sprinkle of seeds like pumpkin or sunflower can add a nice crunch. Feel free to throw in a few dark chocolate chips for a treat!

Ingredients

  • 1 cup almonds
  • 1 cup walnuts
  • 1 cup cashews
  • 1 cup dried cranberries
  • 1 cup dried apricots, chopped
  • 1/2 cup pumpkin seeds
  • 1/2 cup dark chocolate chips (optional)

Instructions

  1. In a large bowl, combine all the nuts, dried fruits, and seeds.
  2. If using, add the dark chocolate chips and mix well.
  3. Store the trail mix in an airtight container or zip-top bag for easy snacking on the road.
  4. Enjoy your nutritious trail mix during your next road trip!

Homemade Granola Bars For On-The-Go Snacking

Homemade granola bars on a wooden cutting board with honey and nuts in the background.

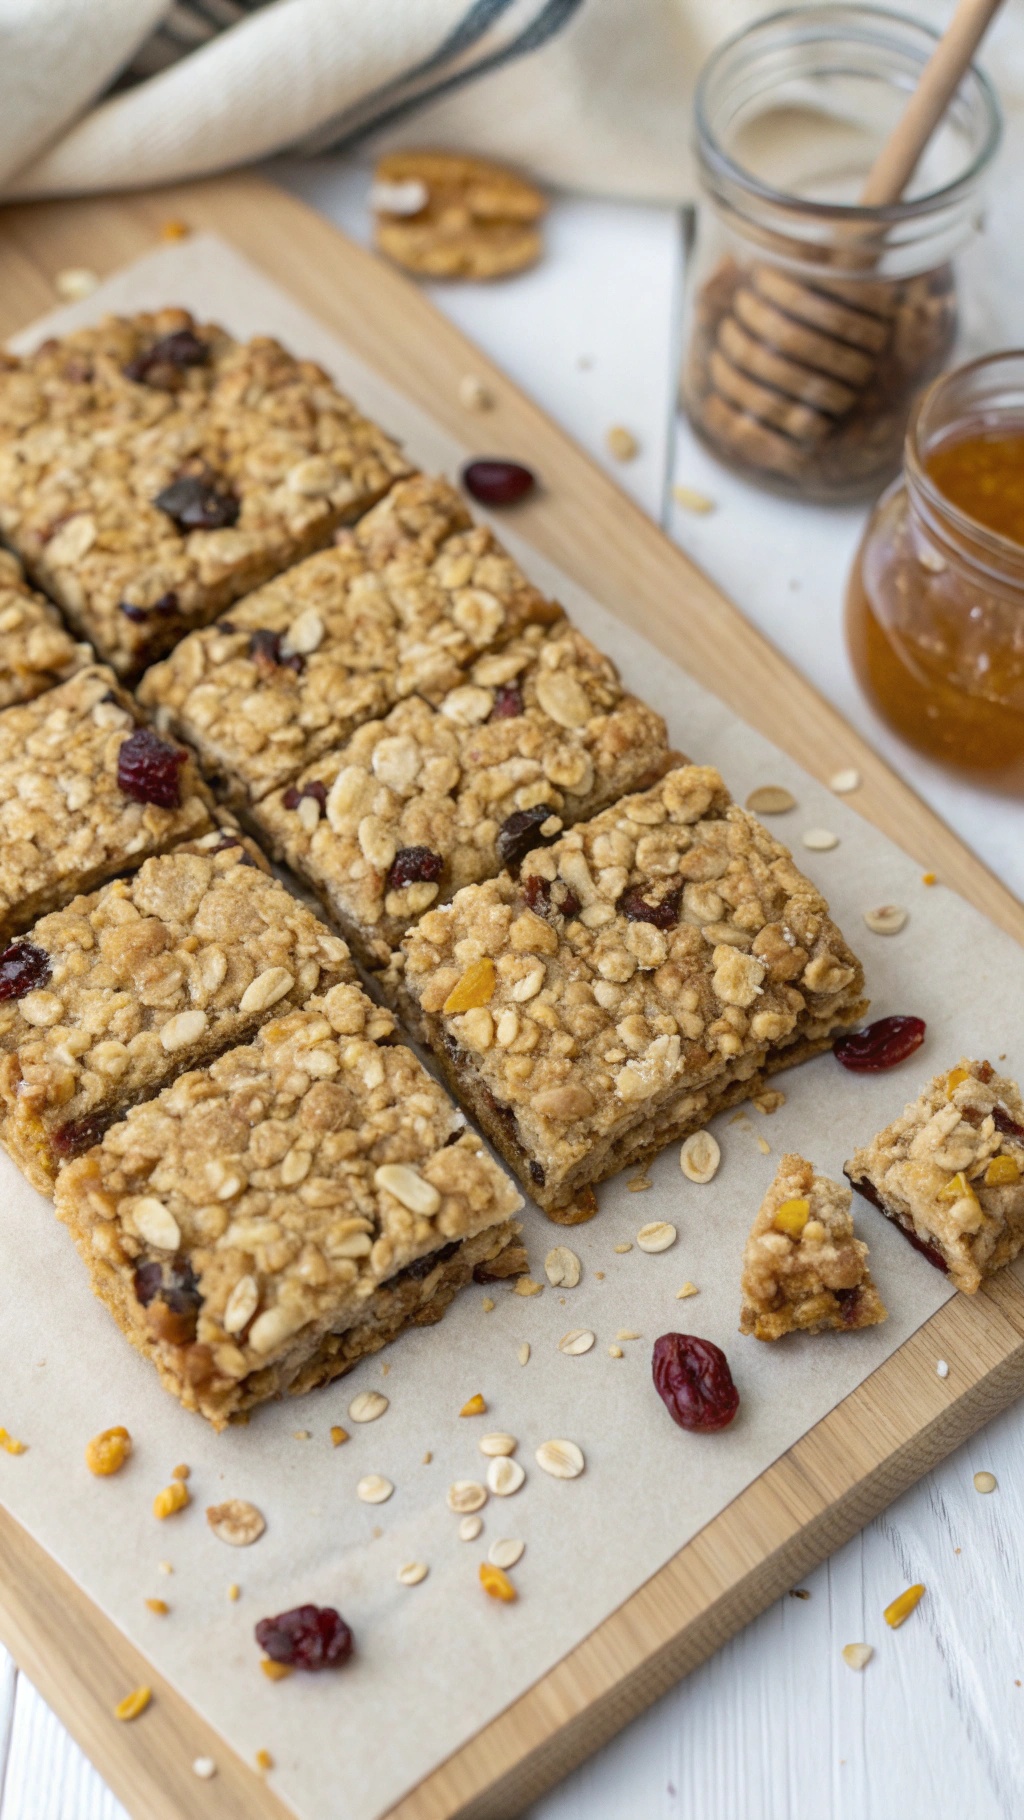
Granola bars are a fantastic choice for road trips. They are easy to pack, delicious, and provide a good energy boost. Homemade granola bars allow you to control the ingredients, making them a healthier option compared to store-bought varieties. You can customize them with your favorite nuts, seeds, and dried fruits.

These bars are chewy, crunchy, and full of flavor. They are perfect for munching on while driving or as a quick snack during stops. Plus, they are simple to make, requiring just a few ingredients and minimal prep time. You can whip up a batch in advance and have them ready for your next trip.

Here’s a quick and easy recipe for homemade granola bars that you can take with you on your travels:

Ingredients

  • 2 cups rolled oats
  • 1 cup mixed nuts (chopped)
  • 1/2 cup honey or maple syrup
  • 1/2 cup nut butter (like almond or peanut)
  • 1/2 cup dried fruits (like cranberries or apricots)
  • 1/4 teaspoon salt
  • 1/2 teaspoon vanilla extract

Instructions

  1. Preheat your oven to 350°F (175°C) and line an 8x8 inch baking dish with parchment paper.
  2. In a large bowl, mix together the oats, chopped nuts, dried fruits, and salt.
  3. In a small saucepan, warm the honey and nut butter over low heat until melted and combined. Stir in the vanilla extract.
  4. Pour the honey mixture over the dry ingredients and mix until everything is well coated.
  5. Transfer the mixture to the prepared baking dish and press it down firmly into an even layer.
  6. Bake for 20-25 minutes or until golden brown. Let it cool completely before cutting into bars.
  7. Store in an airtight container for up to a week.

Zesty Hummus And Veggie Sticks For A Crunchy Treat

A colorful platter of veggie sticks and a bowl of hummus, perfect for healthy snacking on road trips.

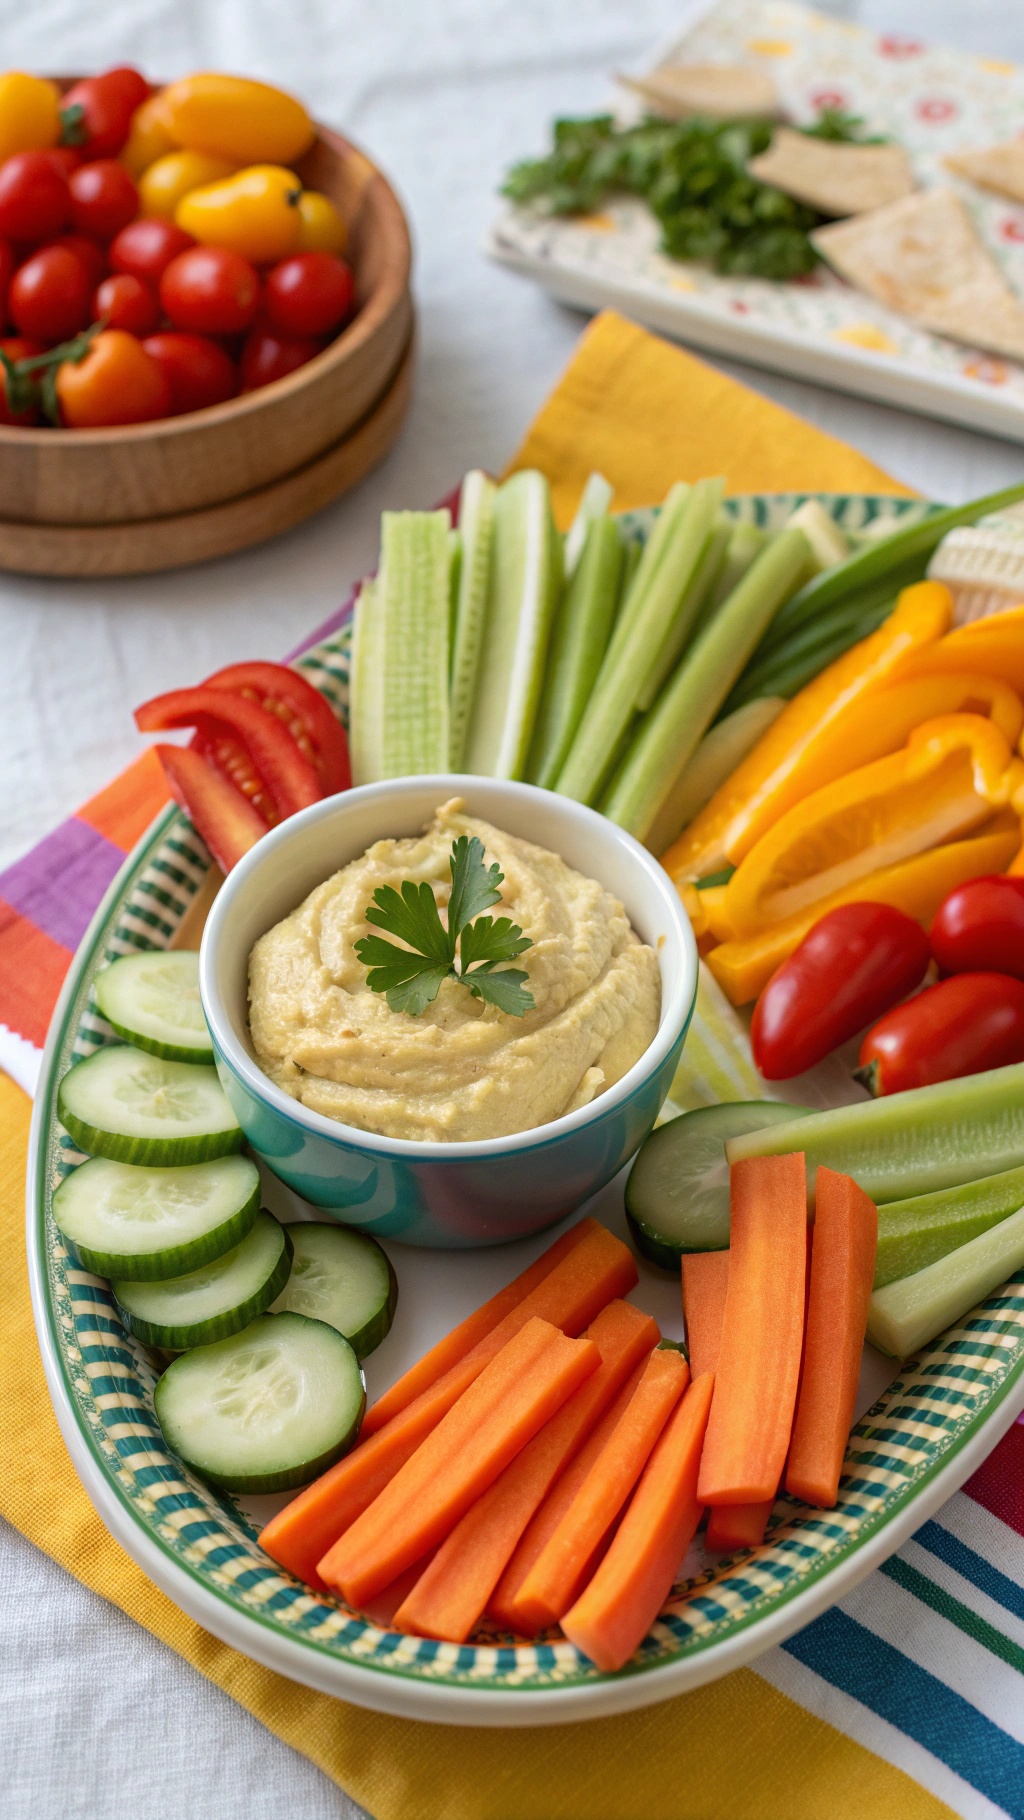
Road trips can be long, and having healthy snacks on hand makes the journey more enjoyable. Zesty hummus paired with fresh veggie sticks is a perfect option. This combo is not only tasty but also packed with nutrients to keep you energized.

The image shows a vibrant platter filled with colorful veggie sticks like carrots, cucumbers, and bell peppers, all ready to dip into a creamy bowl of hummus. The bright colors make it visually appealing and inviting. Plus, it’s easy to prepare and can be enjoyed on the go!

Hummus is a fantastic source of protein and fiber, while the veggies provide essential vitamins and minerals. This snack is a win-win for your health and taste buds!

Ingredients

  • 1 can (15 oz) chickpeas, drained and rinsed
  • 1/4 cup tahini
  • 2 tablespoons olive oil
  • 2 tablespoons lemon juice
  • 1 garlic clove, minced
  • 1/2 teaspoon cumin
  • Salt and pepper to taste
  • Assorted veggie sticks (carrots, cucumbers, bell peppers, celery)

Instructions

  1. Blend the Hummus: In a food processor, combine chickpeas, tahini, olive oil, lemon juice, garlic, cumin, salt, and pepper. Blend until smooth. If the mixture is too thick, add a bit of water until you reach your desired consistency.
  2. Prepare the Veggies: While the hummus is blending, wash and cut your veggies into sticks. Aim for bite-sized pieces for easy dipping.
  3. Serve: Transfer the hummus to a bowl and garnish with a sprinkle of paprika or a drizzle of olive oil if desired. Arrange the veggie sticks around the hummus for a beautiful presentation.
  4. Pack for the Road: Place the hummus and veggie sticks in airtight containers for easy transport. Enjoy your healthy snack during your road trip!

Savory Cheese Crisps For A Satisfying Crunch

A plate of savory cheese crisps served with a dipping sauce and garnished with herbs.

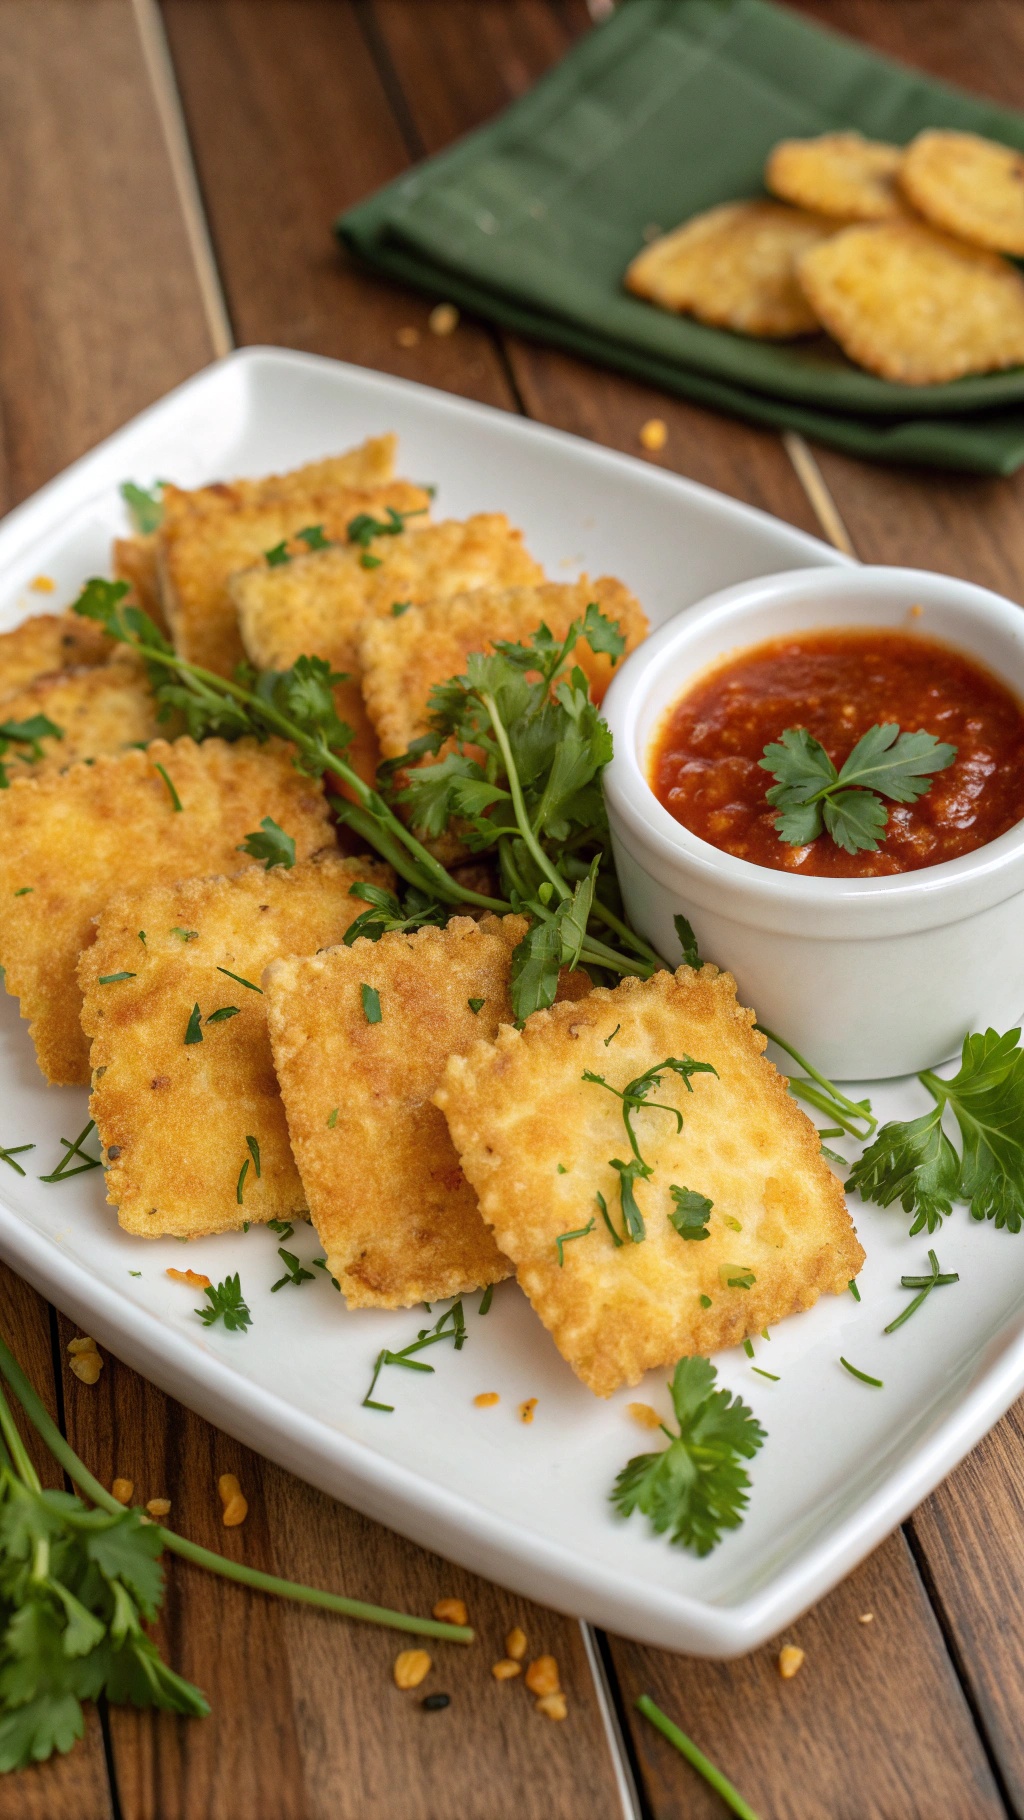
When you're on a road trip, finding snacks that are both tasty and healthy can be a challenge. Savory cheese crisps are a fantastic option that offers a satisfying crunch while keeping things light. These little bites are not only easy to pack but also provide a great source of protein and flavor.

Imagine munching on crispy, golden cheese squares while cruising down the highway. They pair perfectly with your favorite dips, adding a delightful twist to your snack game. Plus, they’re super simple to make at home, so you can customize them to your liking.

To whip up a batch of these cheese crisps, you’ll need just a few ingredients and a little time. They’re perfect for sharing with friends or enjoying solo during those long stretches on the road.

Ingredients

  • 2 cups shredded cheese (cheddar, parmesan, or your favorite)
  • 1/2 teaspoon garlic powder
  • 1/2 teaspoon paprika
  • 1/4 teaspoon black pepper
  • Fresh herbs (like parsley or cilantro) for garnish
  • Your favorite dipping sauce (like salsa or ranch)

Instructions

  1. Preheat your oven to 400°F (200°C) and line a baking sheet with parchment paper.
  2. In a bowl, mix the shredded cheese with garlic powder, paprika, and black pepper until well combined.
  3. Using a tablespoon, scoop the cheese mixture onto the prepared baking sheet, spacing them out evenly.
  4. Bake for 5-7 minutes, or until the edges are golden and crispy.
  5. Let them cool for a few minutes before serving. Garnish with fresh herbs and enjoy with your favorite dip!

Sweet And Spicy Roasted Chickpeas For A Flavor Burst

A vibrant bowl of sweet and spicy roasted chickpeas, showcasing their golden-brown color and seasoning.

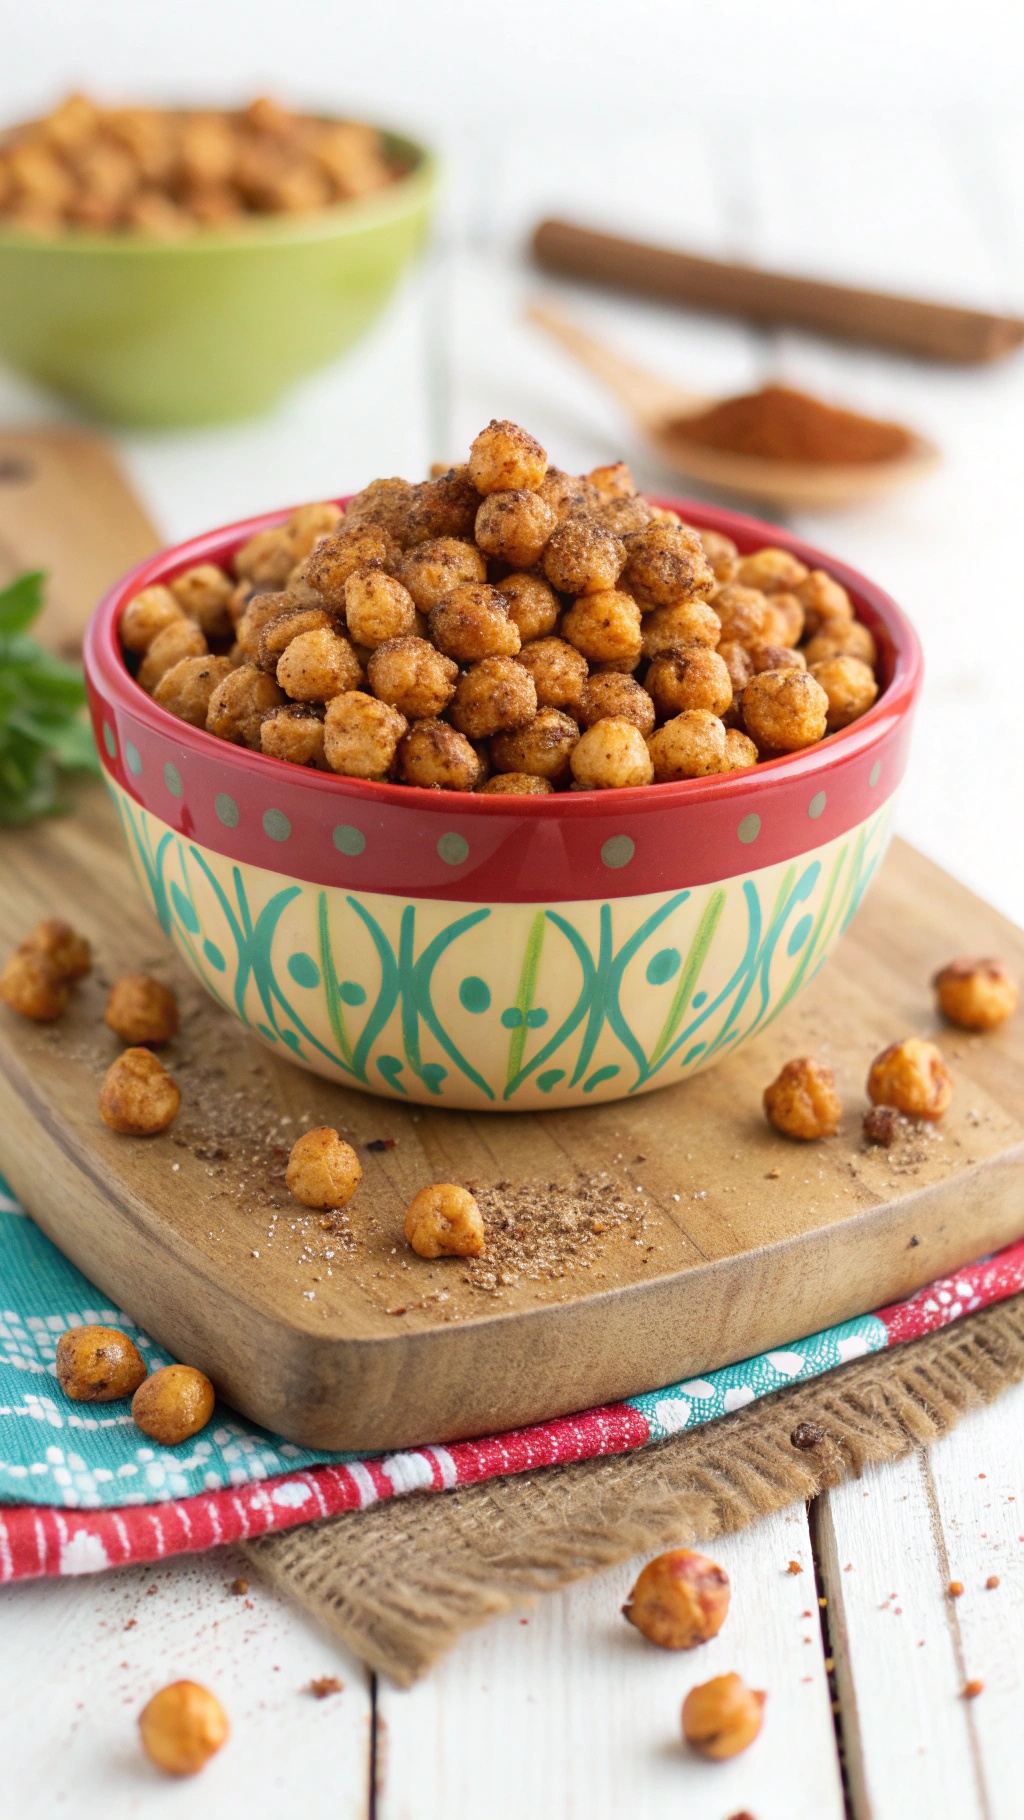
Sweet and spicy roasted chickpeas are a fantastic snack for road trips. They are crunchy, flavorful, and packed with protein. The image shows a vibrant bowl filled with these delicious bites, showcasing their golden-brown color and seasoning. This snack is perfect for keeping your energy up while traveling.

To make these roasted chickpeas, you'll need just a few simple ingredients. The combination of sweetness and spice creates a delightful flavor that will satisfy your cravings. Plus, they are easy to prepare and can be stored for days, making them ideal for on-the-go munching.

Ingredients

  • 1 can (15 oz) chickpeas, drained and rinsed
  • 1 tablespoon olive oil
  • 1 teaspoon paprika
  • 1/2 teaspoon cayenne pepper (adjust to taste)
  • 1 tablespoon honey or maple syrup
  • 1/2 teaspoon salt
  • 1/2 teaspoon black pepper

Instructions

  1. Preheat your oven to 400°F (200°C).
  2. Pat the chickpeas dry with a paper towel to remove excess moisture.
  3. In a bowl, mix the chickpeas with olive oil, paprika, cayenne pepper, honey or maple syrup, salt, and black pepper.
  4. Spread the seasoned chickpeas on a baking sheet in a single layer.
  5. Bake for 25-30 minutes, shaking the pan halfway through, until they are golden and crispy.
  6. Let them cool before enjoying. Store in an airtight container for your road trip!

Crispy Kale Chips For A Guilt-Free Munch

A bowl of crispy kale chips with a small bowl of salt beside it.

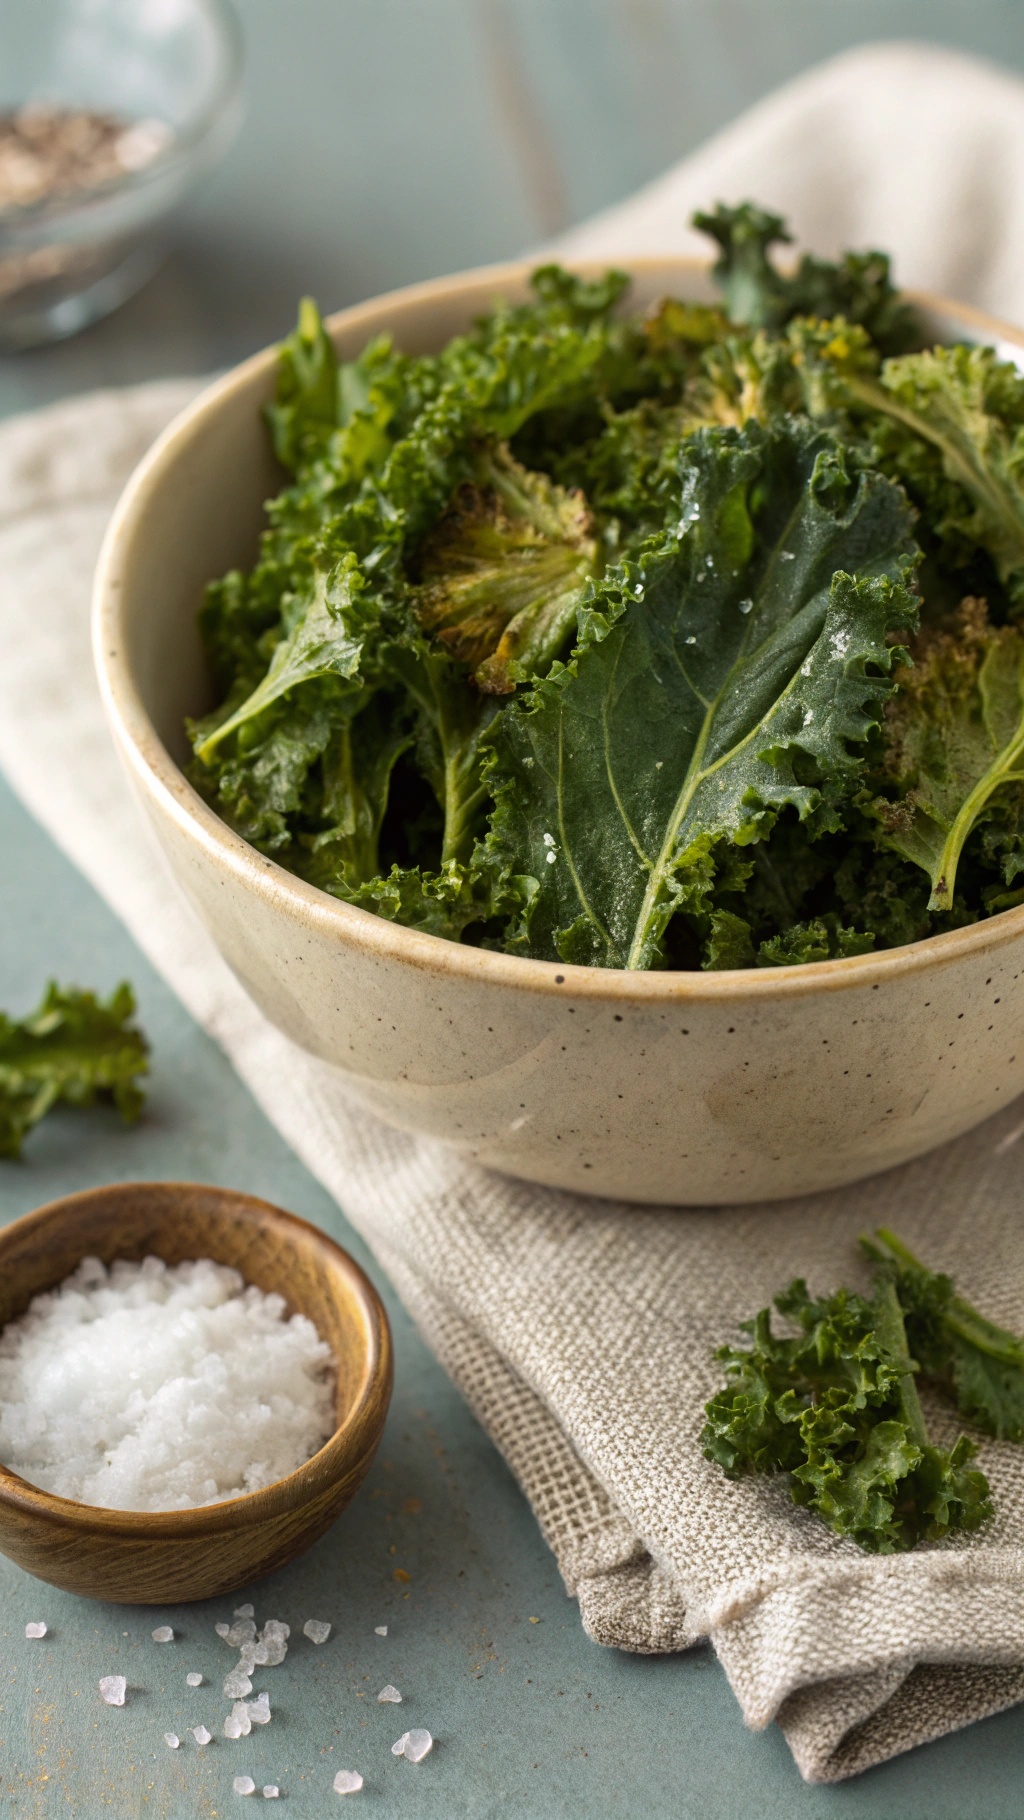
Crispy kale chips are a fantastic snack for road trips. They are light, crunchy, and full of nutrients. Plus, they satisfy that craving for something crispy without the guilt. You can easily pack them in a small container, making them perfect for munching on the go.

Making kale chips is simple and fun. Start with fresh kale, wash and dry it thoroughly, then tear it into bite-sized pieces. Toss the kale with a bit of olive oil and sprinkle some salt for flavor. The key is to bake them at a low temperature until they become crispy. This way, you get a healthy snack that’s ready in no time!

Ingredients

  • 1 bunch of kale
  • 1 tablespoon olive oil
  • 1/2 teaspoon sea salt
  • Optional: garlic powder, paprika, or nutritional yeast for extra flavor

Instructions

  1. Preheat your oven to 300°F (150°C).
  2. Wash the kale thoroughly and dry it with a salad spinner or paper towels.
  3. Tear the kale into bite-sized pieces and place them in a large bowl.
  4. Drizzle the olive oil over the kale and sprinkle with sea salt. Toss to coat evenly.
  5. Spread the kale in a single layer on a baking sheet.
  6. Bake for 20-25 minutes, or until the edges are brown and crispy. Keep an eye on them to avoid burning.
  7. Let them cool before packing them for your trip. Enjoy your crispy kale chips!

Baked Sweet Potato Chips For A Healthier Crunch

A bowl of baked sweet potato chips with whole sweet potatoes in the background.

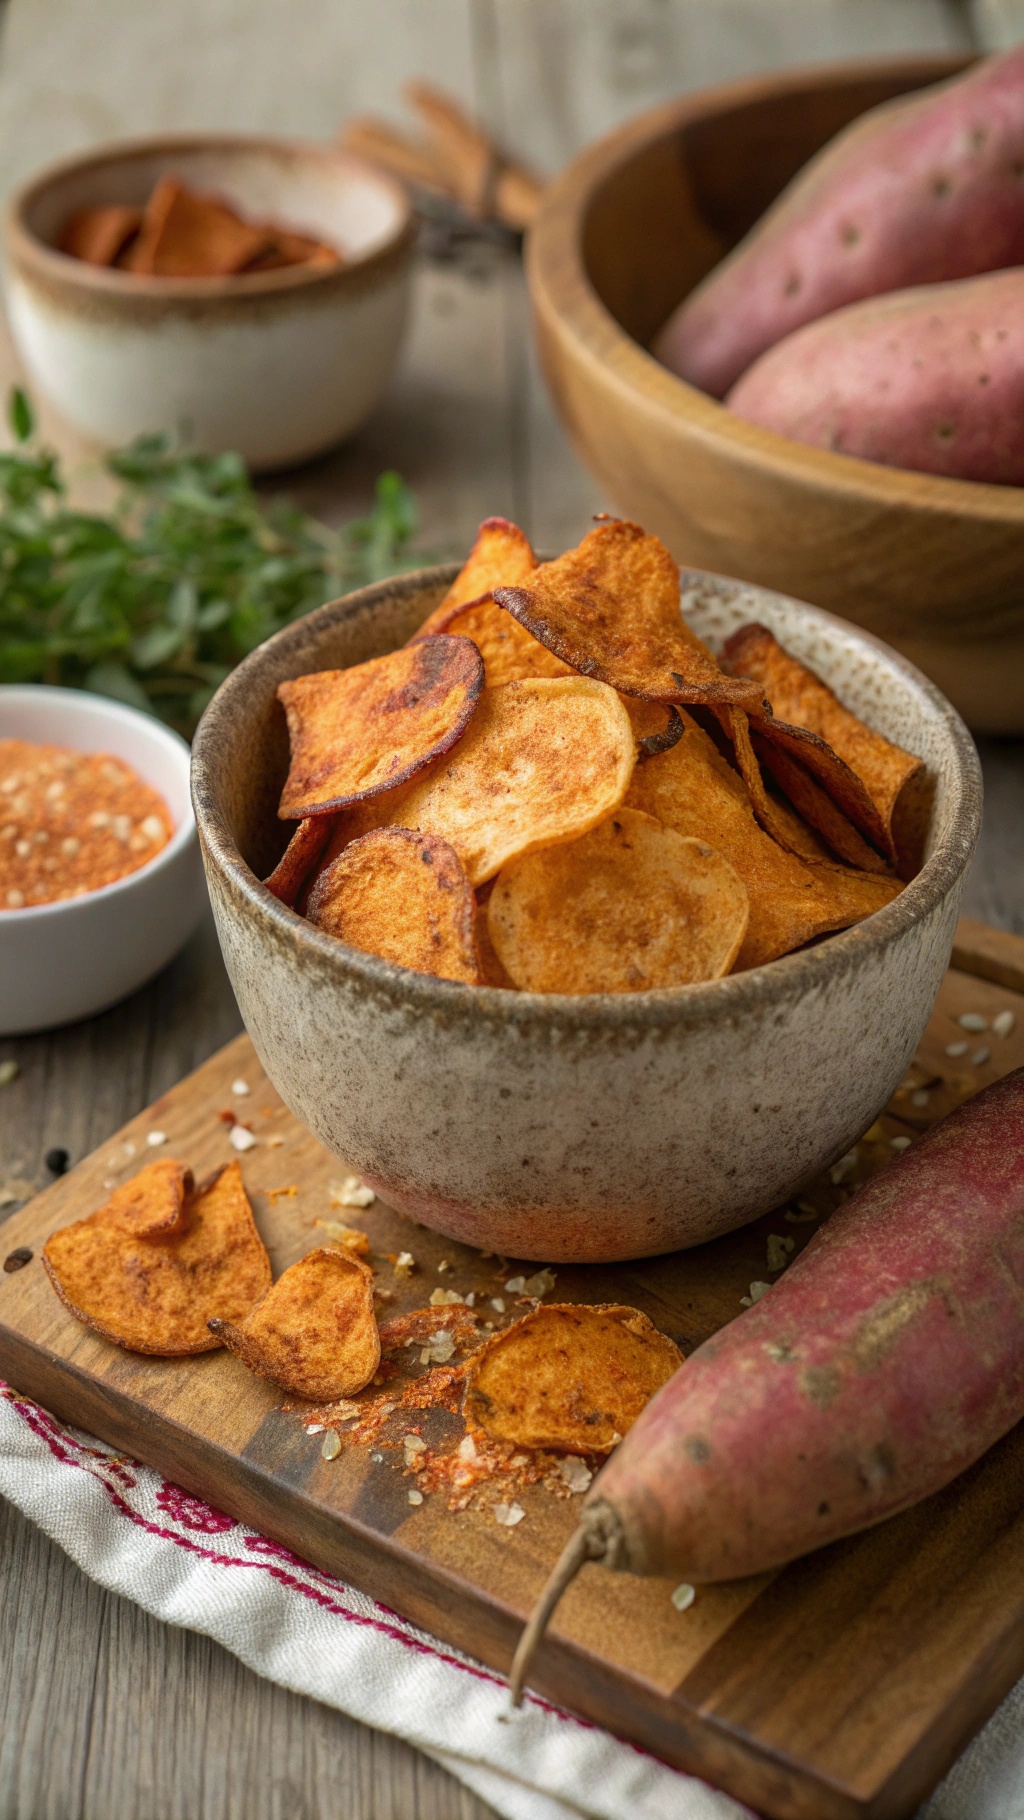
When you're on a road trip, snacking can be tricky. You want something tasty, but also healthy. Baked sweet potato chips are a perfect solution! They offer a satisfying crunch without the guilt. Plus, they are super easy to make.

These chips are not only delicious but packed with nutrients. Sweet potatoes are rich in vitamins and fiber, making them a great choice for a road trip snack. The image shows a bowl of golden-brown sweet potato chips, perfectly crisped and ready to munch on. You can see some whole sweet potatoes in the background, highlighting the fresh ingredients.

To make these chips, you only need a few ingredients. Slice the sweet potatoes thinly, toss them with a bit of olive oil and your favorite seasonings, and bake until crispy. It’s that simple! You can customize the flavors to your liking, whether you prefer a bit of spice or something more savory.

Here’s how to whip up a batch of these tasty chips:

Ingredients

  • 2 medium sweet potatoes
  • 2 tablespoons olive oil
  • 1 teaspoon salt
  • 1/2 teaspoon paprika (optional)
  • 1/2 teaspoon garlic powder (optional)

Instructions

  1. Preheat your oven to 400°F (200°C).
  2. Wash and peel the sweet potatoes. Slice them thinly using a mandoline or a sharp knife.
  3. In a large bowl, toss the sweet potato slices with olive oil, salt, and any additional seasonings you like.
  4. Spread the slices in a single layer on a baking sheet lined with parchment paper.
  5. Bake for 20-25 minutes, flipping halfway through, until the chips are golden and crispy.
  6. Let them cool slightly before enjoying. Store any leftovers in an airtight container.

Homemade Popcorn With Flavorful Twists

A bowl of homemade popcorn with spices, ready for a road trip snack.

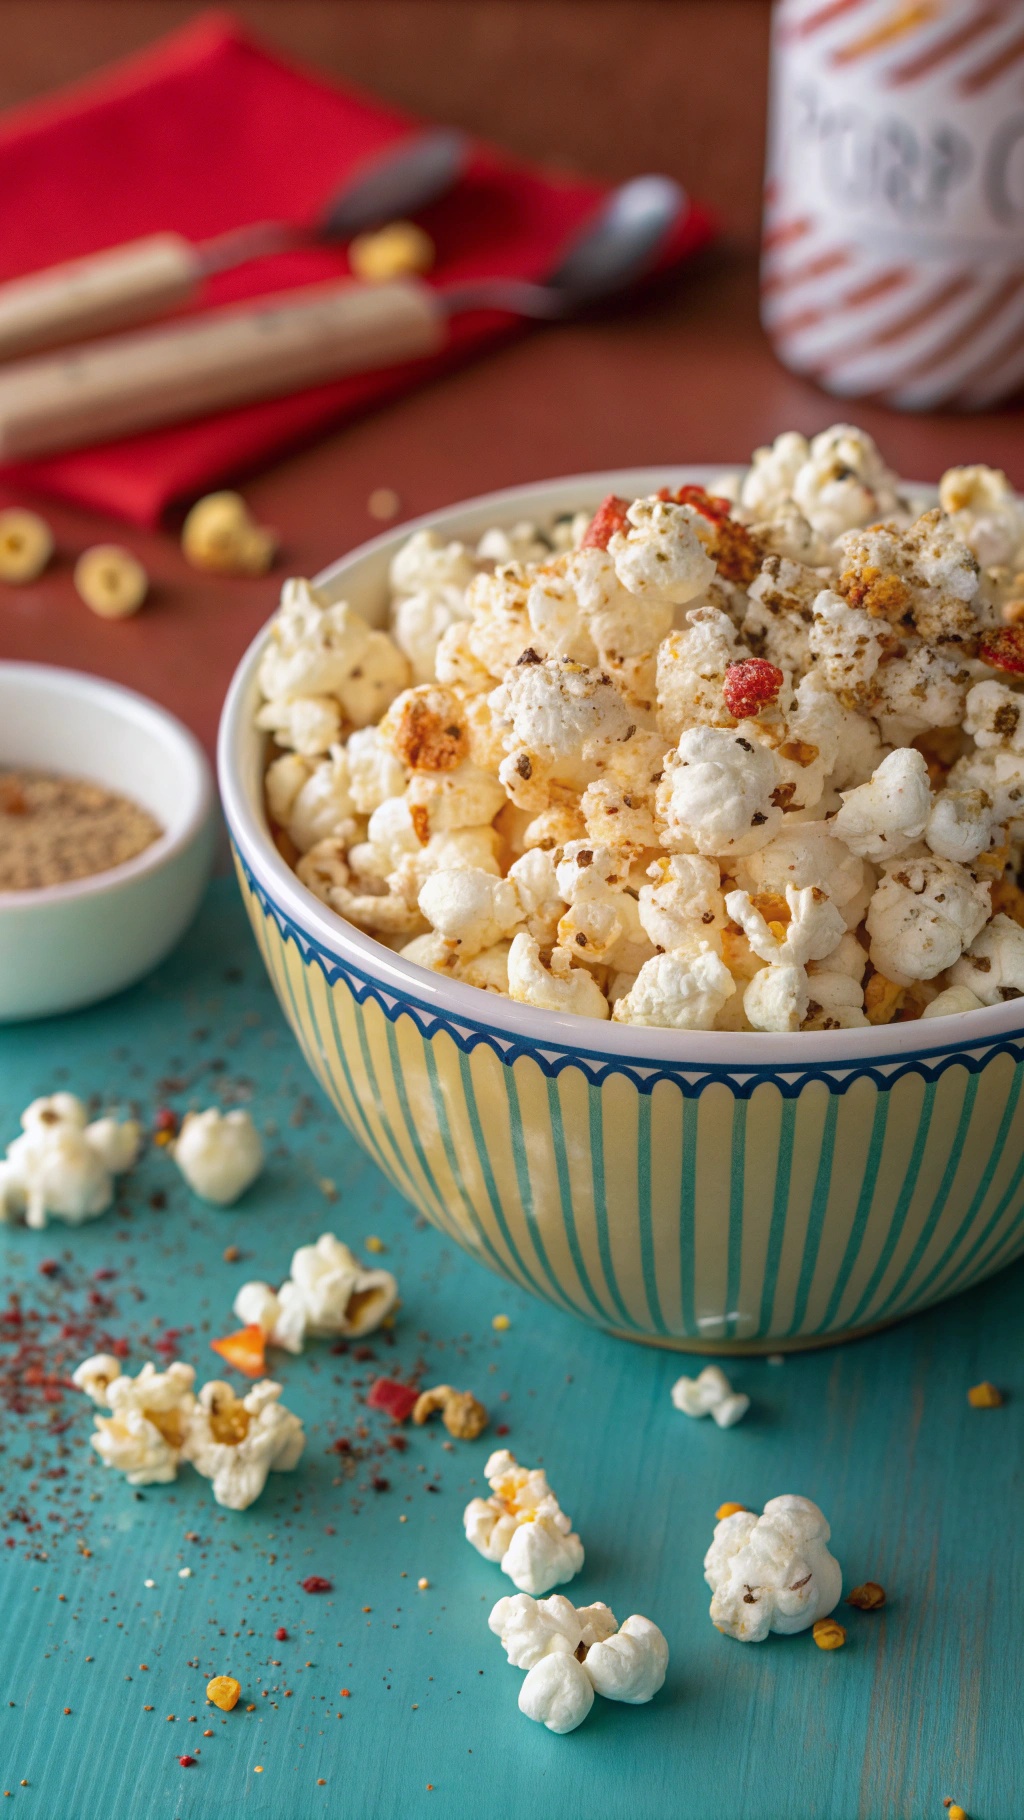
Homemade popcorn is a fantastic snack for road trips. It’s light, easy to make, and can be customized to fit your taste. The image shows a bowl of popcorn sprinkled with various spices, making it look both inviting and delicious. You can enjoy it plain or add your favorite seasonings for a unique twist.

Making popcorn at home is simple. Start with plain popcorn kernels and pop them using your preferred method—stovetop, microwave, or air popper. Once popped, you can add flavors like garlic powder, nutritional yeast, or even a dash of chili powder for some heat. The options are endless!

Pack your popcorn in a resealable bag or an airtight container for your trip. It’s a great way to munch while enjoying the scenery. Plus, it’s healthier than many store-bought snacks. So, let’s get popping!

Ingredients

  • 1/2 cup popcorn kernels
  • 2 tablespoons coconut oil or vegetable oil
  • 1 teaspoon salt (or to taste)
  • 1 teaspoon garlic powder
  • 1 teaspoon nutritional yeast (optional)
  • 1/2 teaspoon chili powder (optional)

Instructions

  1. Pop the Corn: In a large pot, heat the oil over medium heat. Add a few popcorn kernels and cover. Once they pop, add the rest of the kernels and cover again.
  2. Shake It Up: Gently shake the pot occasionally to prevent burning. When the popping slows down, remove from heat.
  3. Season: Transfer the popcorn to a large bowl. Sprinkle with salt, garlic powder, nutritional yeast, and chili powder. Toss well to coat.
  4. Store: Let it cool before packing it in a resealable bag or container for your road trip.

Peanut Butter Banana Roll-Ups For A Sweet Treat

Peanut Butter Banana Roll-Ups on a wooden board with bananas in the background

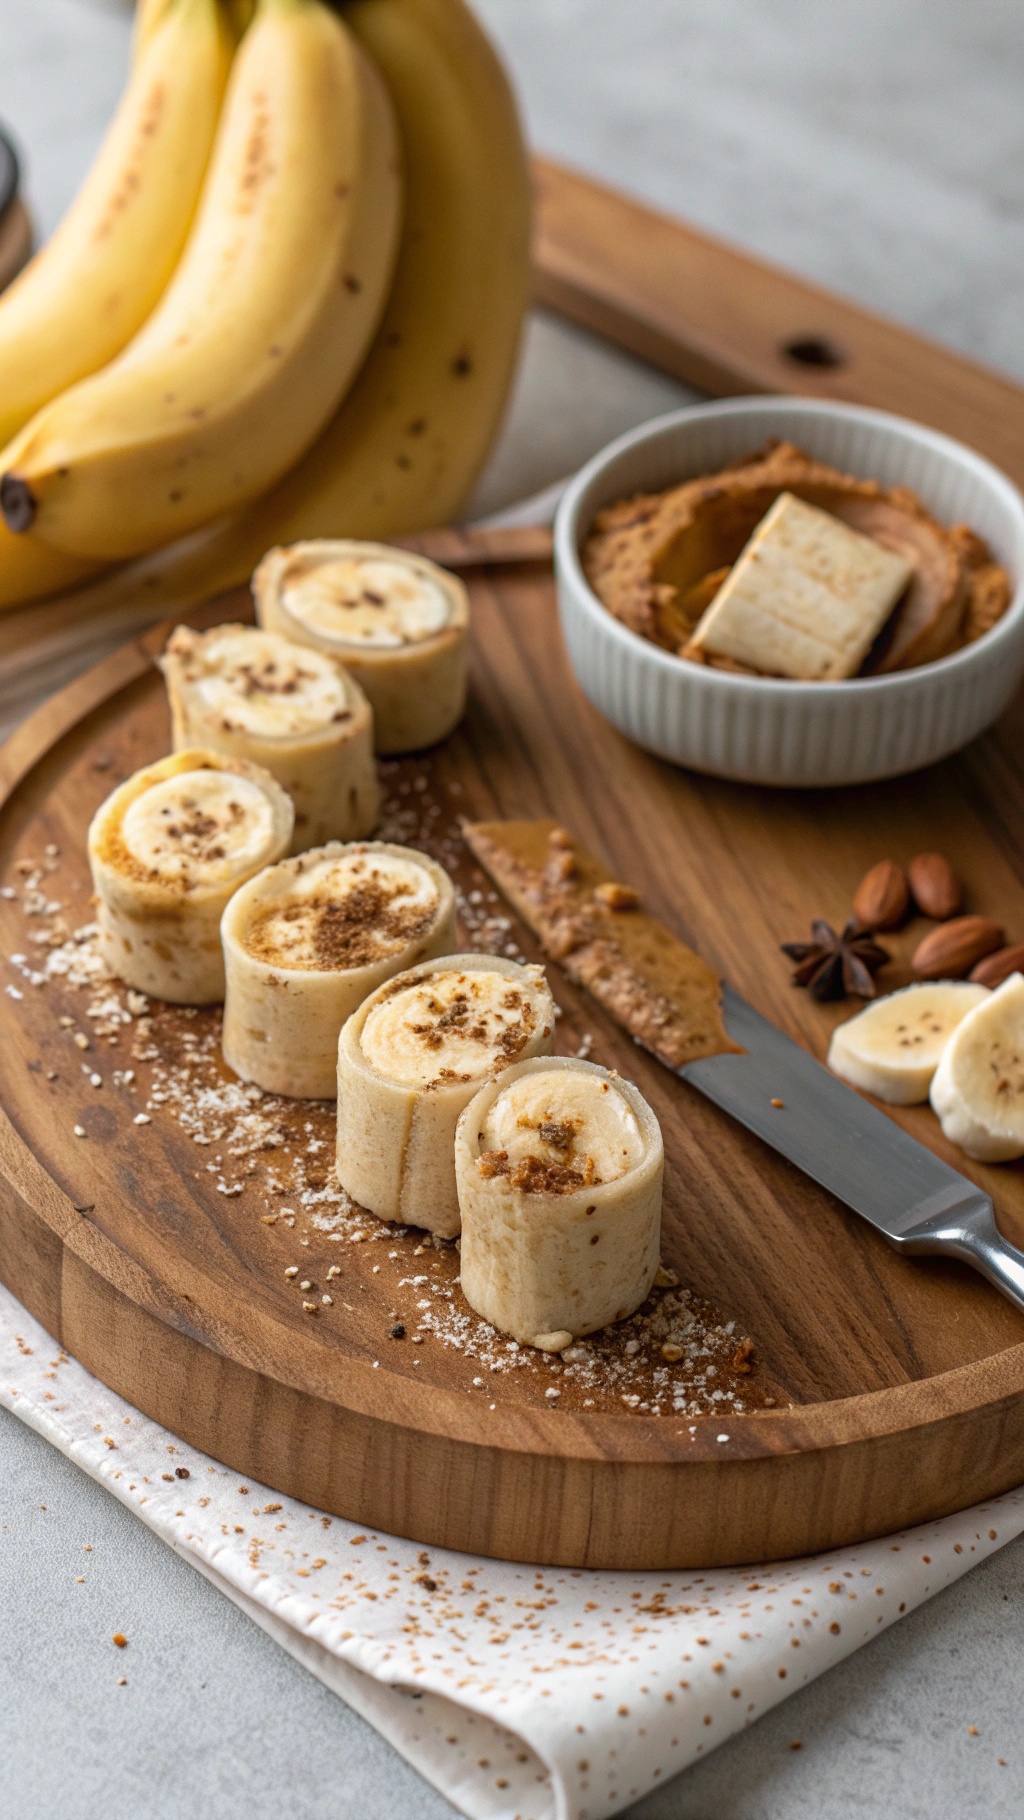
Peanut Butter Banana Roll-Ups are the perfect snack for your road trip. They are easy to make, delicious, and packed with energy. These roll-ups combine the creamy goodness of peanut butter with the sweetness of bananas, making them a hit for both kids and adults.

To prepare, simply spread peanut butter on a whole wheat tortilla, place a banana on top, and roll it up tightly. Slice it into bite-sized pieces for easy snacking. You can even sprinkle some cinnamon or granola for an extra crunch!

These roll-ups are not only tasty but also nutritious. Bananas provide potassium, while peanut butter adds protein to keep you satisfied during your travels. Plus, they are easy to pack and won’t make a mess in the car.

Here’s how to make them:

Ingredients

  • 2 whole wheat tortillas
  • 1/2 cup peanut butter
  • 2 ripe bananas
  • 1 tablespoon honey (optional)
  • 1 teaspoon cinnamon (optional)

Instructions

  1. Spread peanut butter evenly over each tortilla.
  2. Place a banana at one edge of the tortilla and roll it up tightly.
  3. Slice the roll into bite-sized pieces.
  4. If desired, drizzle honey and sprinkle cinnamon on top before serving.
  5. Pack in a container for your road trip and enjoy!

Almond Joy Energy Balls For A Chocolatey Snack

A plate of Almond Joy Energy Balls surrounded by almonds and shredded coconut.

Road trips can often lead to unhealthy snacking. That's where these Almond Joy Energy Balls come in! They are a perfect blend of chocolatey goodness and healthy ingredients. Packed with protein and healthy fats, these bites will keep you energized on the road.

The image shows a delightful plate of Almond Joy Energy Balls, rolled in shredded coconut and surrounded by whole almonds. They look tempting and are easy to grab while driving. Plus, they are simple to make and require no baking!

These energy balls are not just tasty; they are also nutritious. The combination of almonds, cocoa powder, and coconut provides a satisfying treat without the guilt. You can enjoy them without worrying about sugar crashes or unhealthy ingredients.

Ingredients

  • 1 cup rolled oats
  • 1/2 cup almond butter
  • 1/4 cup honey or maple syrup
  • 1/4 cup cocoa powder
  • 1/2 cup shredded coconut
  • 1/2 cup chopped almonds
  • 1/4 teaspoon salt

Instructions

  1. Mix Ingredients: In a large bowl, combine rolled oats, almond butter, honey, cocoa powder, shredded coconut, chopped almonds, and salt. Stir until well combined.
  2. Form Balls: Use your hands to roll the mixture into small balls, about 1 inch in diameter.
  3. Chill: Place the energy balls on a baking sheet and refrigerate for at least 30 minutes to firm up.
  4. Store: Once chilled, transfer them to an airtight container. They can be stored in the fridge for up to a week.

Comments