10 Easy 5-Ingredient Dessert Recipes Anyone Can Make


10 Easy 5-Ingredient Dessert Recipes Anyone Can Make

Sometimes, dessert can seem overwhelming, but it doesn’t have to be! With just five simple ingredients, you can whip up delicious treats that impress without the stress. These easy recipes take the fuss out of baking, making them perfect for novice cooks and busy folks alike. Get ready to satisfy your sweet tooth with minimal hassle!

Delightfully Simple Chocolate Mug Cake

A chocolate mug cake topped with whipped cream and chocolate shavings in a white mug.

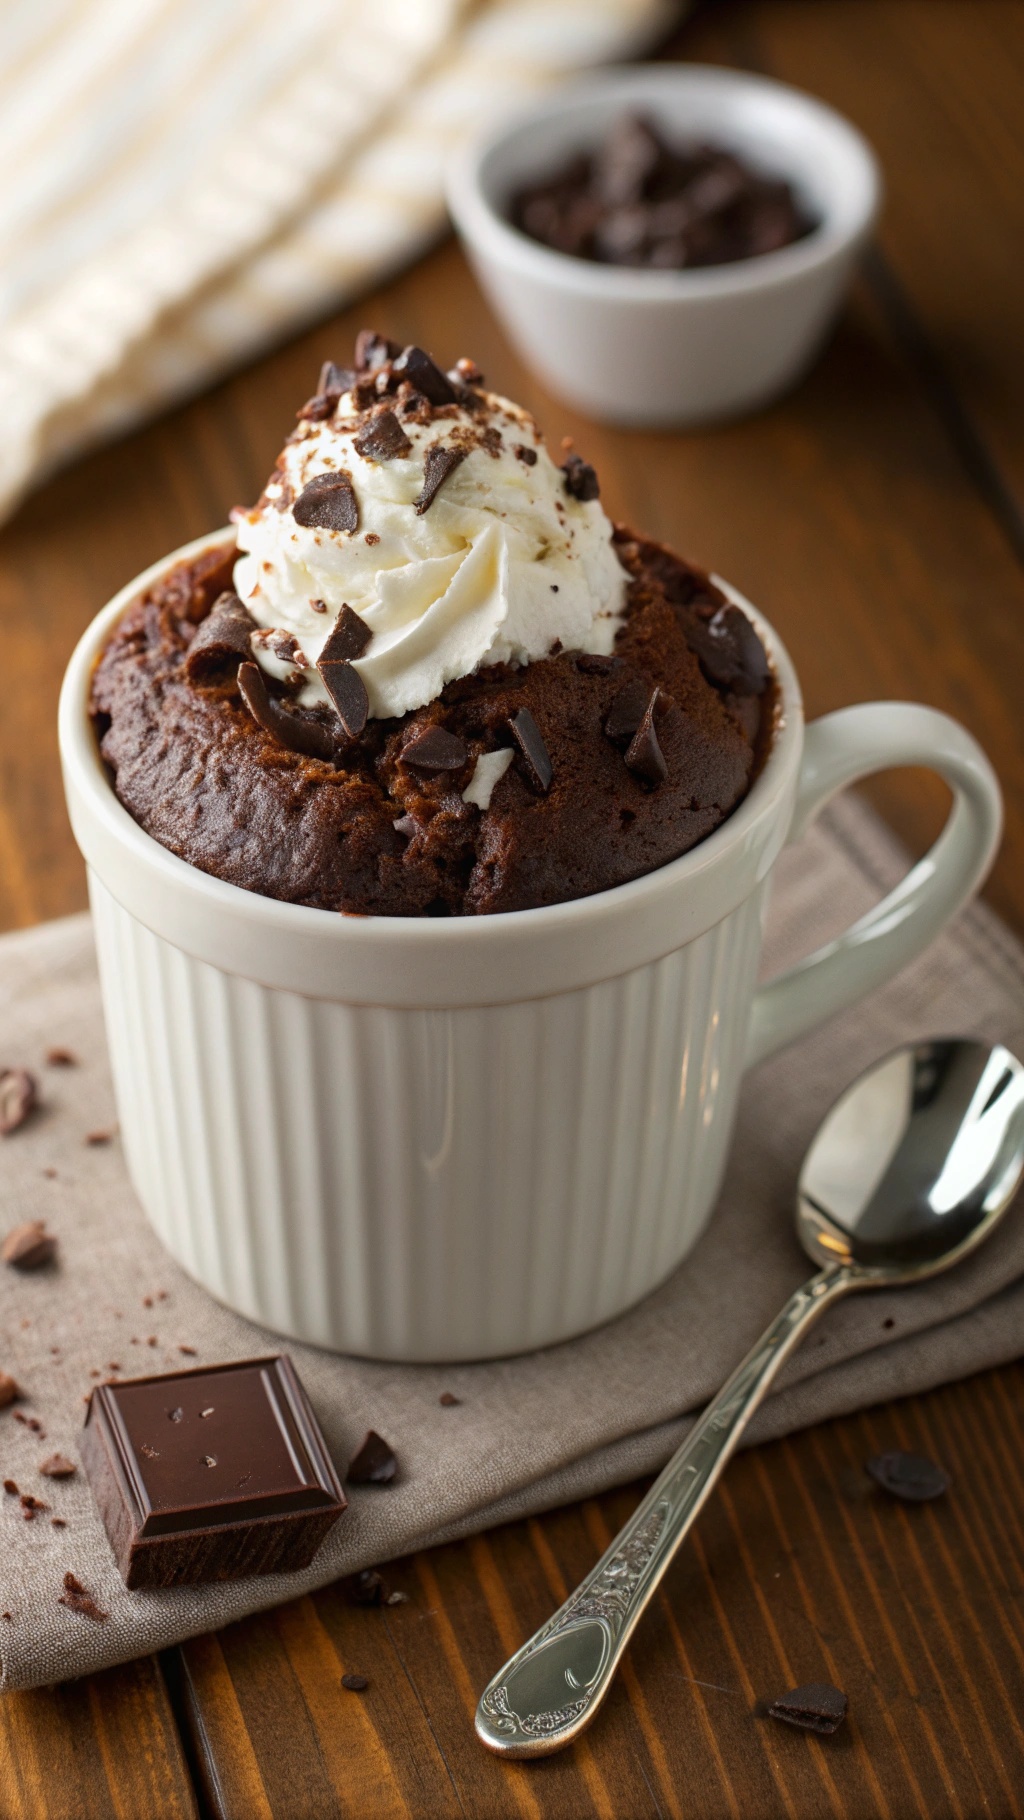
Chocolate mug cake is a quick and easy treat that satisfies your sweet tooth in no time. Just look at that fluffy cake topped with whipped cream and chocolate shavings! It’s perfect for a late-night snack or a last-minute dessert. The best part? You can whip it up in just a few minutes using only five ingredients!

This recipe is all about simplicity. You don’t need any fancy equipment or baking skills. Just grab a mug and your ingredients, and you’re ready to go. The warm, gooey chocolate cake is sure to impress anyone who tries it. Plus, it’s customizable! You can add nuts, chocolate chips, or even a scoop of ice cream on top.

Ingredients

  • 4 tablespoons all-purpose flour
  • 4 tablespoons granulated sugar
  • 2 tablespoons unsweetened cocoa powder
  • 3 tablespoons milk
  • 2 tablespoons vegetable oil
  • 1/4 teaspoon vanilla extract

Instructions

  1. In a microwave-safe mug, mix the flour, sugar, and cocoa powder until well combined.
  2. Add the milk, vegetable oil, and vanilla extract. Stir until the batter is smooth and there are no lumps.
  3. Microwave on high for about 1 minute and 30 seconds. Cooking times may vary, so keep an eye on it!
  4. Let it cool for a minute, then top with whipped cream or your favorite toppings.
  5. Enjoy your delicious chocolate mug cake right from the mug!

Irresistible Peanut Butter Cookies

A stack of peanut butter cookies on a cooling rack with chocolate chips and a glass of milk.

Peanut butter cookies are a classic treat that everyone loves. They are soft, chewy, and packed with that rich peanut butter flavor. The image shows a stack of golden-brown cookies resting on a cooling rack, with a glass of milk nearby. The cookies have a delightful crisscross pattern on top, hinting at their homemade charm. A few chocolate chips are scattered around, adding a touch of sweetness.

Making these cookies is super easy. With just five ingredients, you can whip up a batch in no time. They are perfect for sharing or enjoying with a glass of milk. Whether you’re baking for a special occasion or just craving something sweet, these cookies are sure to hit the spot!

Ingredients

  • 1 cup peanut butter
  • 1 cup granulated sugar
  • 1 large egg
  • 1 teaspoon baking soda
  • 1/2 cup chocolate chips (optional)

Instructions

  1. Preheat the oven to 350°F (175°C).
  2. In a mixing bowl, combine peanut butter, sugar, egg, and baking soda. Stir until well blended.
  3. If using, fold in the chocolate chips.
  4. Drop tablespoon-sized balls of dough onto a baking sheet lined with parchment paper.
  5. Use a fork to create a crisscross pattern on each cookie.
  6. Bake for 10-12 minutes until the edges are golden.
  7. Let cool on the baking sheet for a few minutes before transferring to a wire rack.

No-Bake Chocolate Oatmeal Bars

No-bake chocolate oatmeal bars with chocolate drizzle and oats

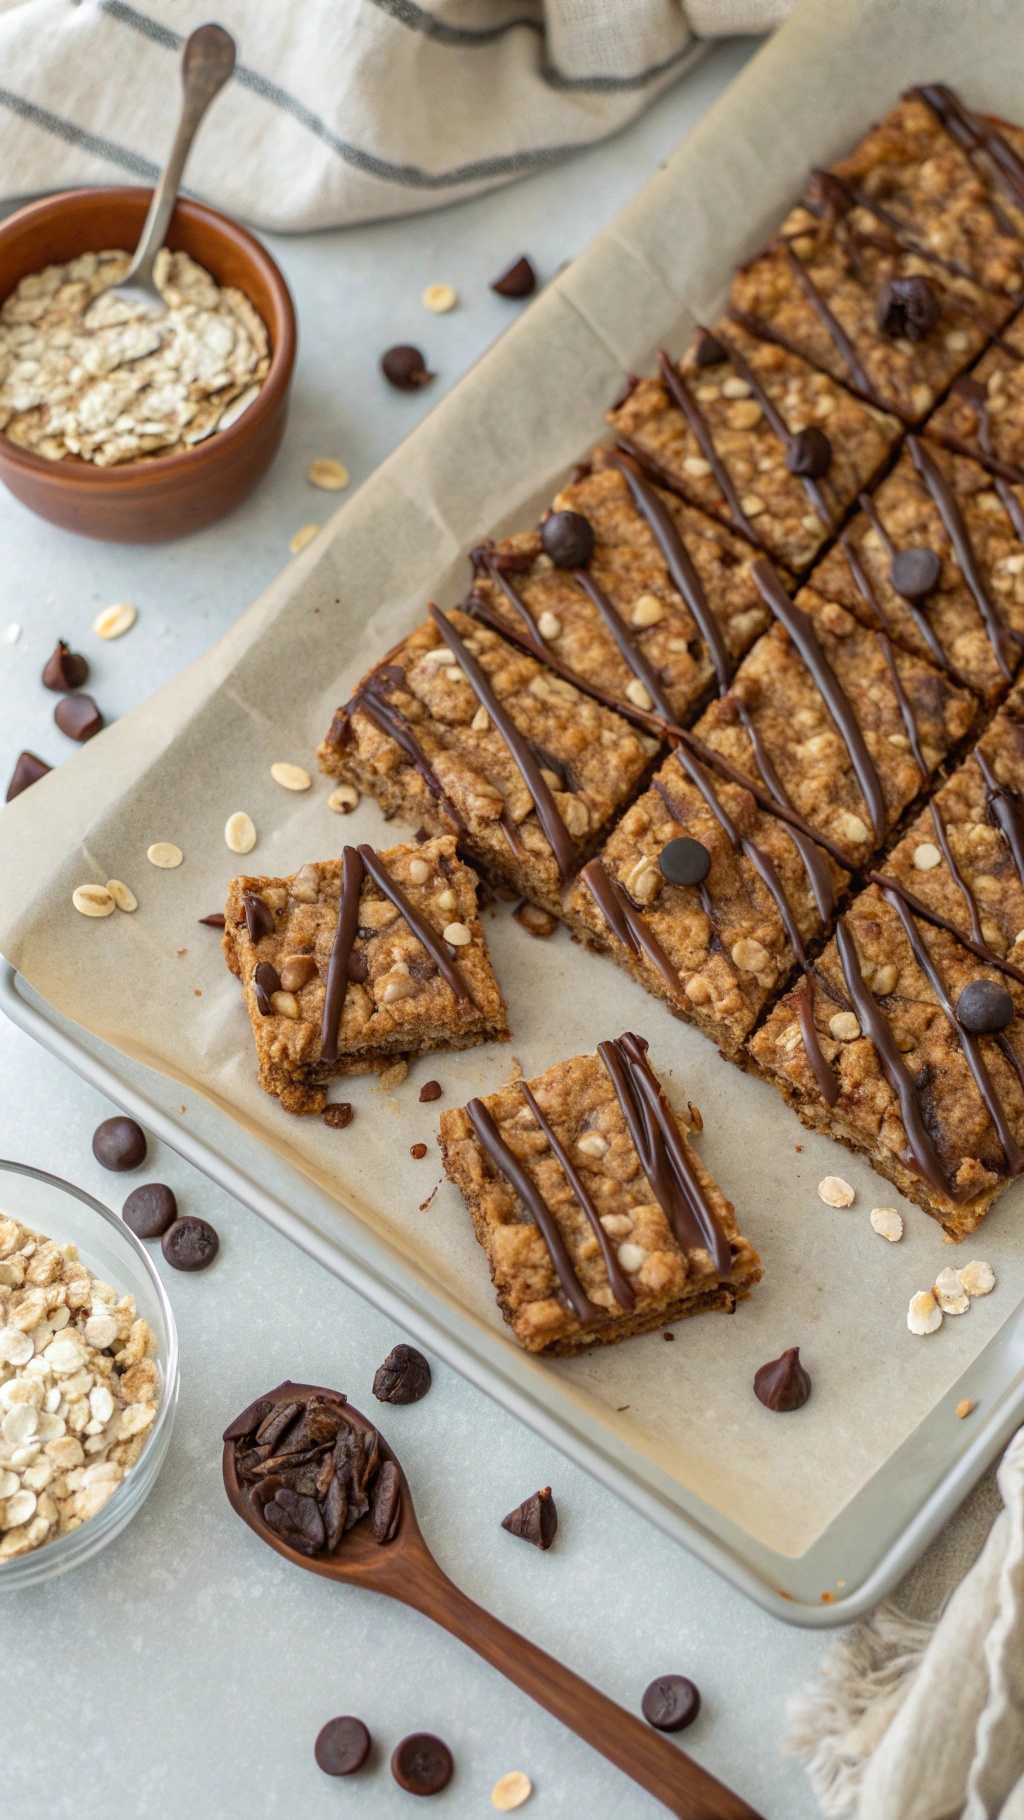
No-bake chocolate oatmeal bars are a fantastic treat that anyone can whip up in no time. These bars are not only simple to make, but they also require just a handful of ingredients. Perfect for satisfying your sweet tooth, they combine the wholesome goodness of oats with the rich flavor of chocolate.

The image shows a delicious batch of these bars, cut into neat squares and drizzled with chocolate on top. The combination of oats and chocolate chips creates a delightful texture that’s both chewy and crunchy. You can see a bowl of oats and some chocolate chips nearby, hinting at the easy preparation process.

These bars are great for a quick snack or a dessert. They’re perfect for sharing with friends or enjoying on your own. Plus, they’re a wonderful option for those who want a treat without turning on the oven!

Ingredients

  • 2 cups rolled oats
  • 1 cup peanut butter
  • 1/2 cup honey or maple syrup
  • 1/2 cup chocolate chips
  • 1/4 cup cocoa powder

Instructions

  1. Mix the Base: In a large bowl, combine the rolled oats, peanut butter, honey, and cocoa powder. Stir until everything is well mixed.
  2. Add Chocolate: Fold in the chocolate chips, making sure they’re evenly distributed throughout the mixture.
  3. Press into Pan: Line an 8x8 inch baking dish with parchment paper. Pour the mixture into the dish and press it down firmly to create an even layer.
  4. Chill: Place the dish in the refrigerator for at least 1 hour to set.
  5. Slice and Serve: Once set, remove from the dish and cut into squares. Drizzle with extra chocolate if desired, and enjoy!

Crispy Apple Cinnamon Nachos

A colorful plate of crispy apple cinnamon nachos topped with caramel sauce and nuts.

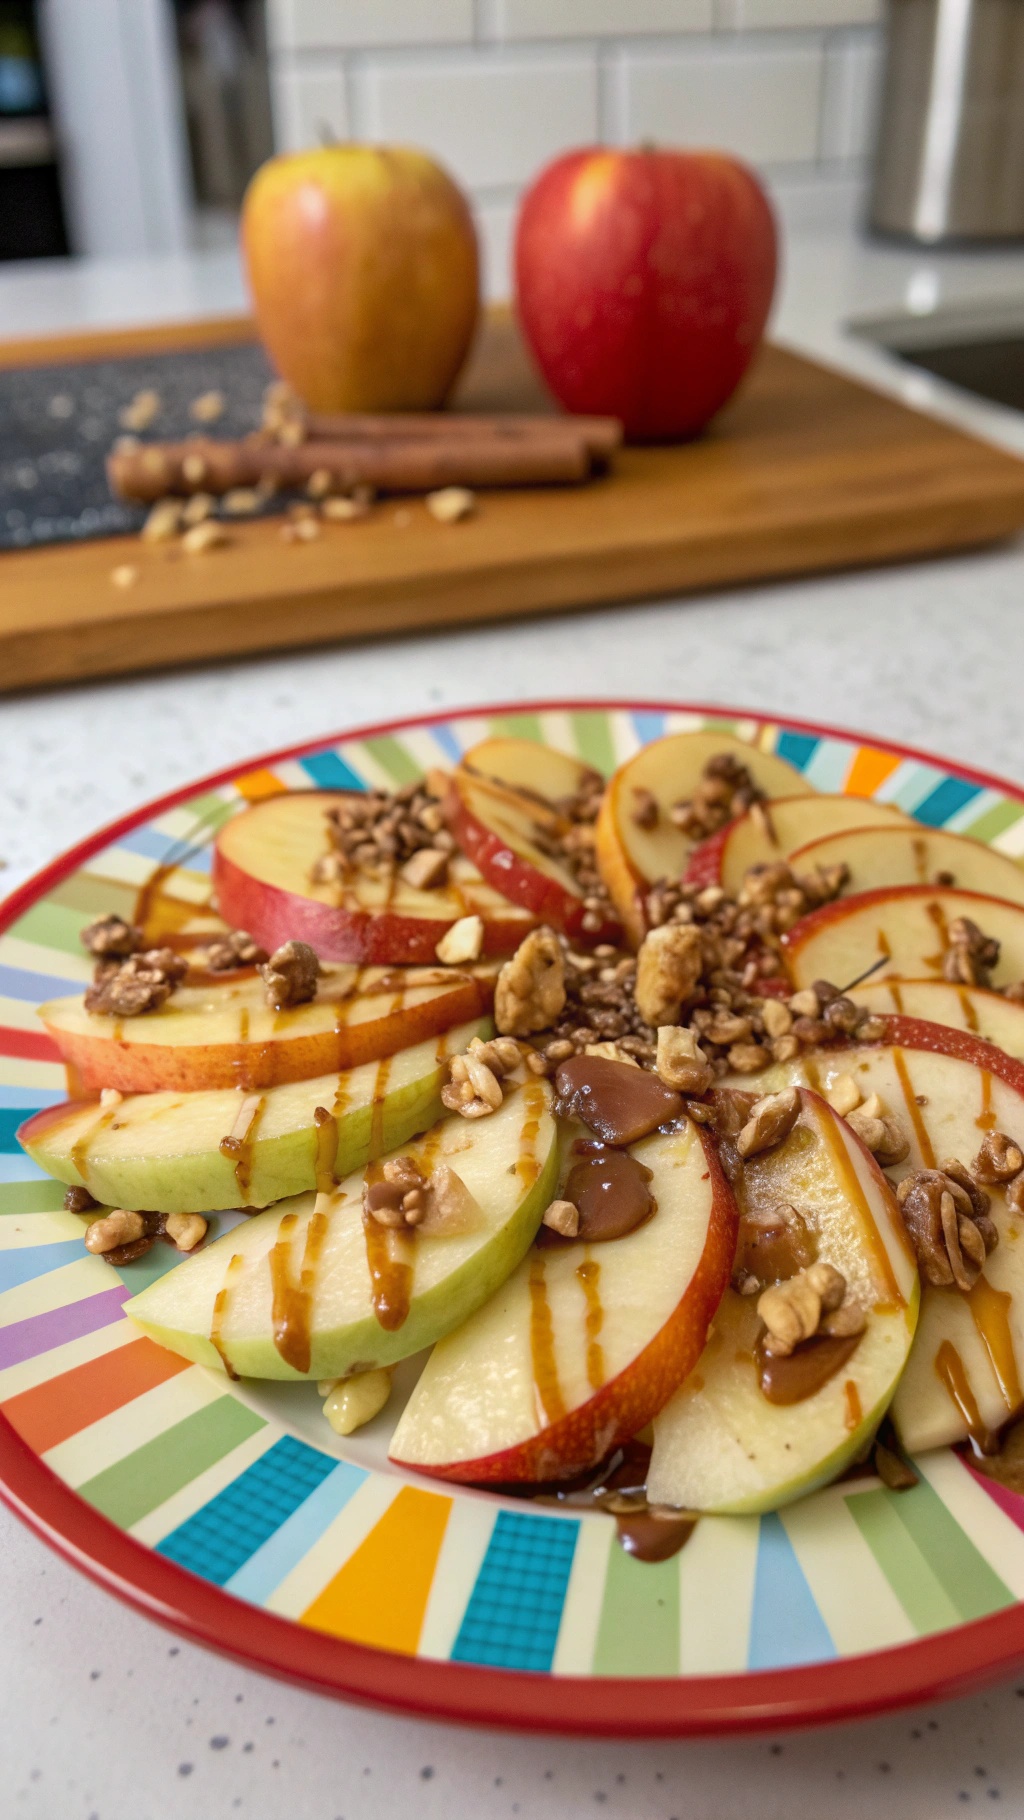
Crispy Apple Cinnamon Nachos are the perfect treat for anyone who loves a sweet and crunchy dessert. This fun recipe takes fresh apples and turns them into a delightful snack that’s easy to make. The vibrant colors of the apples, combined with the warm tones of cinnamon and caramel, make for an eye-catching dish that’s sure to impress.

To make these nachos, start by slicing your favorite apples into thin wedges. Arrange them on a colorful plate for a fun presentation. Drizzle with caramel sauce and sprinkle with chopped nuts for added crunch. A dash of cinnamon ties everything together, giving it that warm, cozy flavor.

This dessert is not only tasty but also a healthier option compared to traditional nachos. It’s perfect for parties, movie nights, or just a sweet treat at home. Plus, it only takes a few minutes to prepare!

Ingredients

  • 2 large apples, sliced
  • 1/4 cup almond butter
  • 1/4 cup granola
  • 2 tablespoons mini chocolate chips
  • 2 tablespoons raisins or dried cranberries
  • 1 tablespoon honey or maple syrup (optional)
  • Chopped nuts for garnish (optional)

Instructions

  1. Prepare the Apples: Wash and slice the apples into thin wedges. Arrange them on a serving plate or platter.
  2. Drizzle Almond Butter: In a small bowl, warm the almond butter slightly in the microwave for about 15-20 seconds to make it easier to drizzle. Pour the almond butter over the apple slices evenly.
  3. Add Toppings: Sprinkle granola, mini chocolate chips, and dried fruit over the apple slices. Drizzle with honey or maple syrup if desired.
  4. Serve: Enjoy immediately as a healthy dessert or snack. You can also serve it with additional almond butter on the side for dipping.

Simple Coconut Macaroons

A plate of coconut macaroons drizzled with chocolate, surrounded by shredded coconut and a coconut shell.

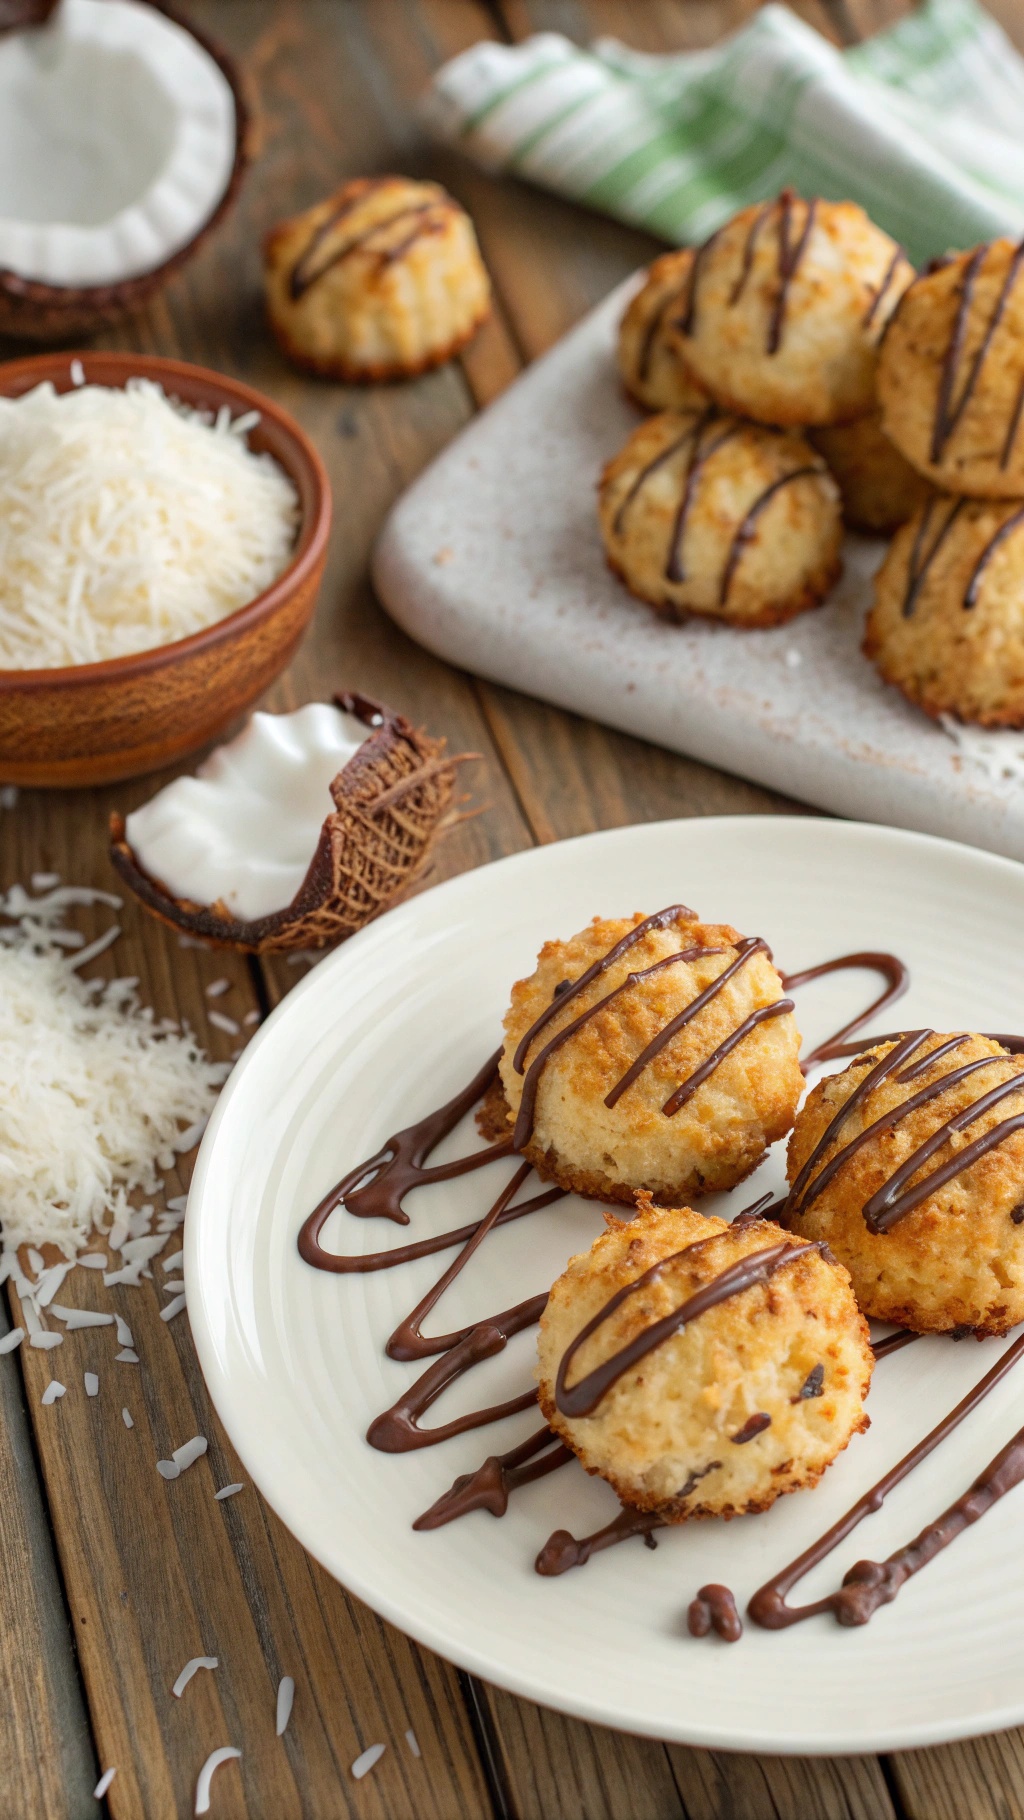
Coconut macaroons are a delightful treat that anyone can whip up in no time. These little bites are chewy on the inside and crispy on the outside, making them a perfect snack or dessert. The image showcases beautifully golden macaroons drizzled with chocolate, adding a touch of elegance to this simple dessert. The surrounding ingredients, like shredded coconut and a coconut shell, highlight the main flavor that makes these treats so special.

Making coconut macaroons is straightforward. With just five ingredients, you can create a delicious dessert that will impress your friends and family. The combination of sweetened shredded coconut, egg whites, and sugar results in a delightful texture that pairs perfectly with a drizzle of chocolate. Whether you’re hosting a gathering or just craving something sweet, these macaroons are sure to satisfy.

Ingredients

  • 2 2/3 cups sweetened shredded coconut
  • 2/3 cup sweetened condensed milk
  • 2 large egg whites
  • 1 teaspoon vanilla extract
  • 1/4 teaspoon salt

Instructions

  1. Preheat the oven to 325°F (165°C) and line a baking sheet with parchment paper.
  2. In a large bowl, mix together the shredded coconut, sweetened condensed milk, egg whites, vanilla extract, and salt until well combined.
  3. Using a spoon or cookie scoop, drop rounded tablespoons of the mixture onto the prepared baking sheet, spacing them about 1 inch apart.
  4. Bake for 20-25 minutes, or until the tops are golden brown.
  5. Let them cool on the baking sheet for a few minutes before transferring to a wire rack.
  6. If desired, melt some chocolate and drizzle it over the cooled macaroons for an extra touch of sweetness.

Tasty Rice Krispie Treats

A tray of Rice Krispie treats on a picnic blanket in a sunny outdoor setting.

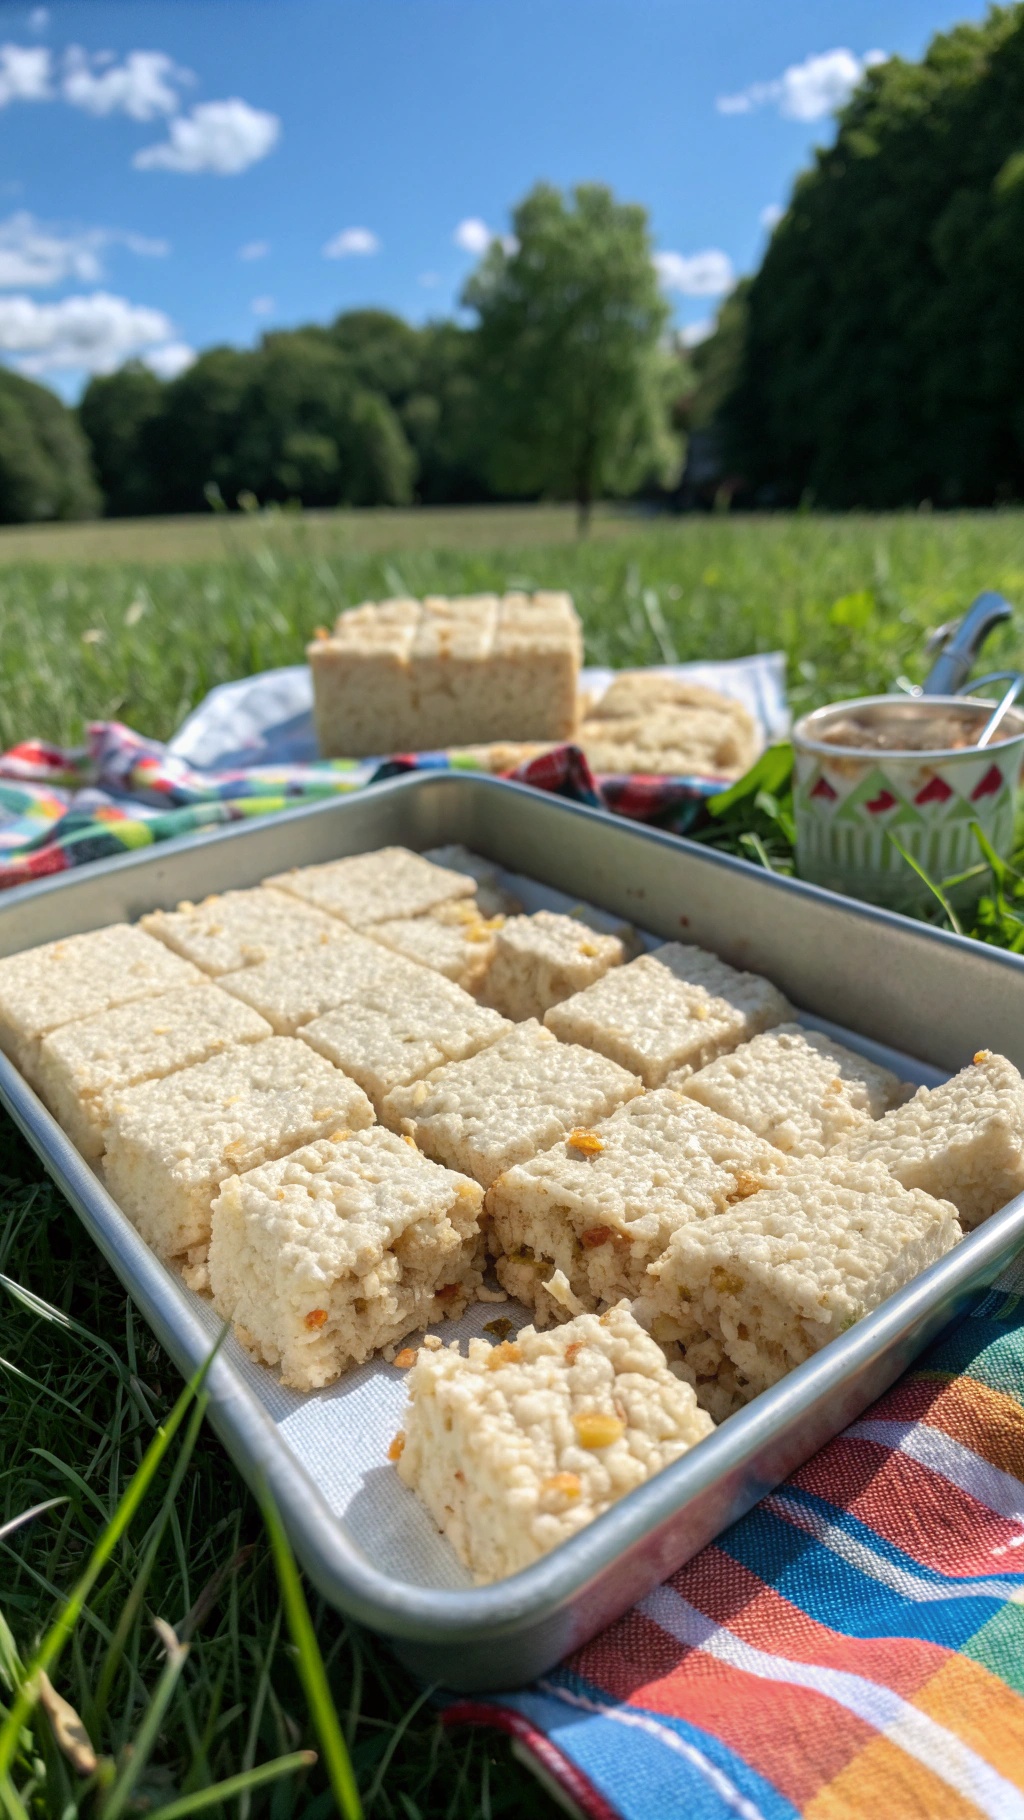
Rice Krispie treats are a classic dessert that everyone loves. They are simple to make and require just a few ingredients. In the image, you can see a tray of perfectly cut Rice Krispie squares, sitting on a colorful picnic blanket in a sunny outdoor setting. The bright blue sky and lush green grass make this treat look even more inviting.

These treats are not only delicious but also fun to prepare. Kids can help with mixing and shaping, making it a great family activity. Plus, they are perfect for parties, picnics, or just a sweet snack at home.

Let’s get to the recipe so you can whip up your own batch of these tasty treats!

Ingredients

  • 3 tablespoons unsalted butter
  • 1 package (10 oz) mini marshmallows
  • 6 cups Rice Krispies cereal
  • 1/2 teaspoon vanilla extract (optional)
  • Pinch of salt

Instructions

  1. Melt the Butter: In a large saucepan over low heat, melt the butter. Once melted, add the marshmallows and stir until completely melted and smooth.
  2. Add Cereal: Remove the saucepan from heat. Stir in the Rice Krispies cereal until well coated. If using, add the vanilla extract and a pinch of salt.
  3. Press into Pan: Grease a 9x13 inch baking dish. Pour the mixture into the dish and press down firmly with a spatula or your hands to create an even layer.
  4. Cool and Cut: Allow the treats to cool for about 30 minutes. Once set, cut into squares and enjoy!

Satisfying Peanut Butter Banana Bites

Peanut Butter Banana Bites on a wooden platter with honey and bananas in the background.

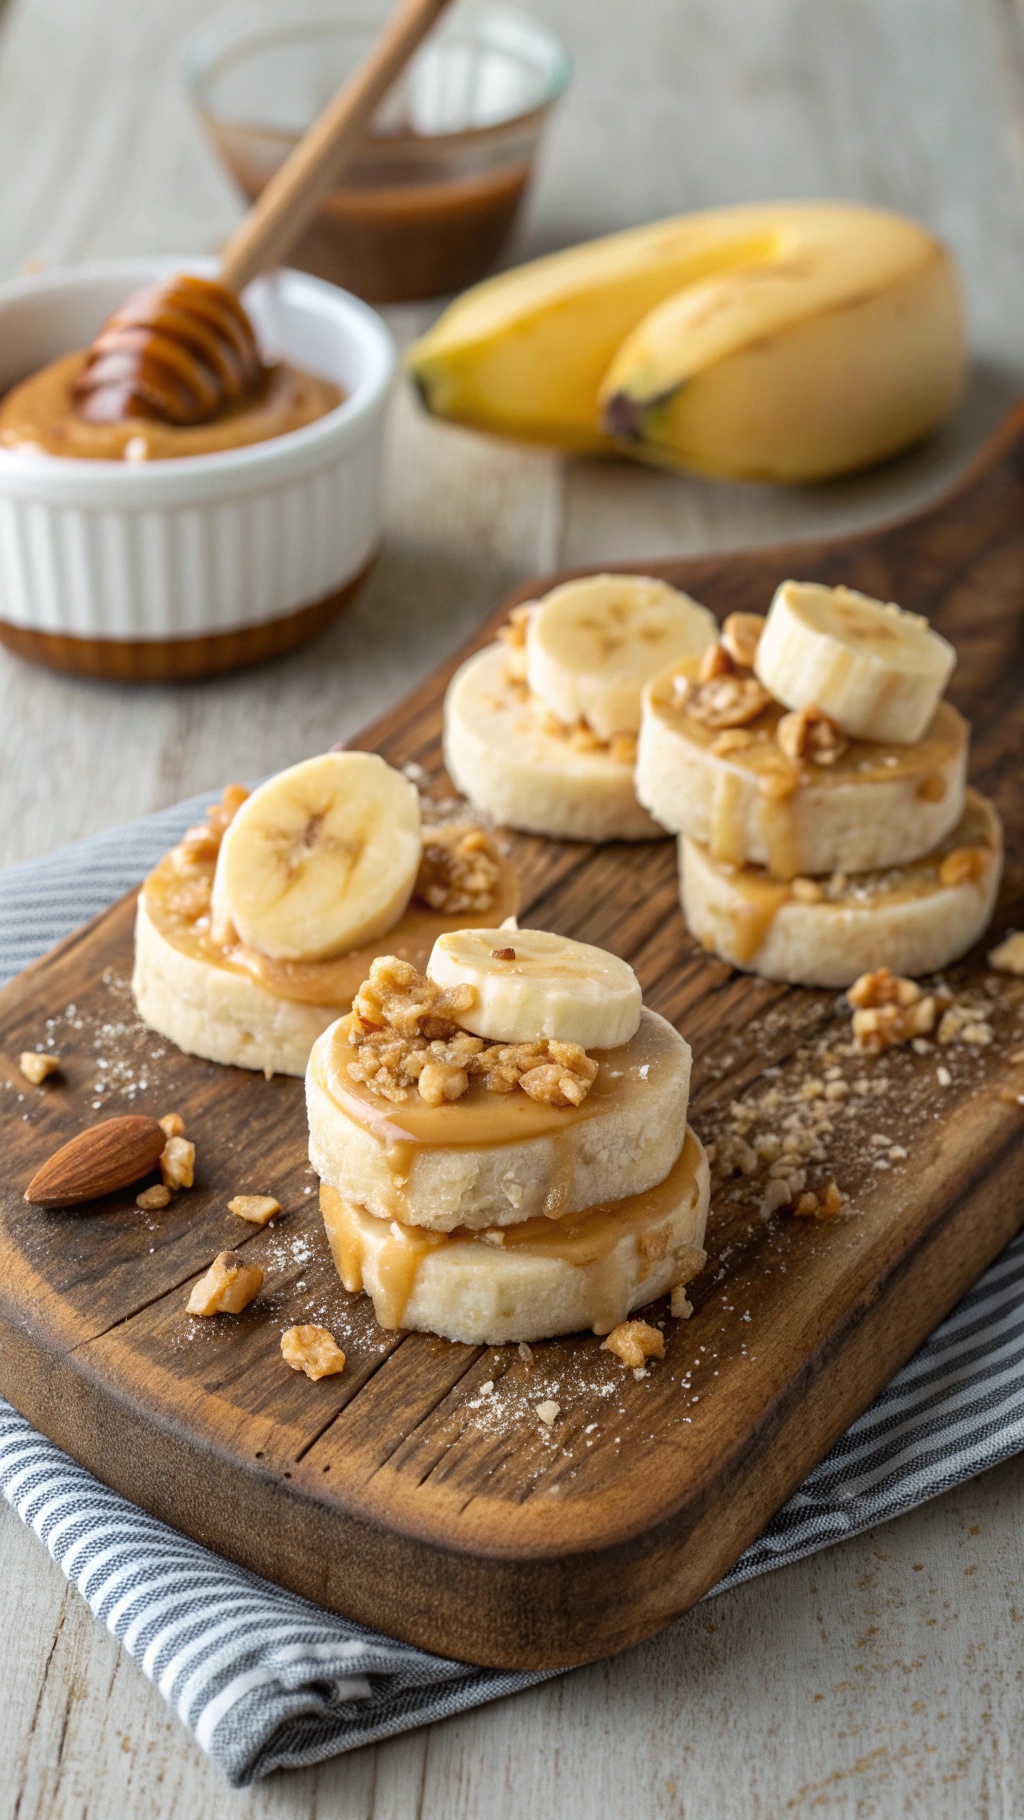
These Peanut Butter Banana Bites are a delightful treat that anyone can whip up in no time. The image showcases a wooden platter filled with stacked banana slices drizzled with creamy peanut butter and topped with crunchy nuts. The bananas add a natural sweetness, while the peanut butter brings a rich, savory flavor. Together, they create a perfect balance that satisfies your sweet tooth without the guilt.

Making these bites is super simple. You only need a few ingredients, and the steps are quick and easy. They’re perfect for a snack, dessert, or even a fun party treat. Plus, they look great on a platter!

Ingredients

  • 2 ripe bananas
  • 1/2 cup peanut butter
  • 1/4 cup honey
  • 1/4 cup chopped nuts (like almonds or walnuts)
  • 1/4 cup granola (optional)

Instructions

  1. Slice the bananas into thick rounds and set them aside.
  2. In a small bowl, mix the peanut butter and honey until smooth.
  3. On a serving platter, layer a banana slice, a dollop of the peanut butter mixture, and a sprinkle of chopped nuts. Repeat until all banana slices are used.
  4. If desired, top with granola for added crunch.
  5. Serve immediately or refrigerate for a cool treat later!

Creamy Yogurt And Honey Delight

A bowl of creamy yogurt topped with fresh fruits, nuts, and honey.

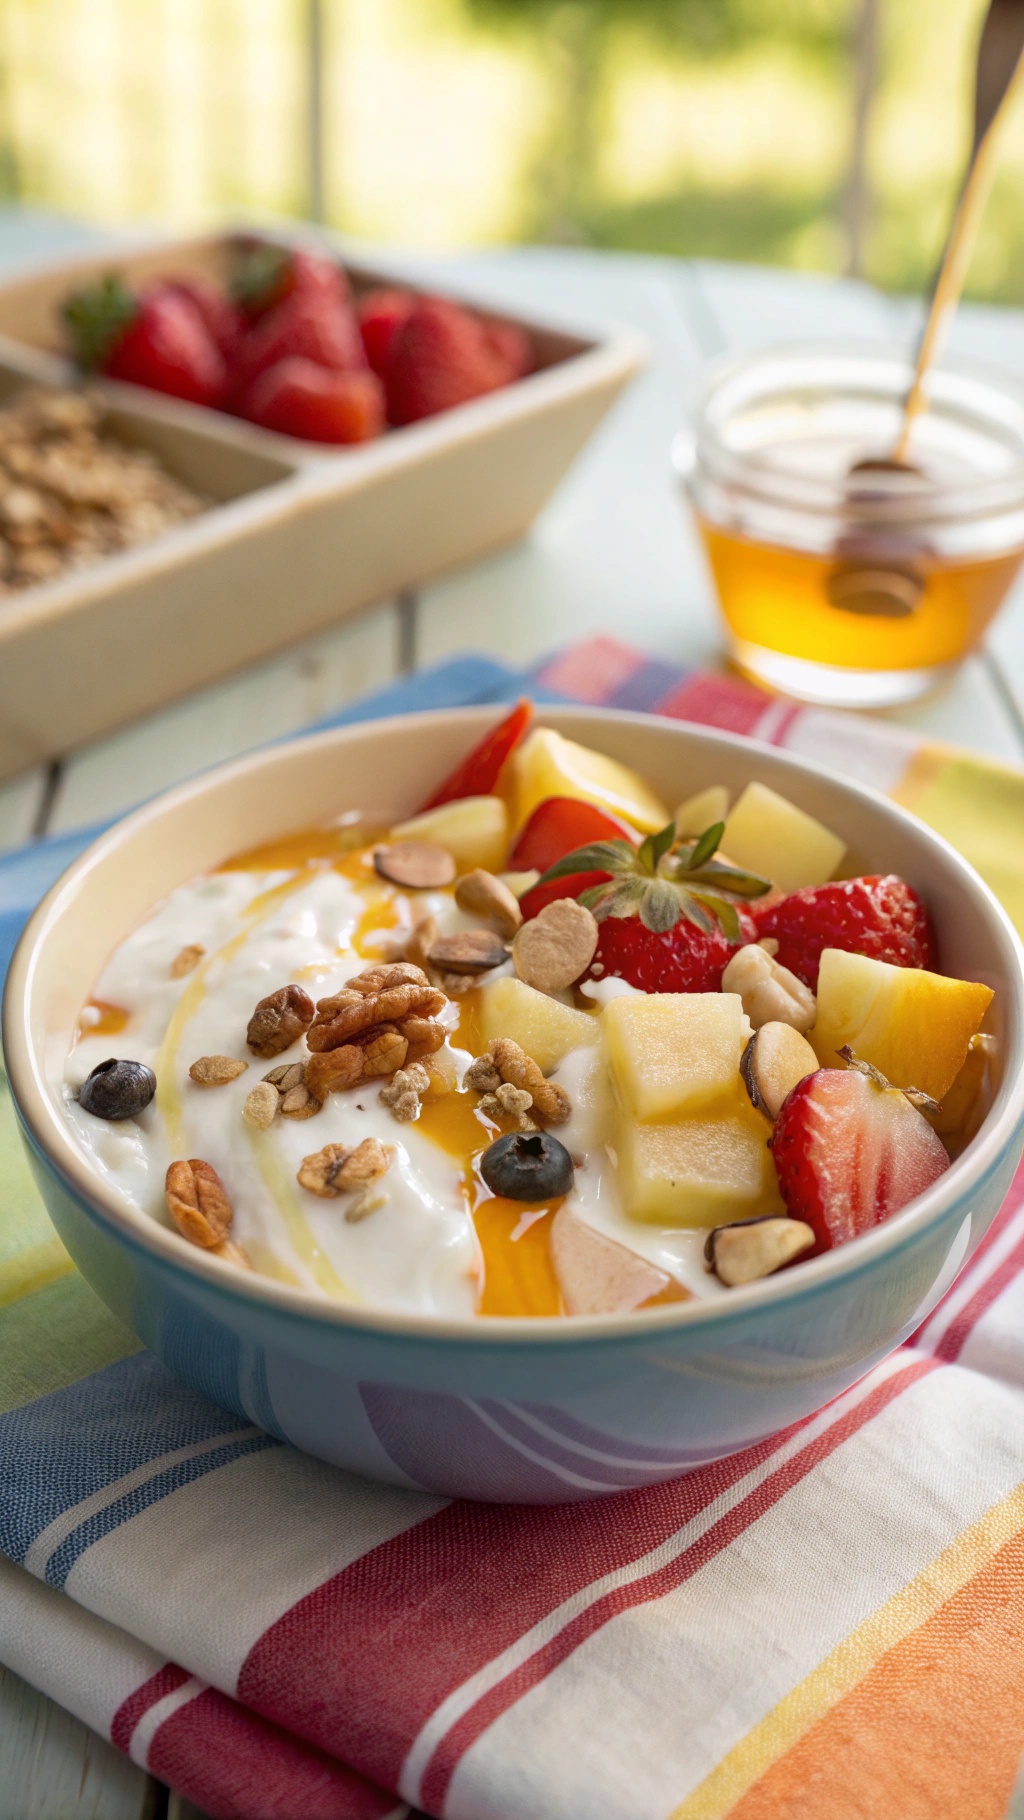
This creamy yogurt and honey delight is a simple yet satisfying dessert. It features a base of smooth yogurt topped with fresh fruits, nuts, and a drizzle of honey. The vibrant colors of the fruits make it visually appealing, while the combination of textures adds to the enjoyment.

The bowl showcases a delightful mix of strawberries, apples, and blueberries, all resting atop a generous layer of yogurt. A sprinkle of nuts adds a crunchy element, while the honey brings a touch of sweetness that ties everything together. This dessert is perfect for any occasion, whether it's a quick snack or a light finish to a meal.

Making this dessert is a breeze. Just gather your ingredients and layer them in a bowl. It’s a great way to enjoy healthy snacks without sacrificing flavor.

Ingredients

  • 2 cups plain yogurt
  • 1 cup mixed fresh fruits (strawberries, apples, blueberries)
  • 1/4 cup nuts (almonds, walnuts, or your choice)
  • 2 tablespoons honey
  • Granola (optional, for extra crunch)

Instructions

  1. In a bowl, add the yogurt as the base layer.
  2. Chop the fresh fruits and arrange them on top of the yogurt.
  3. Sprinkle the nuts over the fruits for added crunch.
  4. Drizzle honey generously over the top.
  5. If desired, add a layer of granola for extra texture.
  6. Serve immediately and enjoy!

Delicious Cinnamon Roll Bites

A plate of cinnamon roll bites drizzled with icing, surrounded by cinnamon sticks and a rolling pin.

Cinnamon roll bites are a delightful treat that combines the classic flavors of cinnamon rolls in a fun, bite-sized form. These little morsels are perfect for sharing or enjoying on your own. The image showcases a stack of golden-brown cinnamon roll bites, drizzled with sweet icing and dusted with powdered sugar. They sit on a simple white plate, surrounded by cinnamon sticks and a rolling pin, hinting at the homemade goodness that awaits.

Making these cinnamon roll bites is simple and requires just a few ingredients. They are great for breakfast, snacks, or dessert. The combination of warm cinnamon and sweet icing makes them irresistible. Plus, they’re easy to whip up, even for those who might not consider themselves bakers!

Ingredients

  • 1 can of refrigerated crescent roll dough
  • 1/4 cup granulated sugar
  • 1 tablespoon ground cinnamon
  • 2 tablespoons unsalted butter, melted
  • 1/2 cup powdered sugar
  • 1 tablespoon milk

Instructions

  1. Preheat your oven to 375°F (190°C) and grease a muffin tin.
  2. Unroll the crescent roll dough and separate it into triangles. Brush each triangle with melted butter.
  3. In a small bowl, mix together the sugar and cinnamon. Sprinkle this mixture evenly over the buttered dough.
  4. Roll each triangle tightly from the wide end to the point, then cut into bite-sized pieces.
  5. Place the pieces into the greased muffin tin and bake for 12-15 minutes, or until golden brown.
  6. While they bake, mix the powdered sugar and milk to create a smooth icing. Drizzle this over the warm cinnamon roll bites once they are out of the oven.

Fresh Berry Cheesecake Cups

Fresh Berry Cheesecake Cups with strawberries, blueberries, and blackberries on top.

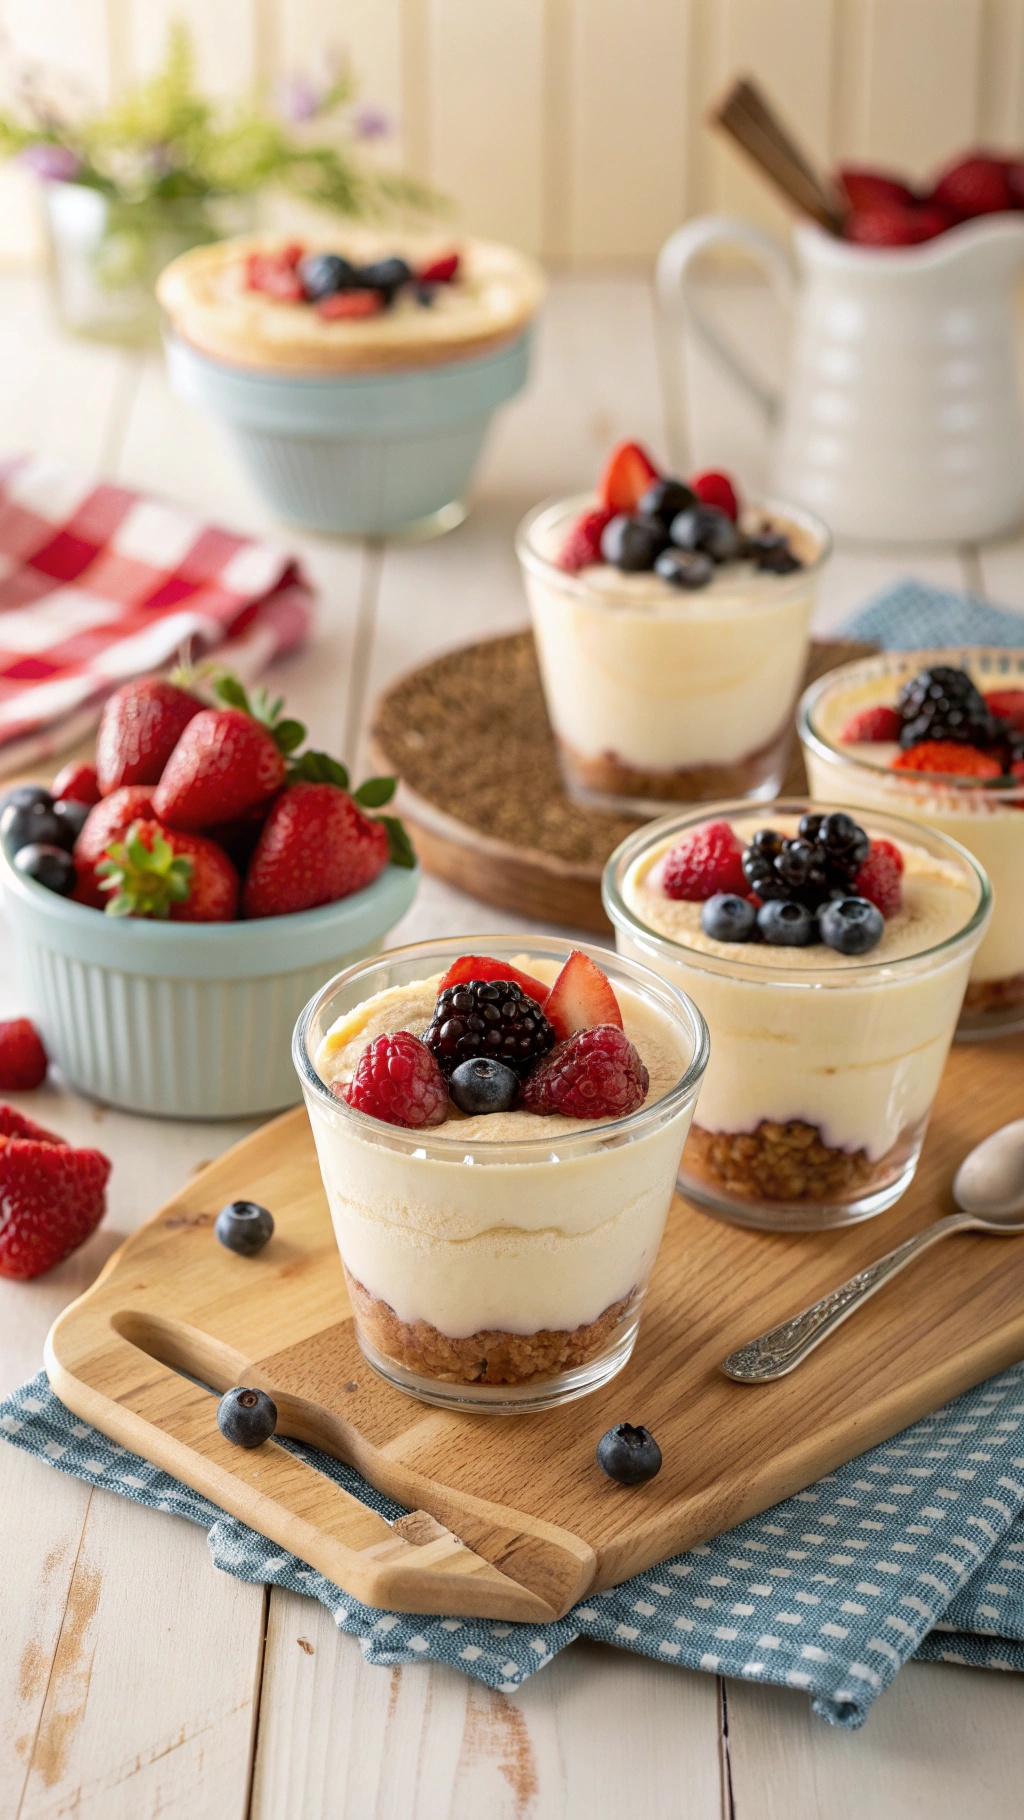
Fresh Berry Cheesecake Cups are a delightful treat that anyone can whip up. These little desserts are perfect for warm days or any time you want something sweet without too much fuss. The image shows beautiful cups filled with creamy cheesecake and topped with vibrant berries. You can see strawberries, blueberries, and blackberries, all adding a pop of color and flavor.

The layers of cheesecake and a crunchy base make each bite a joy. Plus, they are served in individual cups, making them easy to share or enjoy on your own. This recipe is simple, requiring just five ingredients, and it’s a great way to showcase fresh berries.

Let’s get started on making these delicious cheesecake cups!

Ingredients

  • 1 cup graham cracker crumbs
  • 1/4 cup unsalted butter, melted
  • 2 cups cream cheese, softened
  • 1 cup powdered sugar
  • 1 teaspoon vanilla extract
  • 1 cup heavy whipping cream
  • 2 cups mixed fresh berries (strawberries, blueberries, raspberries)
  • Mint leaves for garnish (optional)

Instructions

  1. Prepare the Crust: In a mixing bowl, combine graham cracker crumbs and melted butter. Mix until well combined. Spoon the mixture into the bottom of serving cups and press down firmly to create an even layer.
  2. Make the Cheesecake Filling: In a large bowl, beat the softened cream cheese with an electric mixer until smooth. Gradually add powdered sugar and vanilla extract, mixing until well combined.
  3. Whip the Cream: In a separate bowl, whip the heavy cream until stiff peaks form. Gently fold the whipped cream into the cream cheese mixture until fully incorporated.
  4. Assemble the Cups: Spoon the cheesecake filling over the crust in each cup. Smooth the top with a spatula. Refrigerate for at least 2 hours to allow the filling to set.
  5. Add Berries: Before serving, top each cheesecake cup with a generous amount of fresh berries. Garnish with mint leaves if desired.
  6. Serve: Enjoy these refreshing cheesecake cups chilled, perfect for any occasion.

Comments