15 No-Bake Healthy Desserts Perfect for Hot Summer Days


15 No-Bake Healthy Desserts Perfect for Hot Summer Days

When the heat turns up, turning on the oven is the last thing you want to do. Thankfully, there’s a world of delicious no-bake desserts waiting to keep you cool and satisfied. From creamy treats to fruity bites, these 15 healthy recipes are super easy to whip up and will help you beat the heat without breaking a sweat.

Refreshing Chocolate Avocado Mousse For A Guilt-Free Treat

Chocolate avocado mousse in a glass, garnished with mint and chocolate chips, with avocados in the background.

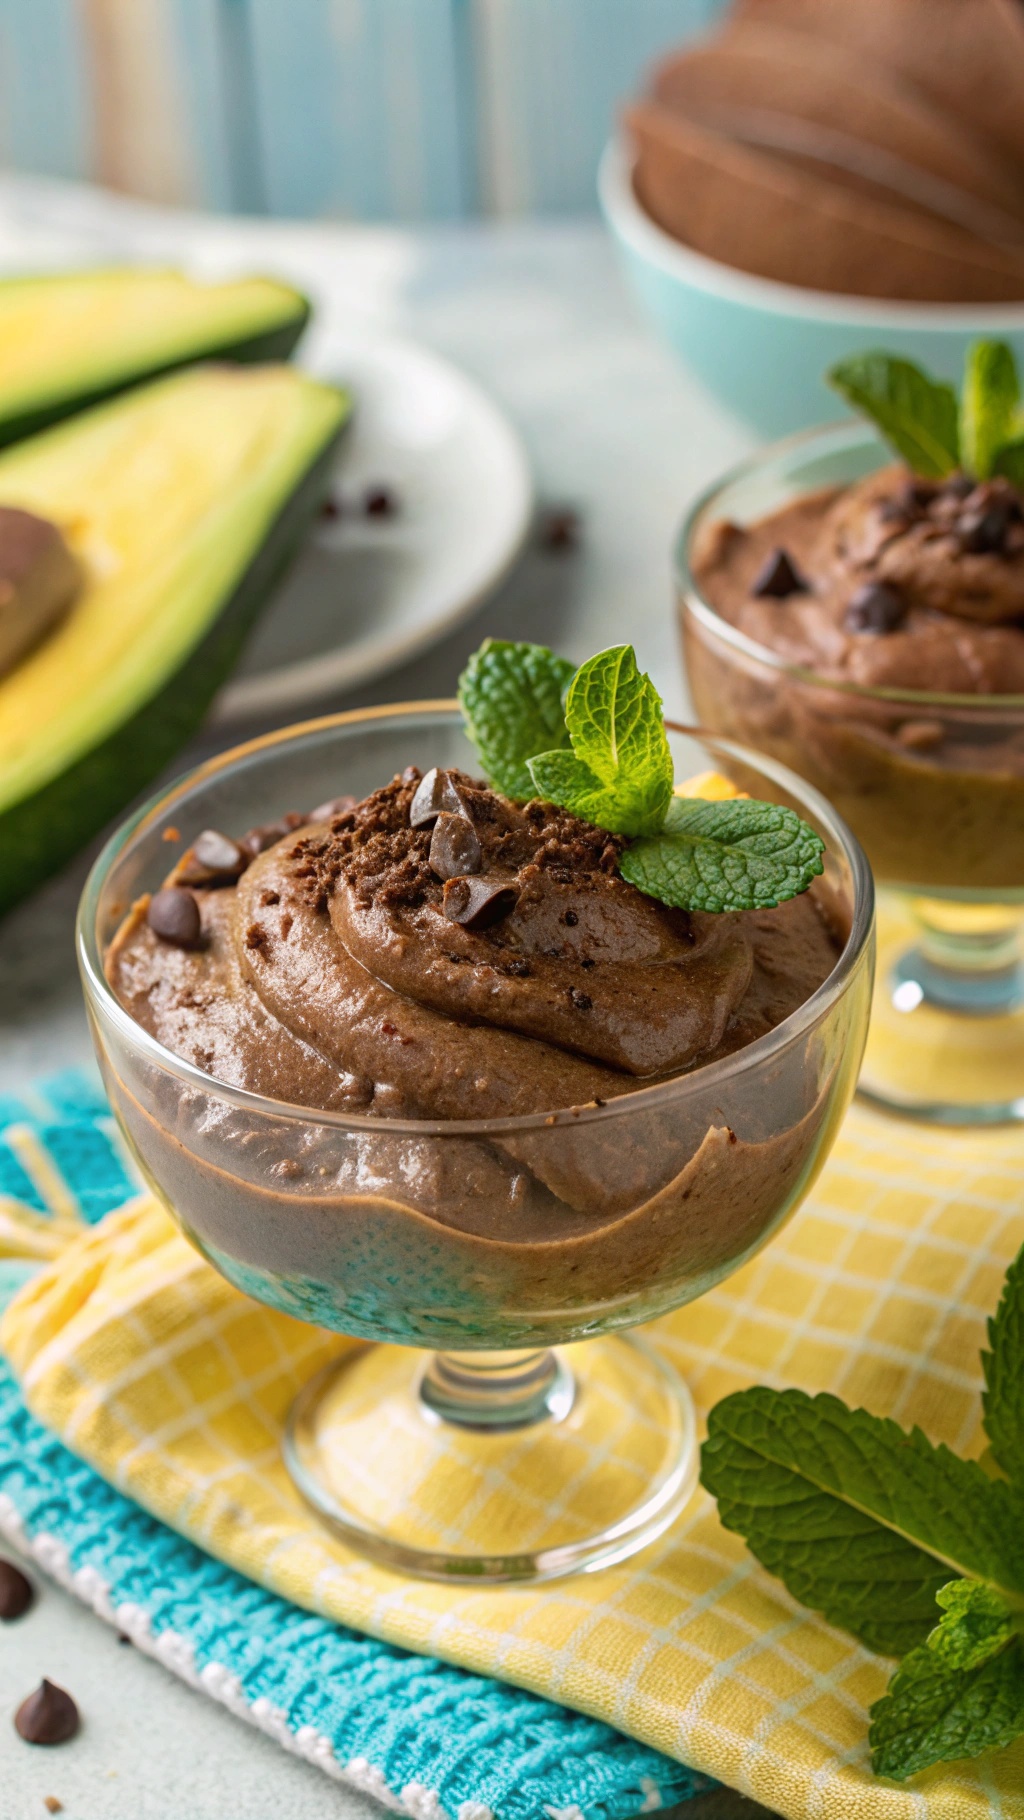
When the heat is on, a cool dessert is just what you need. This chocolate avocado mousse is a delightful way to satisfy your sweet tooth without turning on the oven. The rich, creamy texture comes from ripe avocados, making it a healthy choice that feels indulgent.

The image showcases this luscious mousse served in elegant glasses, topped with a sprinkle of chocolate chips and fresh mint leaves. The vibrant green of the avocado blends beautifully with the deep chocolate color, creating an inviting treat that's as pleasing to the eyes as it is to the palate.

Making this mousse is simple and requires just a few ingredients. You’ll be amazed at how easy it is to whip up a dessert that’s both delicious and nutritious!

Ingredients

  • 2 ripe avocados
  • 1/4 cup unsweetened cocoa powder
  • 1/4 cup maple syrup or honey
  • 1/4 cup almond milk (or any milk of choice)
  • 1 teaspoon vanilla extract
  • A pinch of salt
  • Chocolate chips and mint leaves for garnish

Instructions

  1. Prepare the Avocados: Cut the avocados in half, remove the pit, and scoop the flesh into a blender or food processor.
  2. Add Ingredients: To the avocados, add cocoa powder, maple syrup, almond milk, vanilla extract, and a pinch of salt.
  3. Blend: Blend everything until smooth and creamy. You may need to scrape down the sides to ensure everything is well mixed.
  4. Taste and Adjust: Taste the mousse and adjust sweetness if needed by adding more maple syrup or honey.
  5. Chill: Transfer the mousse into serving glasses and chill in the refrigerator for at least 30 minutes before serving.
  6. Serve: Garnish with chocolate chips and fresh mint leaves before enjoying!

Coconut Chia Seed Pudding For A Tropical Escape

A jar of coconut chia seed pudding layered with fresh fruits like mango, kiwi, and green apple, garnished with shredded coconut.

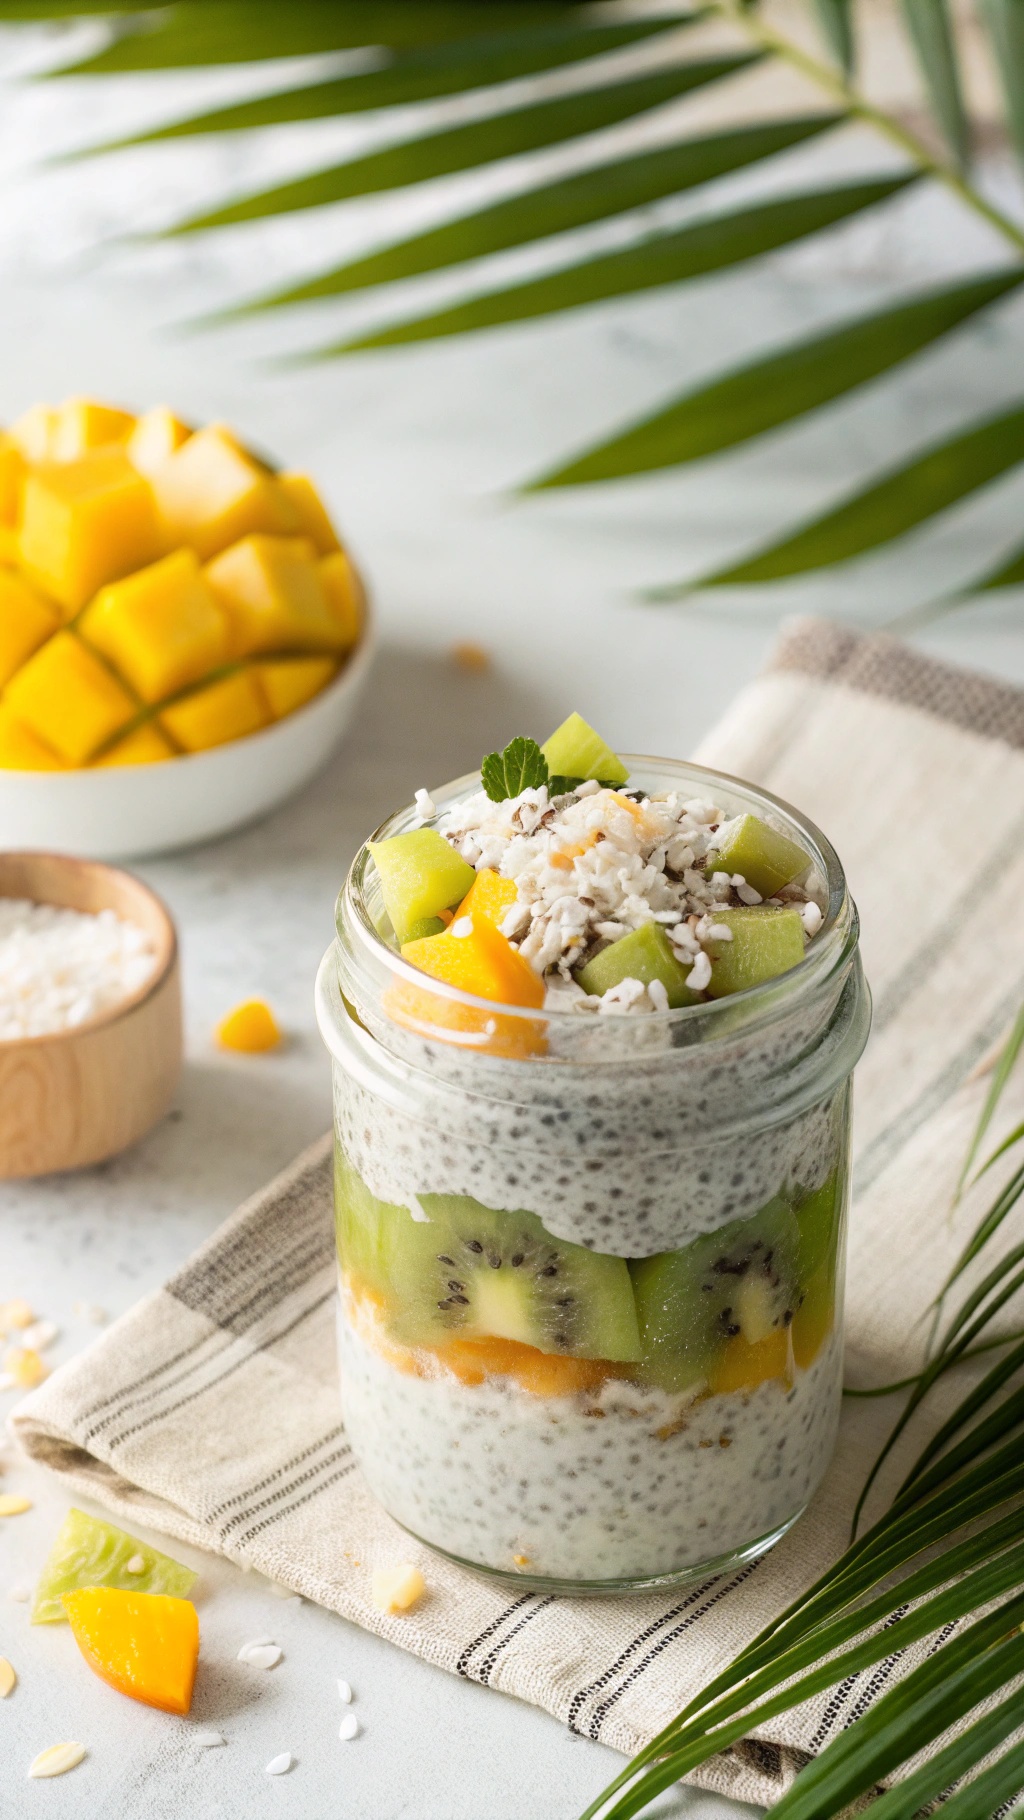
When the heat rises, a refreshing dessert can make all the difference. Coconut chia seed pudding is a perfect choice for those warm days. This treat is not only delicious but also packed with nutrients. The creamy coconut flavor combined with the delightful texture of chia seeds creates a tropical escape right in your kitchen.

The image showcases a beautiful jar filled with layers of chia seed pudding, fresh fruits, and a sprinkle of coconut. The vibrant colors of mango, kiwi, and green apple make it visually appealing. It’s a feast for the eyes and the taste buds!

Making this pudding is simple and requires no baking. Just mix the ingredients, let them sit, and you’re ready to enjoy a cool, healthy dessert. It’s perfect for meal prep, too. You can whip up a batch and have it ready for the week.

Ingredients

  • 1 cup coconut milk
  • 1/4 cup chia seeds
  • 2 tablespoons honey or maple syrup
  • 1 teaspoon vanilla extract
  • 1/2 cup diced mango
  • 1/2 cup diced kiwi
  • 1/2 cup diced green apple
  • 2 tablespoons shredded coconut (optional)

Instructions

  1. In a bowl, whisk together coconut milk, chia seeds, honey, and vanilla extract until well combined.
  2. Cover the bowl and refrigerate for at least 4 hours, or overnight, until the mixture thickens.
  3. Once thickened, stir the pudding to break up any clumps.
  4. Layer the chia pudding in jars with diced mango, kiwi, and green apple.
  5. Top with shredded coconut if desired. Serve chilled and enjoy!

Berry Bliss No-Bake Cheesecake For A Sweet Indulgence

A delicious no-bake cheesecake topped with fresh berries on a wooden serving board.

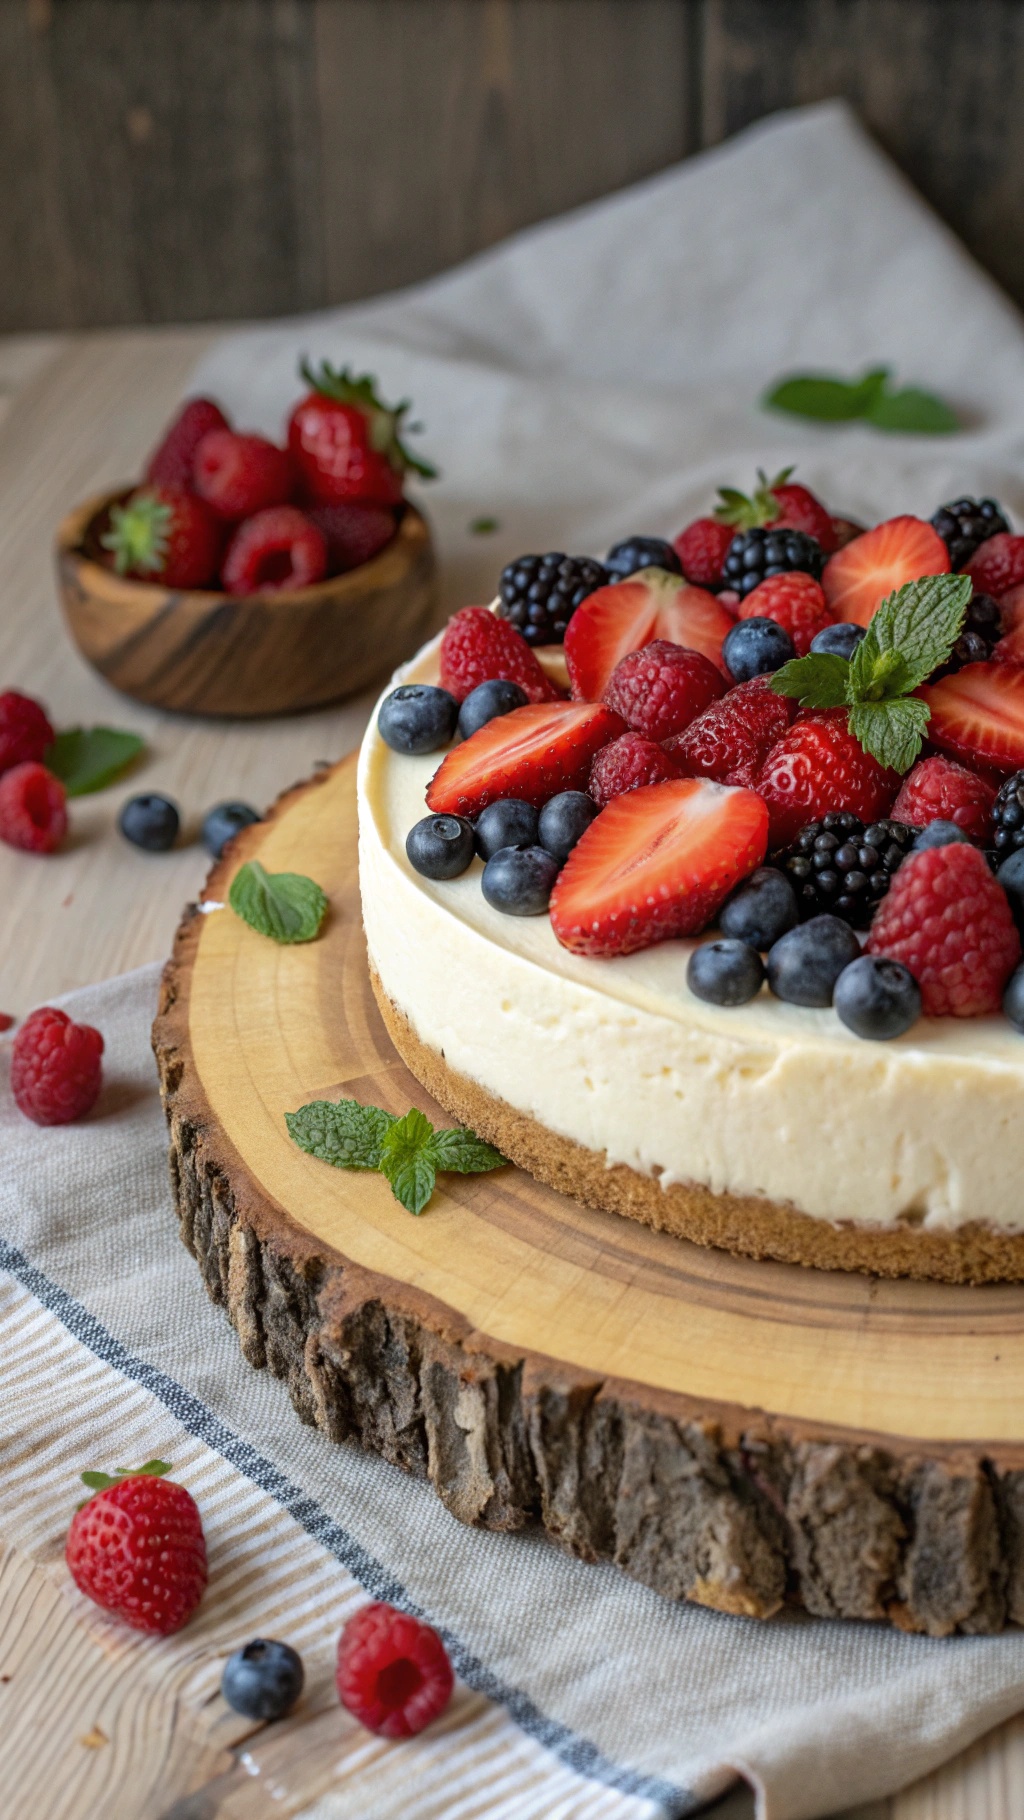
When the heat is on, there's nothing better than a cool, refreshing dessert. This Berry Bliss No-Bake Cheesecake is the perfect treat to satisfy your sweet tooth without turning on the oven. Topped with a colorful array of fresh berries, it’s as delightful to look at as it is to eat!

The creamy cheesecake filling is light and fluffy, making it a great choice for warm days. The crust, made from crushed graham crackers, adds a nice crunch that balances the smooth texture of the cheesecake. Plus, the vibrant berries not only enhance the flavor but also add a pop of color that makes this dessert a showstopper.

Gather your friends and family for a summer gathering, and serve this cheesecake as a refreshing end to your meal. It’s sure to impress everyone!

Ingredients

  • 1 ½ cups graham cracker crumbs
  • ½ cup unsalted butter, melted
  • 2 cups cream cheese, softened
  • 1 cup powdered sugar
  • 1 teaspoon vanilla extract
  • 1 cup heavy whipping cream
  • 2 cups mixed fresh berries (strawberries, blueberries, raspberries, blackberries)
  • Fresh mint leaves for garnish

Instructions

  1. Prepare the Crust: In a bowl, combine graham cracker crumbs and melted butter. Mix until well combined. Press the mixture into the bottom of a 9-inch springform pan to form an even layer.
  2. Make the Cheesecake Filling: In a large mixing bowl, beat the softened cream cheese until smooth. Gradually add powdered sugar and vanilla extract, mixing until well combined.
  3. Whip the Cream: In another bowl, whip the heavy cream until stiff peaks form. Gently fold the whipped cream into the cream cheese mixture until fully incorporated.
  4. Assemble: Pour the cheesecake filling over the crust in the springform pan. Smooth the top with a spatula. Cover and refrigerate for at least 4 hours, or until set.
  5. Garnish: Once set, remove the cheesecake from the pan. Top with fresh berries and mint leaves before serving.


GET 21 QUICK & EASY LOW-CALORIE MEAL PLANS


Peanut Butter Banana Ice Cream For A Creamy Delight

A bowl of peanut butter banana ice cream topped with peanuts and banana slices, served on a colorful napkin.

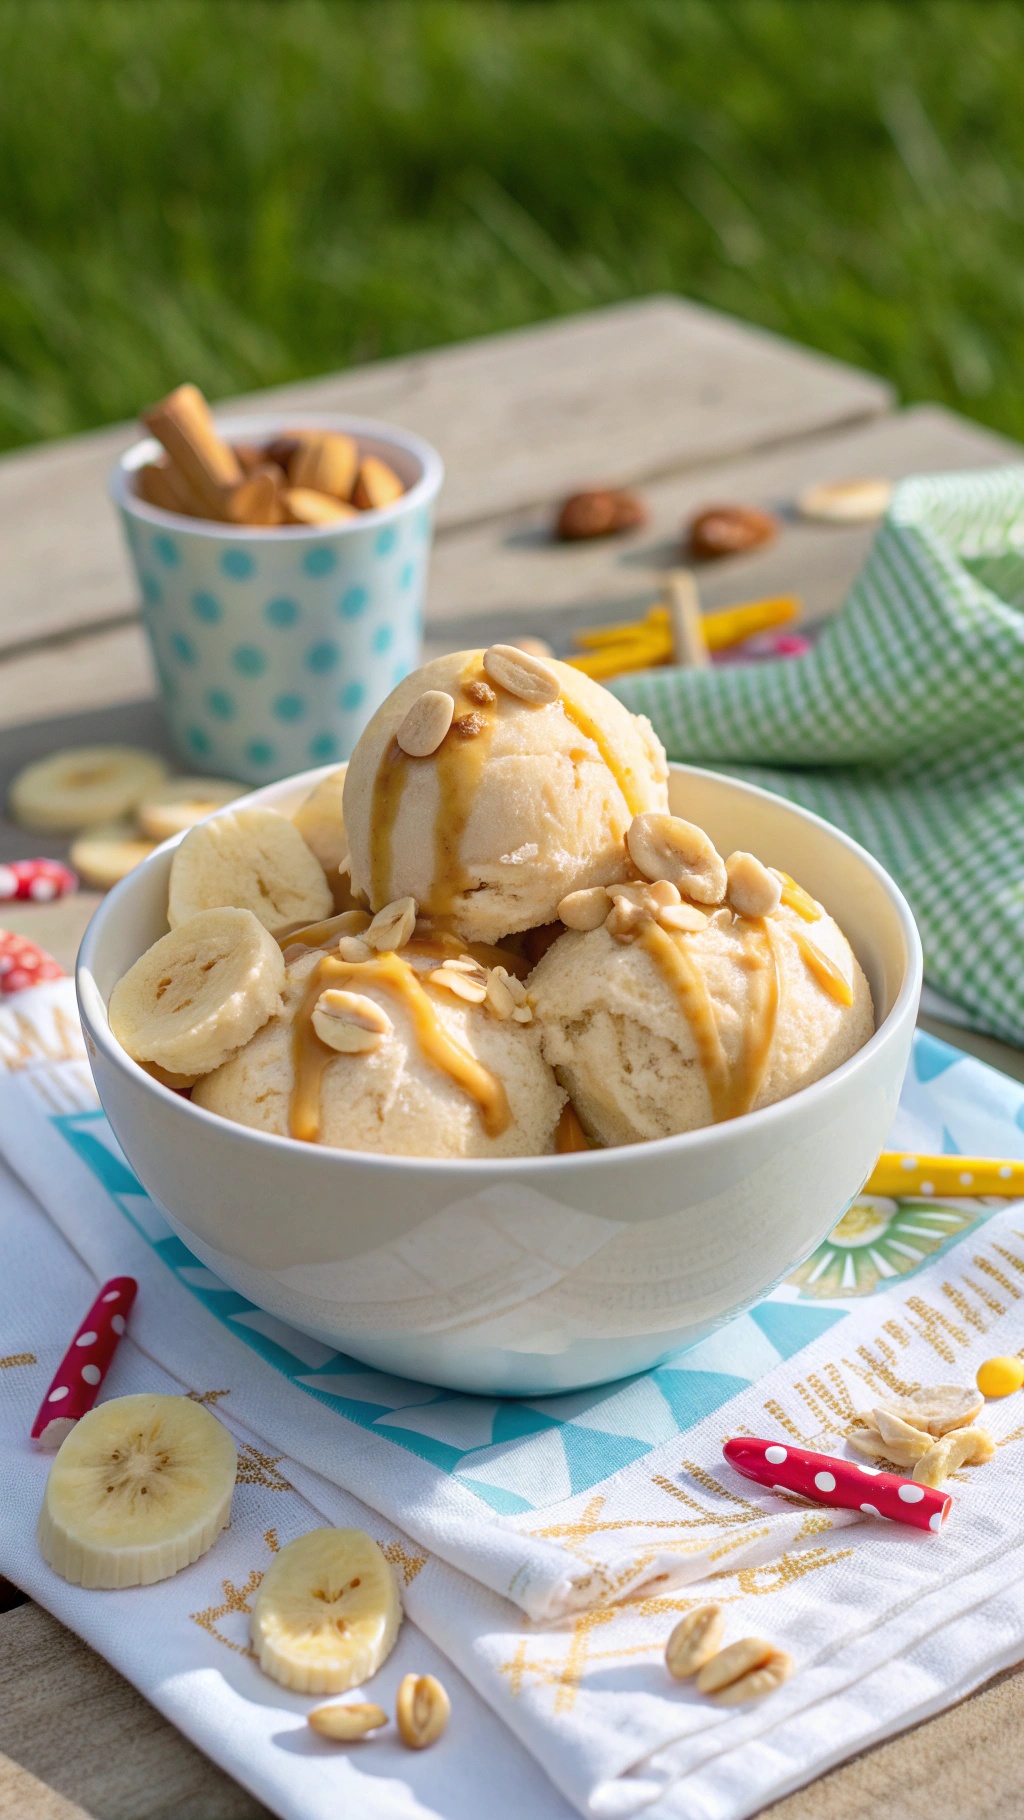
When the heat is on, nothing beats a cool treat like Peanut Butter Banana Ice Cream. This dessert is not only easy to make, but it’s also packed with flavor and nutrition. The creamy texture comes from ripe bananas blended with peanut butter, creating a delightful combination that feels indulgent without the guilt.

The image shows a bowl filled with scoops of this delicious ice cream, drizzled with peanut butter and topped with crunchy peanuts. Slices of fresh banana add a pop of color and freshness. It’s the perfect dessert for a hot day, and you won't even need to turn on the oven!

Making this ice cream is a breeze. Just gather your ingredients and follow the simple steps below. You’ll have a creamy delight ready in no time!

Ingredients

  • 4 ripe bananas
  • 1/2 cup creamy peanut butter
  • 1 tablespoon honey or maple syrup (optional)
  • 1 teaspoon vanilla extract
  • 1/4 cup milk (dairy or non-dairy)
  • Chopped peanuts and banana slices for topping

Instructions

  1. Prepare the Bananas: Peel the ripe bananas and slice them into small pieces. Place them in a freezer-safe container and freeze for about 2 hours, or until solid.
  2. Blend the Ingredients: In a blender or food processor, combine the frozen banana slices, peanut butter, honey or maple syrup (if using), vanilla extract, and milk. Blend until smooth and creamy.
  3. Adjust Consistency: If the mixture is too thick, add a bit more milk until you reach your desired consistency.
  4. Freeze Again: Transfer the mixture to an airtight container and freeze for another 1-2 hours to firm up.
  5. Serve: Scoop the ice cream into bowls and top with chopped peanuts and banana slices. Enjoy your creamy delight!

Chocolate-Dipped Frozen Banana Pops For A Fun Treat

Chocolate-dipped frozen banana pops on a tray with crushed nuts and sprinkles

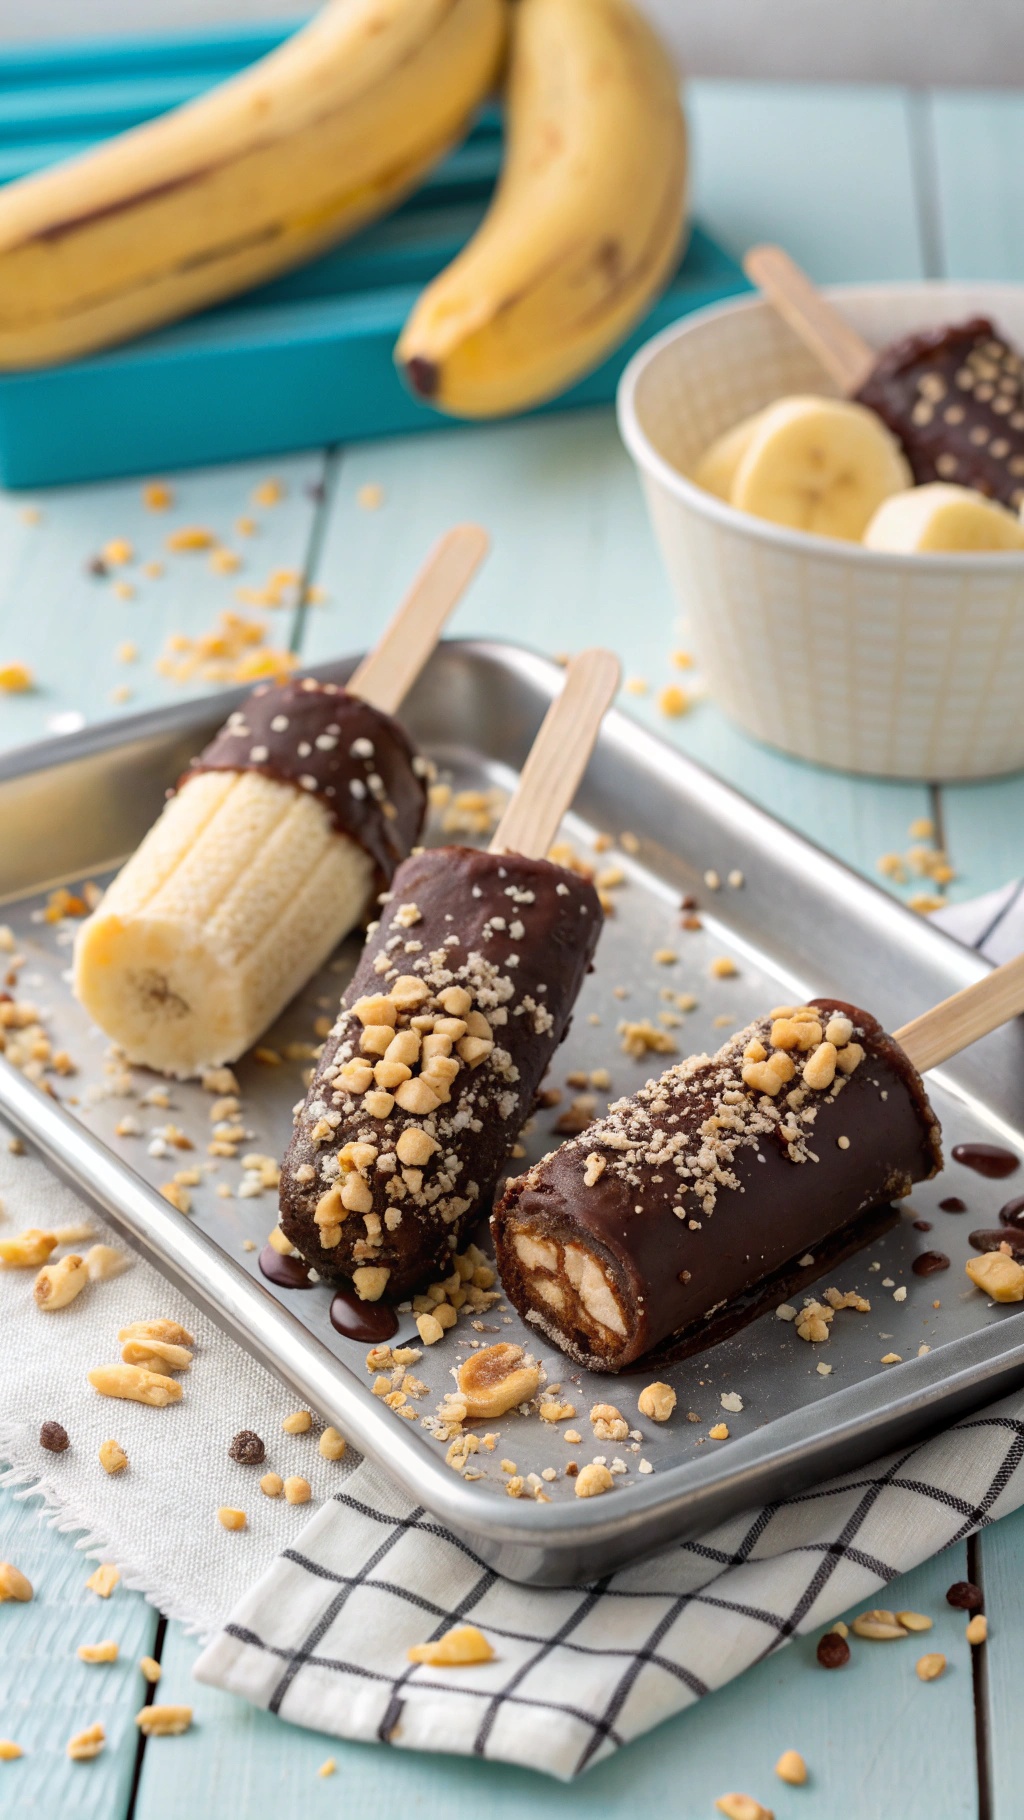
When the heat is on, nothing beats a cool treat. Chocolate-dipped frozen banana pops are not only refreshing but also super fun to make. These pops are perfect for a hot day, offering a delightful mix of creamy banana and rich chocolate. You can customize them with your favorite toppings, making them a hit for both kids and adults.

In the image, you can see a tray of these delicious pops, each coated in chocolate and sprinkled with crunchy toppings. The bananas are perfectly frozen, making them easy to hold and eat. The combination of chocolate and banana is simply irresistible!

Ingredients

  • 2 ripe bananas
  • 1 cup dark chocolate chips
  • 1 tablespoon coconut oil
  • 1/4 cup crushed nuts (like peanuts or almonds)
  • 1/4 cup sprinkles (optional)
  • Wooden popsicle sticks

Instructions

  1. Prep the Bananas: Peel the bananas and cut them in half. Insert a popsicle stick into each half.
  2. Freeze: Place the banana pops on a baking sheet lined with parchment paper and freeze for about 1-2 hours until solid.
  3. Melt Chocolate: In a microwave-safe bowl, combine the dark chocolate chips and coconut oil. Microwave in 30-second intervals, stirring in between, until smooth.
  4. Dip the Pops: Remove the frozen banana pops from the freezer. Dip each one into the melted chocolate, allowing the excess to drip off.
  5. Add Toppings: Before the chocolate sets, sprinkle your choice of crushed nuts or sprinkles on top.
  6. Final Freeze: Place the coated pops back on the baking sheet and freeze for another 30 minutes to set the chocolate.
  7. Enjoy: Once the chocolate is firm, your chocolate-dipped frozen banana pops are ready to enjoy!

Mango Coconut Sorbet For A Refreshing Summer Dessert

A bowl of mango coconut sorbet garnished with coconut flakes and fresh mango, set against a sandy background.

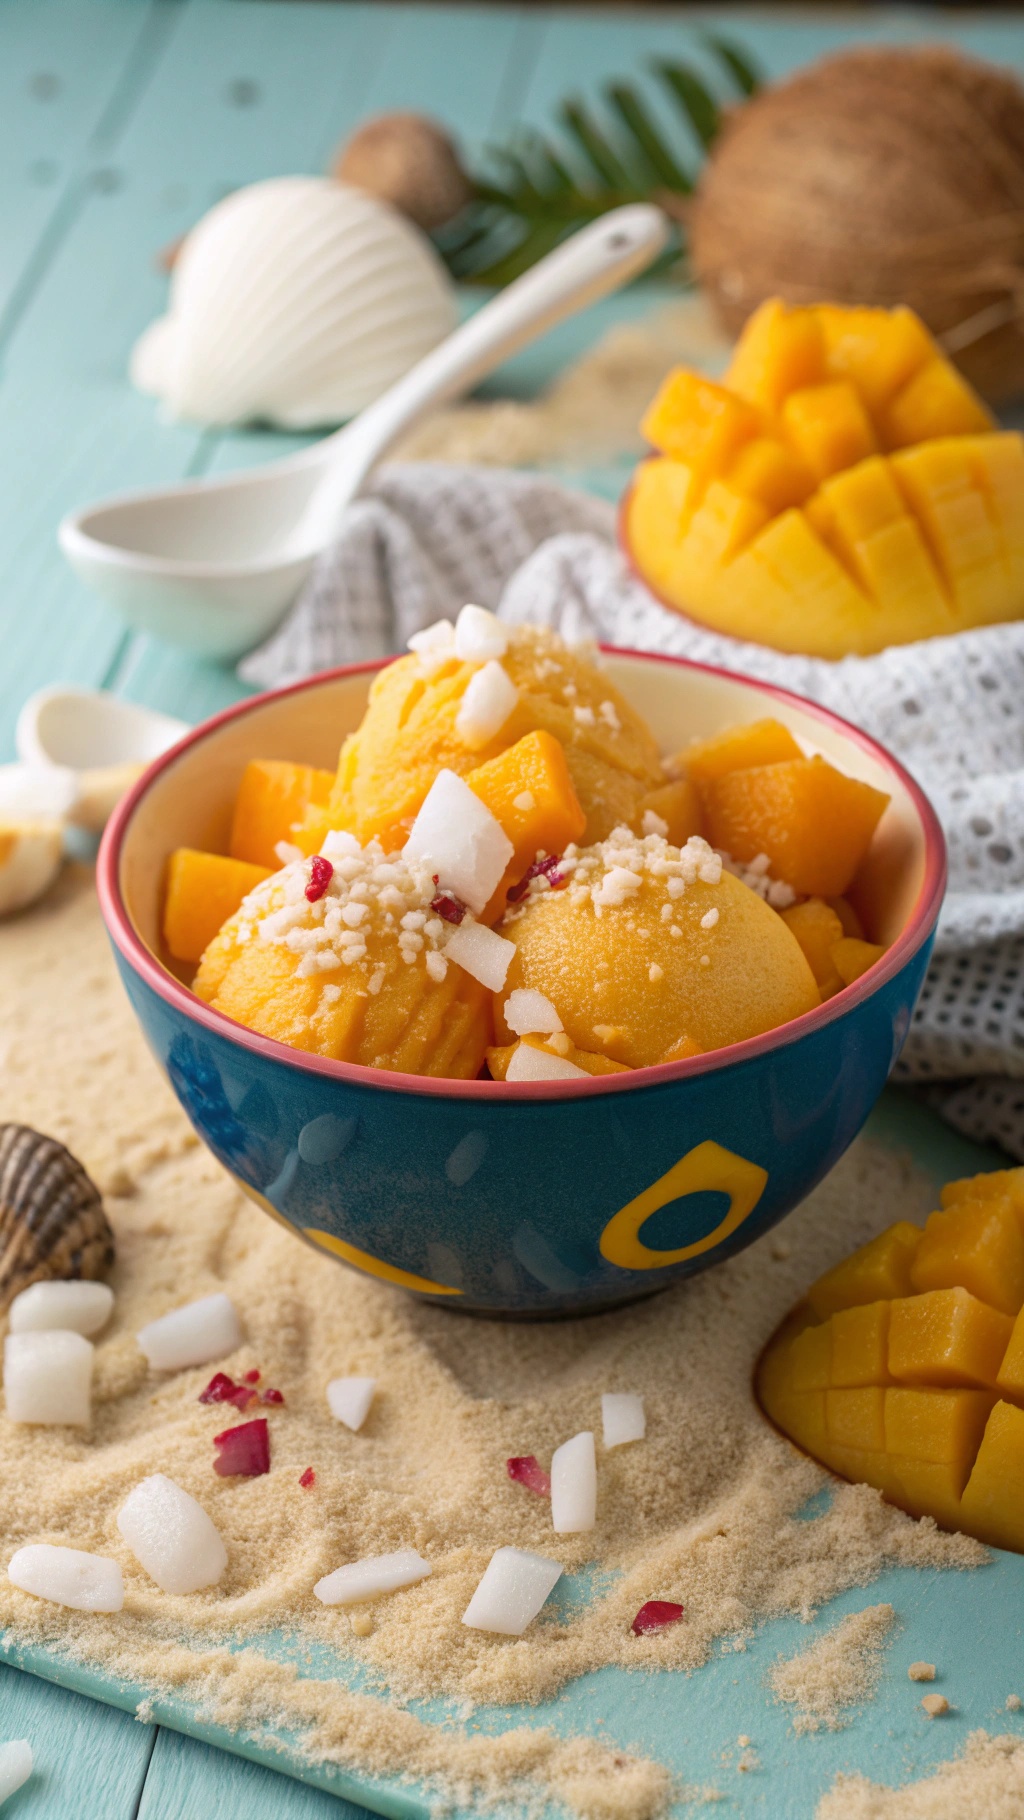
When the heat is on, nothing beats a cool treat like mango coconut sorbet. This dessert is not only refreshing but also super easy to make. The vibrant yellow of the mango and the creamy white of the coconut create a beautiful contrast that’s as pleasing to the eyes as it is to the taste buds.

The image shows a colorful bowl filled with scoops of mango sorbet, garnished with coconut flakes and bits of fresh mango. The sandy background adds a beachy vibe, making it perfect for summer. This sorbet is a delightful way to enjoy the sweet and tropical flavors of mango and coconut.

Making this sorbet is a breeze. You’ll need ripe mangoes, coconut milk, and a touch of sweetener. Blend everything together, freeze, and you’re set! It’s a guilt-free dessert that’s perfect for hot days.

Ingredients

  • 2 ripe mangoes, peeled and diced
  • 1 cup coconut milk
  • 2 tablespoons honey or maple syrup (adjust to taste)
  • 1 tablespoon lime juice
  • 1/4 cup shredded coconut (for garnish)

Instructions

  1. Blend the mangoes, coconut milk, honey, and lime juice in a blender until smooth.
  2. Taste and adjust sweetness if needed.
  3. Pour the mixture into a shallow dish and freeze for about 4 hours, stirring every hour to break up ice crystals.
  4. Once frozen, scoop into bowls and garnish with shredded coconut and extra mango pieces.
  5. Enjoy your refreshing mango coconut sorbet!

Lemon Coconut Energy Bars For A Zesty Boost

Lemon coconut energy bars stacked on a marble surface with fresh lemons and mint leaves.

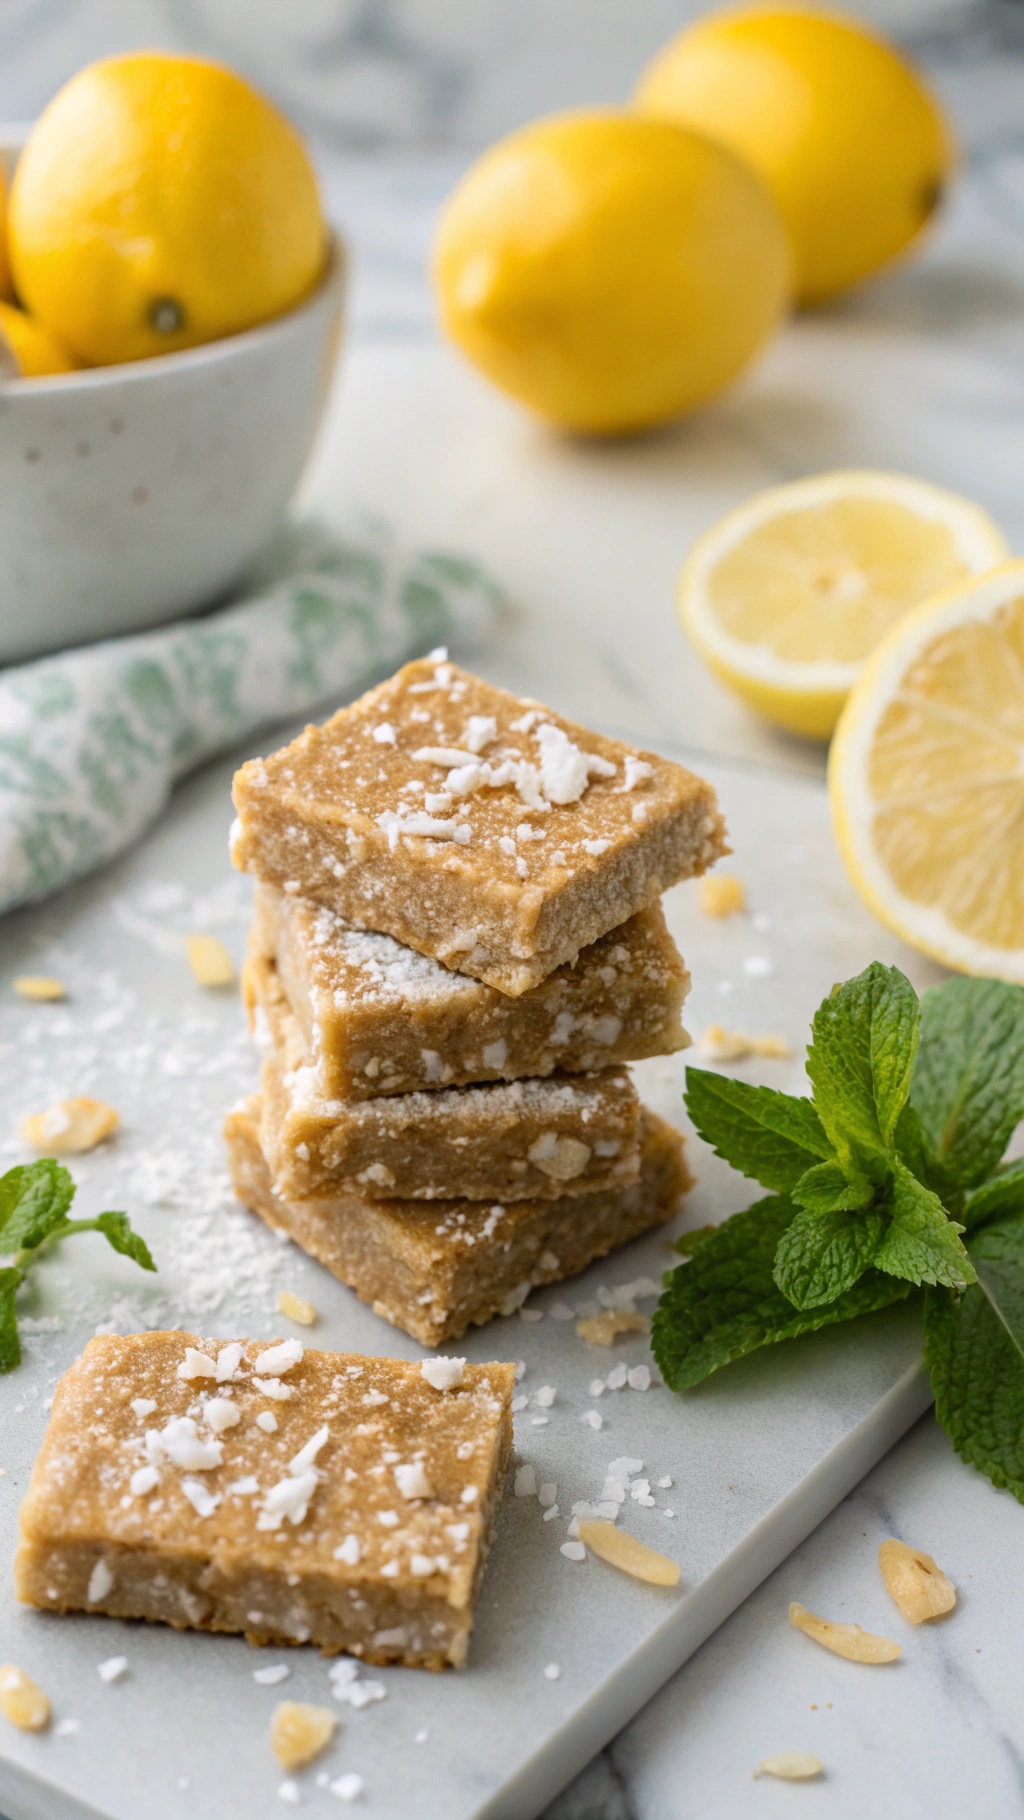
These Lemon Coconut Energy Bars are perfect for a quick snack on a hot day. They’re refreshing, zesty, and packed with energy. The bright yellow lemons and creamy coconut create a delightful combination that’s hard to resist. Plus, they require no baking, making them ideal for those sweltering afternoons when turning on the oven feels like a chore.

The bars are simple to make. Just mix together some wholesome ingredients, press them into a pan, and let them chill. They’re great for a quick breakfast or a midday pick-me-up. You can even pack them for a picnic or a day at the beach!

With a sprinkle of coconut on top and a hint of lemon zest, these bars look as good as they taste. They’re not only delicious but also nutritious, giving you that much-needed boost without any guilt. Enjoy them chilled for the best experience!

Ingredients

  • 1 cup pitted dates
  • 1 cup rolled oats
  • 1/2 cup unsweetened shredded coconut
  • 1/4 cup almond butter
  • 1/4 cup lemon juice
  • 1 tablespoon lemon zest
  • 1/4 teaspoon salt

Instructions

  1. Prepare the Base: In a food processor, combine the pitted dates, rolled oats, shredded coconut, almond butter, lemon juice, lemon zest, and salt. Pulse until the mixture is well combined and sticky.
  2. Press into Pan: Line an 8x8 inch baking dish with parchment paper. Transfer the mixture into the dish and press it down firmly to create an even layer.
  3. Chill: Place the dish in the refrigerator for at least 2 hours to set.
  4. Cut and Serve: Once set, remove from the dish and cut into bars. Enjoy chilled or at room temperature!

Raspberry Almond No-Bake Bars For A Sweet Crunch

Raspberry Almond No-Bake Bars on a plate with fresh raspberries and almonds

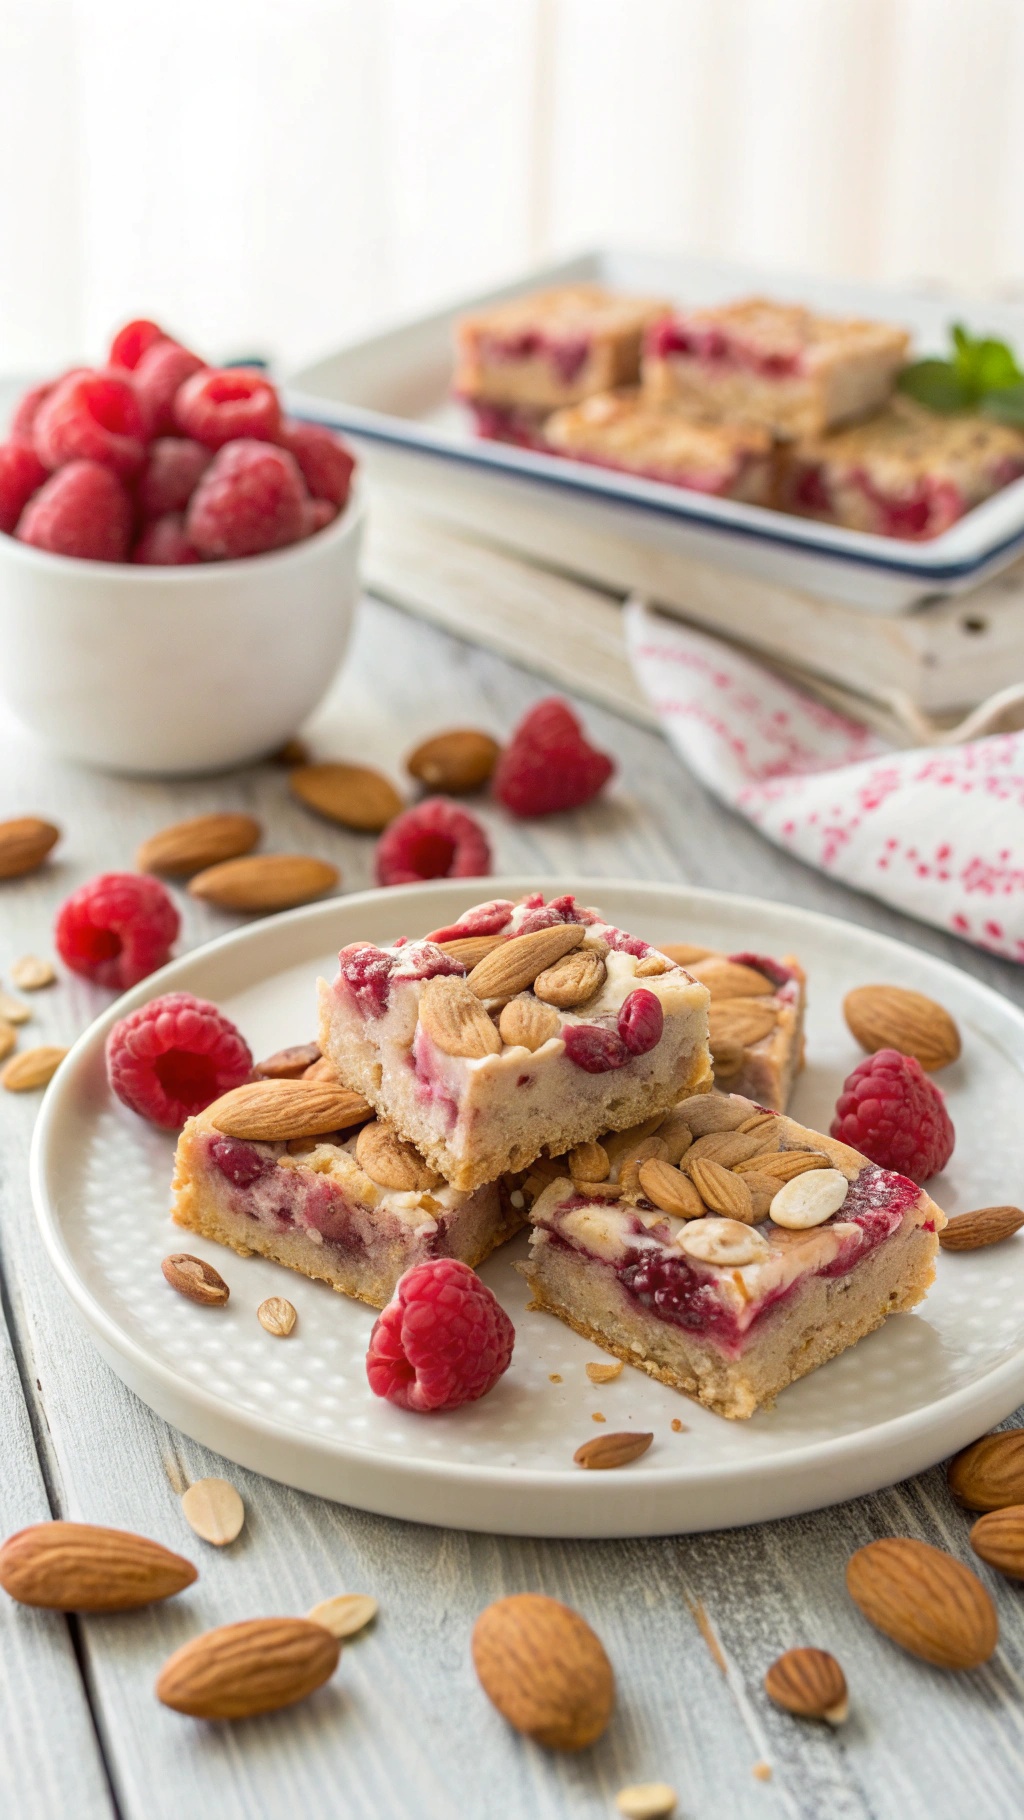
Raspberry Almond No-Bake Bars are the perfect treat for hot days when you want something sweet without turning on the oven. These bars combine the tartness of fresh raspberries with the crunch of almonds, creating a delightful balance of flavors and textures.

The image showcases these delicious bars, beautifully arranged on a plate, surrounded by scattered almonds and fresh raspberries. The vibrant colors make them look as good as they taste. You can almost feel the refreshing burst of raspberry with every bite!

Making these bars is simple and requires no baking. Just mix your ingredients, press them into a pan, and let them chill in the fridge. They’re great for a quick snack or a healthy dessert option.

Ingredients

  • 1 cup almond flour
  • 1/2 cup rolled oats
  • 1/4 cup honey or maple syrup
  • 1/2 cup almond butter
  • 1 cup fresh raspberries
  • 1/4 cup sliced almonds
  • 1 teaspoon vanilla extract
  • Pinch of salt

Instructions

  1. Prepare the Base: In a mixing bowl, combine almond flour, rolled oats, honey, almond butter, vanilla extract, and salt. Mix until well combined.
  2. Add Raspberries: Gently fold in the fresh raspberries, being careful not to mash them too much.
  3. Press into Pan: Line an 8x8 inch baking dish with parchment paper. Press the mixture evenly into the bottom of the dish.
  4. Add Toppings: Sprinkle sliced almonds on top, pressing them in slightly.
  5. Chill: Place the dish in the fridge for at least 2 hours to set.
  6. Slice and Serve: Once set, remove from the dish, slice into bars, and enjoy!


GET 8-WEEKS OF WORKOUTS TO LOSE INCHES


Fruit And Yogurt Parfaits For A Healthy Breakfast Option

Colorful fruit and yogurt parfaits in clear glasses with layers of yogurt, berries, and granola.

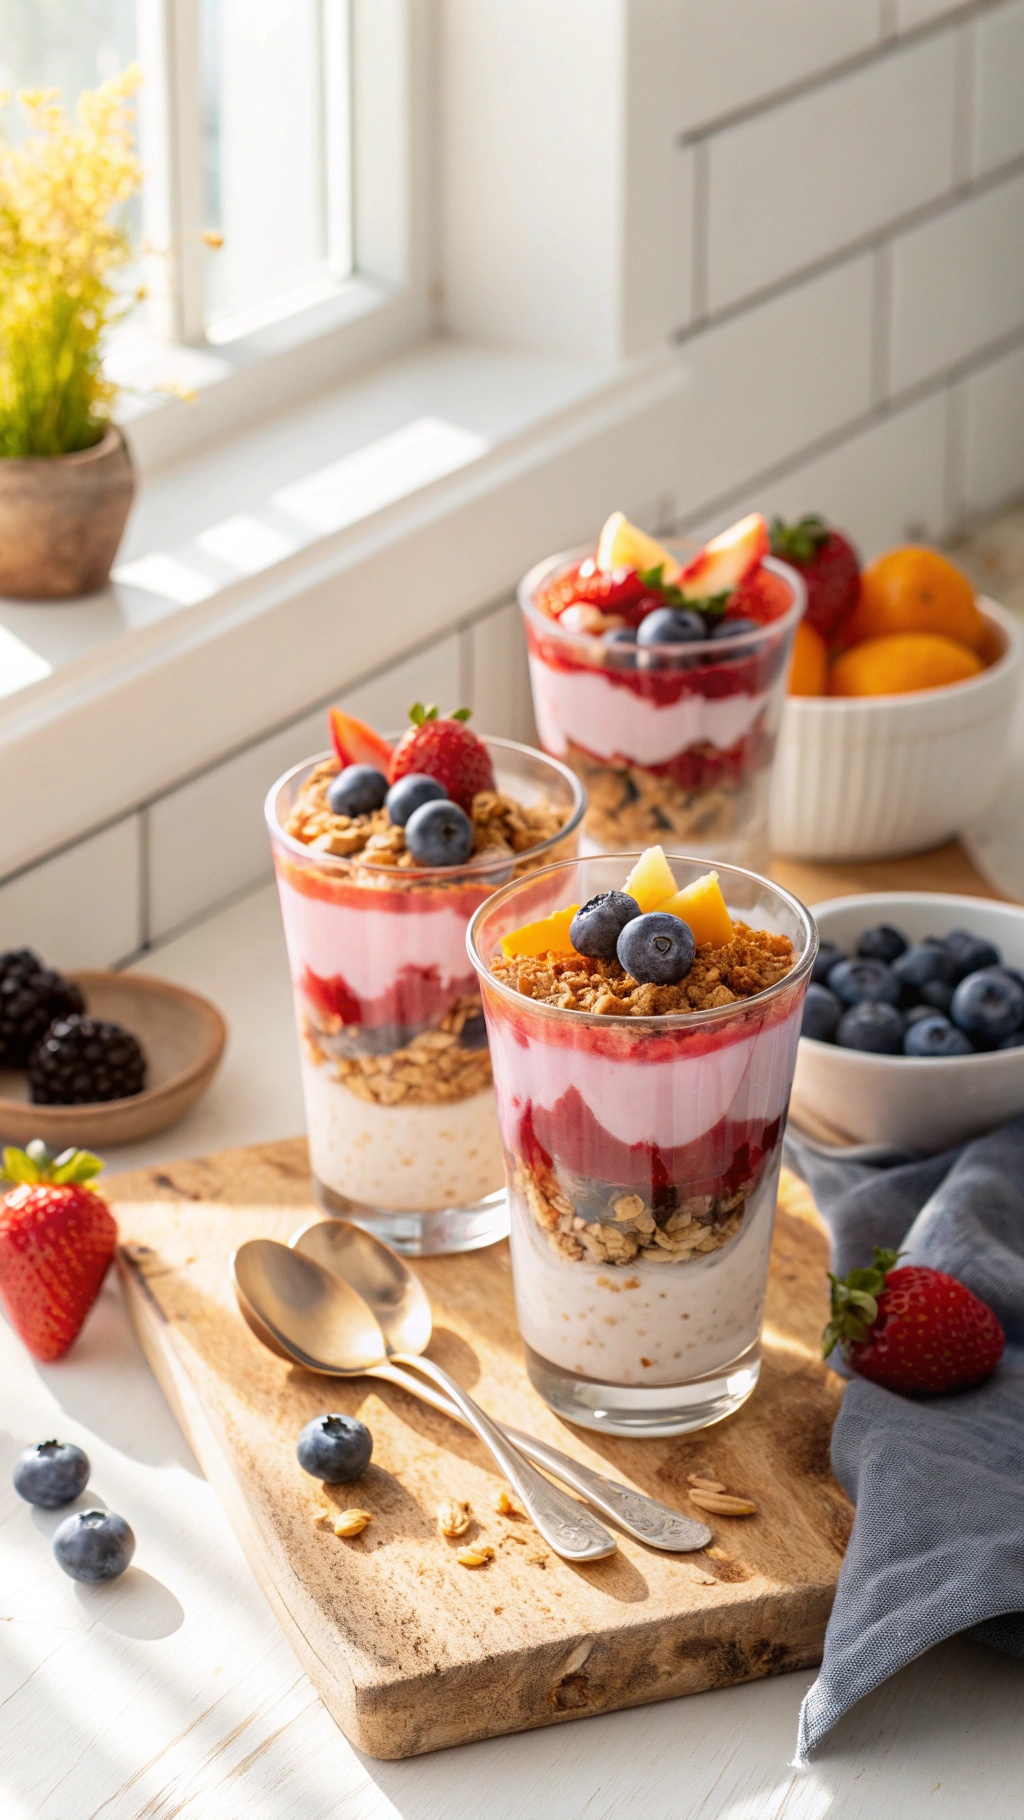
Fruit and yogurt parfaits are a fantastic choice for a healthy breakfast, especially when the weather is warm. These colorful layers of yogurt, fresh fruit, and crunchy granola are not only visually appealing but also packed with nutrients. You can customize them with your favorite fruits and toppings, making them a versatile option for everyone.

The image shows beautifully arranged parfaits in clear glasses, showcasing layers of creamy yogurt, vibrant berries, and crunchy granola. The sunlight streaming in adds a warm touch, making these treats even more inviting. It's a perfect way to start your day with a burst of freshness!

To make your own fruit and yogurt parfaits, here’s a simple recipe:

Ingredients

  • 2 cups Greek yogurt
  • 1 cup mixed berries (strawberries, blueberries, raspberries)
  • 1 cup granola
  • 2 tablespoons honey or maple syrup (optional)
  • Mint leaves for garnish (optional)

Instructions

  1. In a glass or bowl, start with a layer of Greek yogurt at the bottom.
  2. Add a layer of mixed berries on top of the yogurt.
  3. Sprinkle a layer of granola over the berries.
  4. Repeat the layers until the glass is full, finishing with a layer of berries and a drizzle of honey or maple syrup if desired.
  5. Garnish with mint leaves for a refreshing touch.
  6. Serve immediately and enjoy your delicious and healthy breakfast!

No-Bake Peanut Butter Pie For A Rich Dessert

A slice of no-bake peanut butter pie topped with whipped cream and crushed peanuts, served on a decorative plate.

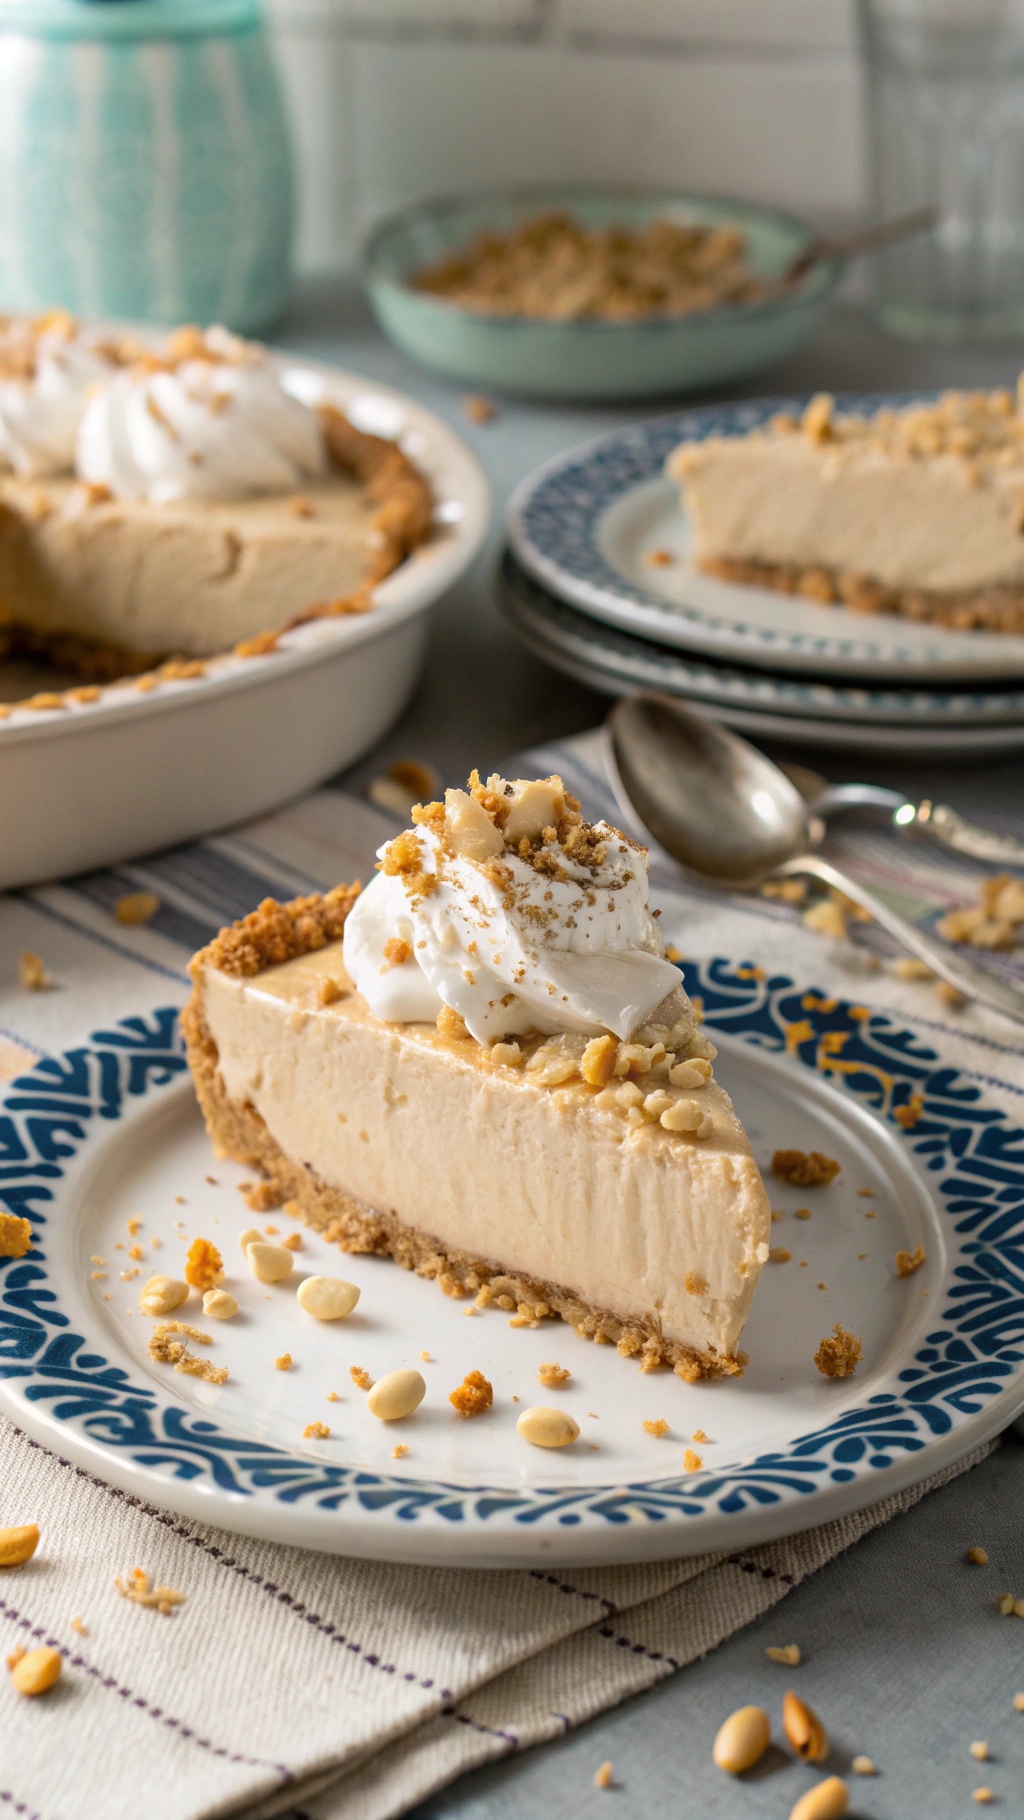
When the heat is on, turning on the oven is the last thing you want to do. That’s where this no-bake peanut butter pie comes in! It’s creamy, rich, and oh-so-delicious. The image shows a slice of this delightful pie, topped with whipped cream and crushed peanuts, sitting on a decorative plate. The pie itself is nestled in a crumbly crust, making it a perfect treat for those hot summer days.

This dessert is not just easy to make; it’s also a crowd-pleaser. The combination of peanut butter and cream cheese creates a smooth texture that melts in your mouth. Plus, the crust adds a nice crunch that balances the creaminess perfectly. Serve it at your next gathering, and watch it disappear!

Ingredients

  • 1 1/2 cups graham cracker crumbs
  • 1/2 cup unsalted butter, melted
  • 1 cup creamy peanut butter
  • 1 cup powdered sugar
  • 8 oz cream cheese, softened
  • 1 cup whipped cream
  • 1/4 cup crushed peanuts (for topping)
  • Whipped cream (for garnish)

Instructions

  1. Make the Crust: In a bowl, combine graham cracker crumbs and melted butter. Mix until well combined. Press the mixture into the bottom of a pie dish to form the crust.
  2. Prepare the Filling: In another bowl, beat together the peanut butter, powdered sugar, and softened cream cheese until smooth. Fold in the whipped cream gently until fully incorporated.
  3. Assemble the Pie: Pour the peanut butter filling into the prepared crust. Smooth the top with a spatula.
  4. Chill: Place the pie in the refrigerator for at least 4 hours or until set.
  5. Serve: Before serving, top with whipped cream and crushed peanuts for added texture. Slice and enjoy!

Chocolate Covered Strawberries For A Classic Treat

A platter of chocolate covered strawberries elegantly arranged with candles in the background.

Chocolate covered strawberries are a timeless favorite that never goes out of style. They are simple to make and perfect for any occasion, whether it's a romantic dinner or a summer gathering. The combination of juicy strawberries and rich chocolate creates a delightful treat that’s hard to resist.

In the image, you can see a beautiful platter of chocolate covered strawberries, elegantly arranged. The glossy chocolate coating glistens under the soft candlelight, making them look even more inviting. This dessert not only tastes great but also adds a touch of sophistication to any table setting.

Making chocolate covered strawberries is a breeze. You just need a few ingredients and some quick steps. They are a fantastic way to satisfy your sweet tooth without turning on the oven, especially when the weather is hot!

Ingredients

  • 1 pound fresh strawberries
  • 8 ounces dark chocolate (or milk chocolate, if you prefer)
  • 1 tablespoon coconut oil (optional, for a smoother melt)
  • Sprinkles or chopped nuts (optional, for decoration)

Instructions

  1. Wash the strawberries and dry them thoroughly with a paper towel. Make sure they are completely dry for the chocolate to stick.
  2. In a microwave-safe bowl, combine the chocolate and coconut oil. Microwave in 30-second intervals, stirring in between, until melted and smooth.
  3. Dip each strawberry into the melted chocolate, covering about two-thirds of the berry. Allow any excess chocolate to drip off.
  4. If desired, sprinkle with toppings like sprinkles or chopped nuts before the chocolate sets.
  5. Place the dipped strawberries on a parchment-lined baking sheet and refrigerate for about 30 minutes, or until the chocolate hardens.

Enjoy your delicious chocolate covered strawberries as a refreshing treat!

Healthy Fruit Skewers For A Colorful Snack

Colorful fruit skewers with watermelon, pineapple, honeydew, grapes, and kiwi on a plate.

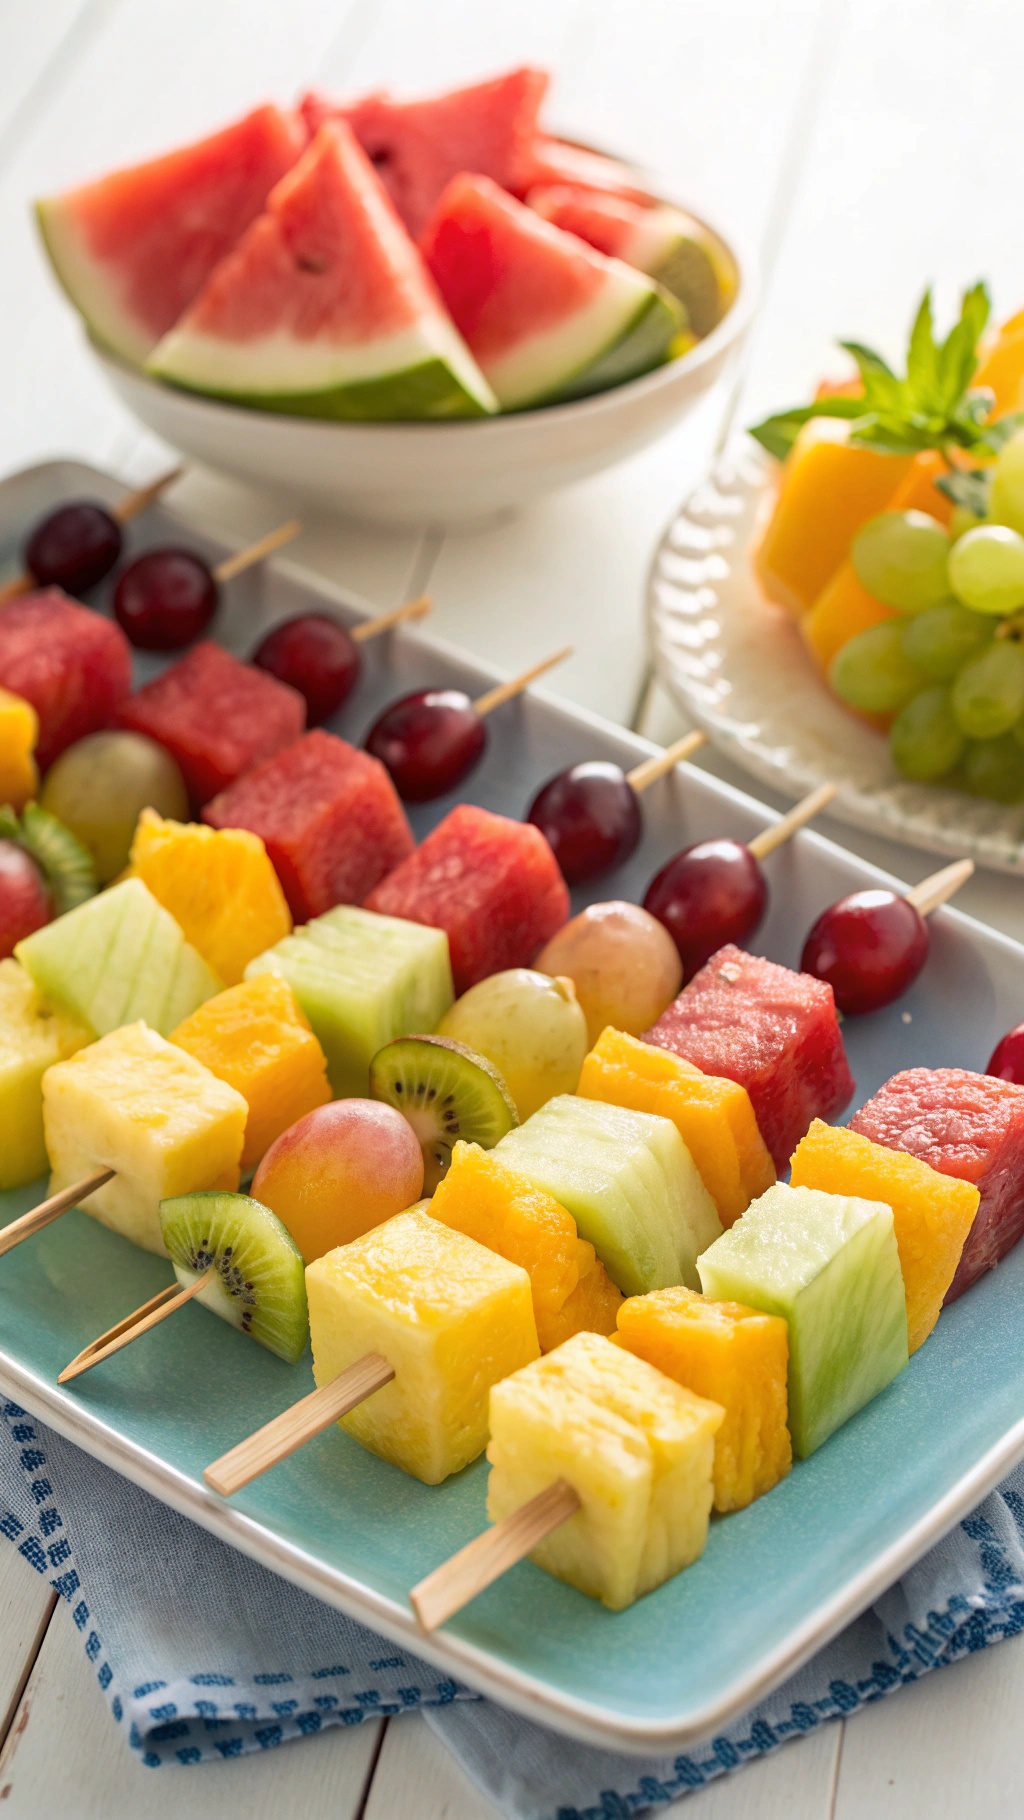
When the heat is on, nothing beats a refreshing snack like fruit skewers. These vibrant treats are not only easy to make but also packed with nutrients. You can mix and match your favorite fruits to create a colorful display that’s sure to impress.

Start with a variety of fruits such as juicy watermelon, sweet pineapple, and tangy kiwi. The bright colors make these skewers visually appealing, and they’re perfect for parties or a fun afternoon snack. Plus, they’re a great way to get kids involved in the kitchen!

Simply chop the fruits into bite-sized pieces, and thread them onto skewers. You can alternate colors and shapes for a fun twist. Serve them chilled for an extra refreshing bite. These skewers are not just tasty; they’re also a healthy option that satisfies your sweet tooth without any added sugars.

Ingredients

  • 1 cup watermelon, cubed
  • 1 cup pineapple, cubed
  • 1 cup honeydew melon, cubed
  • 1 cup grapes
  • 1 cup kiwi, sliced
  • Wooden skewers

Instructions

  1. Prepare the Fruits: Wash and cut the watermelon, pineapple, honeydew, and kiwi into bite-sized pieces. Rinse the grapes.
  2. Assemble the Skewers: Take a wooden skewer and start threading the fruits in any order you like. Alternate colors for a fun look.
  3. Chill and Serve: Once all the skewers are assembled, place them in the fridge for about 30 minutes. Serve chilled for a refreshing snack!

Yummy Trail Mix Bars For An On-The-Go Snack

A stack of trail mix bars on a picnic blanket surrounded by nuts and a bowl of granola.

When the heat is on, no-bake treats are a lifesaver. These trail mix bars are perfect for busy days when you need a quick snack. Packed with nuts, seeds, and dried fruits, they offer a delightful crunch and a burst of flavor. Plus, they’re super easy to make!

In the image, you can see a stack of golden-brown trail mix bars sitting on a picnic blanket. They look inviting, surrounded by a variety of nuts and a small bowl of granola. The setting is perfect for enjoying a healthy snack outdoors, making it a great choice for a picnic or a day at the park.

These bars are not only tasty but also provide a good source of energy. They’re great for kids and adults alike, making them a fantastic option for lunchboxes or post-workout fuel. Let’s get to the recipe so you can whip these up in no time!

Ingredients

  • 2 cups rolled oats
  • 1 cup mixed nuts (almonds, walnuts, cashews, etc.) chopped
  • 1/2 cup seeds (pumpkin seeds, sunflower seeds, etc.)
  • 1/2 cup dried fruit (raisins, cranberries, apricots, etc.) chopped
  • 1/2 cup nut butter (peanut butter, almond butter, etc.)
  • 1/3 cup honey or maple syrup
  • 1 teaspoon vanilla extract
  • 1/2 teaspoon salt

Instructions

  1. Prepare the Pan: Line an 8x8 inch baking dish with parchment paper, leaving some overhang for easy removal.
  2. Mix Dry Ingredients: In a large bowl, combine the rolled oats, chopped nuts, seeds, dried fruit, and salt.
  3. Combine Wet Ingredients: In a separate bowl, mix the nut butter, honey, and vanilla extract until smooth.
  4. Combine Mixtures: Pour the wet mixture over the dry ingredients and stir until everything is well coated and combined.
  5. Press into Pan: Transfer the mixture to the prepared baking dish and press it down firmly with a spatula or your hands to create an even layer.
  6. Chill: Refrigerate the bars for at least 2 hours to set, then lift them out using the parchment paper and cut into squares or rectangles.
  7. Store: Keep the bars in an airtight container in the refrigerator for up to a week.

Cinnamon Apple Nachos For A Creative Dessert

A plate of cinnamon apple nachos topped with caramel, granola, chocolate chips, and nuts.

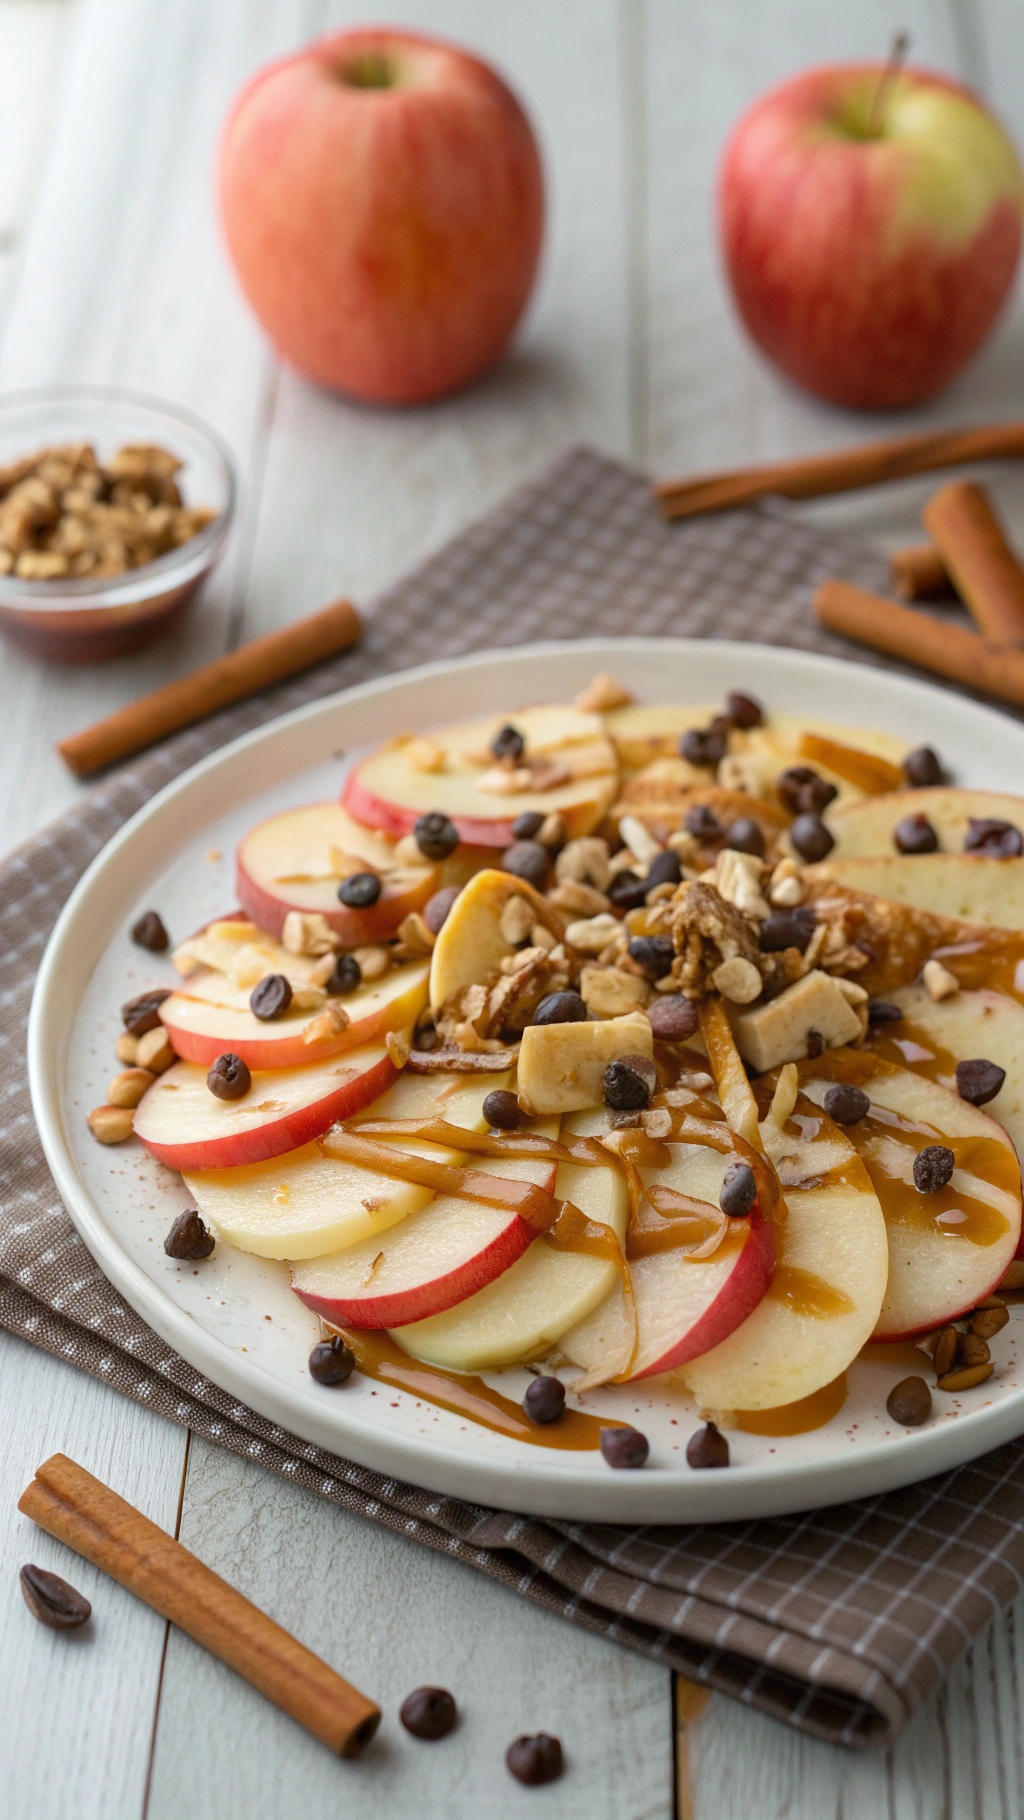
Cinnamon apple nachos are a fun twist on a classic dessert. This dish combines the sweetness of apples with a variety of toppings, making it a perfect treat for hot days. The vibrant colors of the apples, drizzled with caramel and sprinkled with nuts, create a visually appealing dessert that’s easy to make.

Start by slicing fresh apples into thin rounds. Arrange them on a plate, overlapping slightly for a beautiful presentation. Drizzle with caramel sauce and sprinkle with your choice of toppings like granola, chocolate chips, or nuts. The cinnamon adds a warm flavor that ties everything together.

This dessert is not only tasty but also healthy. Apples are packed with fiber and vitamins, making this a guilt-free option. Plus, you can customize it with your favorite toppings to suit your taste.

Ingredients

  • 2 large apples (any variety)
  • 1/4 cup caramel sauce
  • 1/4 cup granola
  • 1/4 cup chocolate chips
  • 1/4 cup chopped nuts (like walnuts or almonds)
  • 1 teaspoon ground cinnamon

Instructions

  1. Slice the apples into thin rounds and arrange them on a plate.
  2. Drizzle the caramel sauce evenly over the apple slices.
  3. Sprinkle granola, chocolate chips, and chopped nuts on top.
  4. Finish with a light dusting of ground cinnamon.
  5. Serve immediately and enjoy your delicious cinnamon apple nachos!

Creamy Fruit Popsicles For A Chill Treat

Colorful creamy fruit popsicles on a wooden board with fresh fruits in the background

When the heat is on, nothing beats a refreshing popsicle. These creamy fruit popsicles are not just easy to make, but they also pack a punch of flavor and nutrition. With vibrant layers of fruit, they look as good as they taste. Imagine biting into a cold treat that bursts with the sweetness of strawberries, oranges, and kiwis. Perfect for cooling down on a hot summer day!

Making these popsicles is a breeze. You can use fresh or frozen fruits, and the creamy base can be made with yogurt or coconut milk. Layering different fruit purees creates a beautiful visual effect and allows you to enjoy a variety of flavors in each bite. Plus, they’re a fun activity to make with kids!

Here’s how to whip up these delightful popsicles:

Ingredients

  • 1 cup strawberries, hulled
  • 1 cup orange juice
  • 1 cup yogurt (plain or flavored)
  • 1 banana
  • 1 kiwi, peeled and sliced
  • 1 tablespoon honey or maple syrup (optional)

Instructions

  1. Blend the strawberries until smooth. If you want it sweeter, add honey or maple syrup.
  2. In a separate bowl, mix the yogurt and banana until creamy.
  3. Pour a layer of strawberry puree into popsicle molds and freeze for about 30 minutes.
  4. Next, add a layer of the yogurt-banana mixture and freeze for another 30 minutes.
  5. Finally, pour in the orange juice and freeze until solid, about 4-6 hours.
  6. To remove the popsicles, run warm water over the outside of the molds for a few seconds.

Enjoy your homemade creamy fruit popsicles! They’re a perfect way to stay cool and treat yourself to something healthy.


Struggling to Stay on Track with Your Eating?

You’re not alone. One of the biggest obstacles I see people face is not knowing what to eat. Between busy schedules, endless diet advice online, and trying to cook healthy meals that actually taste good—it’s easy to feel stuck or overwhelmed.

That’s why I created my 21 Quick & Easy Custom Low-Calorie Meal Plans Program. These plans are built specifically for you—your goals, your lifestyle, and your food preferences. You won’t find any cookie-cutter diets here. Just real, satisfying meals that help you stay full, energized, and on track without the stress.

No more guessing.
No more skipping meals or eating diet food you hate.
Just a clear, doable plan that fits your life.

👉 Ready to eat better, feel better, and finally make progress? [Click here to get your custom meal plans today.]


Not Seeing the Inches Drop No Matter What You Do?

If you’re working out but still not seeing the results in the mirror, I hear you. So many people come to me after months of doing cardio or random workouts—and still struggling to lose inches or tone up. The truth is, your body needs more than just movement. It needs a proven strategy.

My 8-Week Workout Program to Lose Inches is designed to do just that—burn fat, tighten up, and give you visible results. These workouts are fun, effective, and designed for real people with real lives. Whether you’re getting back into fitness or ready to take it to the next level, this program gives you a clear path to success.

Just 8 weeks to build strength, confidence, and a fitter shape.
No endless cardio.
No gym required (unless you want it).

👉 If you're ready to drop inches and feel amazing in your own skin, [click here to start the 8-Week Workout Program].


Comments