13 Delicious No-Oven Thanksgiving Appetizers for Busy Kitchens


13 Delicious No-Oven Thanksgiving Appetizers for Busy Kitchens

This Thanksgiving, skip the oven and still impress your guests with a variety of tasty appetizers that come together in no time. From fresh dips to simple finger foods, these crowd-pleasers are perfect for busy kitchens. Get ready to enjoy easy, delicious bites that keep the holiday spirit alive without the stress of cooking in the oven.

Savory Spinach And Feta Puff Pastry Bites

Savory spinach and feta puff pastry bites on a wooden platter with herbs and candles

These savory spinach and feta puff pastry bites are perfect for a busy Thanksgiving kitchen. They are easy to make and require no oven time, allowing you to focus on the main dishes. The golden, flaky pastry is filled with a creamy mixture of spinach and feta, making them a delightful appetizer.

Picture a wooden platter adorned with these delicious bites, surrounded by fresh herbs and candles. The warm glow from the candles adds a cozy touch, perfect for the holiday spirit. Each bite is not only visually appealing but also packed with flavor, making them a hit at any gathering.

Ingredients

  • 1 sheet of puff pastry, thawed
  • 1 cup fresh spinach, chopped
  • 1/2 cup feta cheese, crumbled
  • 1/4 cup cream cheese, softened
  • 1 egg, beaten (for egg wash)
  • Salt and pepper to taste
  • Fresh herbs (like dill or parsley) for garnish

Instructions

  1. Preheat your oven to 400°F (200°C).
  2. Roll out the puff pastry on a floured surface and cut it into small squares.
  3. In a bowl, mix the chopped spinach, feta, cream cheese, salt, and pepper until well combined.
  4. Place a spoonful of the spinach mixture in the center of each pastry square.
  5. Fold the corners of the pastry over the filling to create a pocket and seal them well.
  6. Brush the tops with the beaten egg for a golden finish.
  7. Place the bites on a baking sheet lined with parchment paper and bake for 15-20 minutes or until golden brown.
  8. Garnish with fresh herbs before serving.

Crispy Parmesan Roasted Chickpeas

A bowl of crispy Parmesan roasted chickpeas garnished with cheese, surrounded by autumn leaves and festive decor.

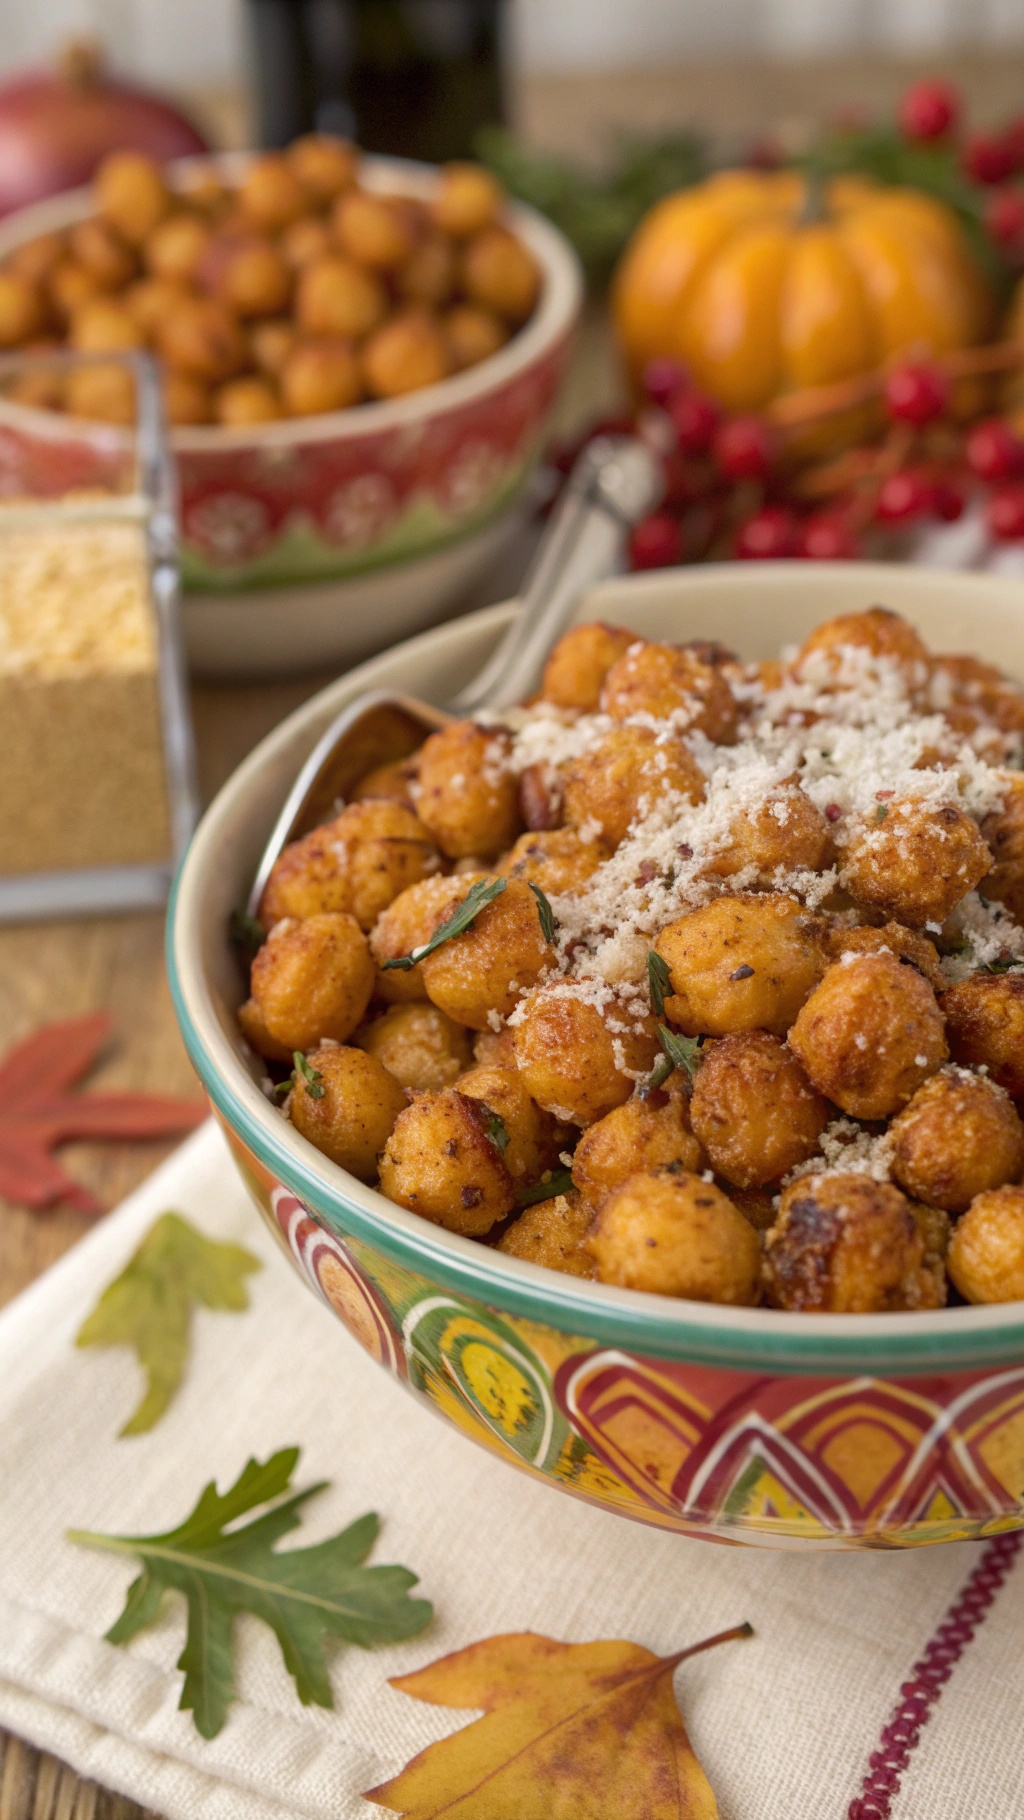
Crispy Parmesan roasted chickpeas are a fantastic addition to your Thanksgiving spread. These little bites are packed with flavor and crunch, making them a perfect appetizer for busy kitchens. With their golden-brown exterior and cheesy goodness, they are sure to impress your guests.

Making these chickpeas is simple and quick. You can whip them up while you prepare other dishes, and they require no oven time, which is a bonus during the holiday rush. Just toss canned chickpeas with some seasonings, pop them in the air fryer or on a stovetop, and you’re good to go!

These crispy treats are not only delicious but also healthy. Chickpeas are a great source of protein and fiber, making them a guilt-free snack. Plus, the Parmesan adds a savory touch that elevates the dish.

Ingredients

  • 1 can (15 oz) chickpeas, drained and rinsed
  • 2 tablespoons olive oil
  • 1/2 teaspoon garlic powder
  • 1/2 teaspoon onion powder
  • 1/2 teaspoon smoked paprika
  • Salt and pepper to taste
  • 1/4 cup grated Parmesan cheese

Instructions

  1. Prepare the Chickpeas: After draining and rinsing the chickpeas, pat them dry with a paper towel. This helps them get crispy.
  2. Toss with Oil and Spices: In a bowl, combine chickpeas, olive oil, garlic powder, onion powder, smoked paprika, salt, and pepper. Mix well to coat the chickpeas evenly.
  3. Cook: If using an air fryer, cook at 400°F (200°C) for about 15-20 minutes, shaking the basket halfway through. If using a stovetop, heat a non-stick skillet over medium heat and cook for about 10-15 minutes, stirring occasionally.
  4. Add Parmesan: Once the chickpeas are crispy, remove them from heat and sprinkle with grated Parmesan cheese. Toss to coat.
  5. Serve: Enjoy these crispy Parmesan roasted chickpeas warm or at room temperature. They make a great snack or appetizer for your Thanksgiving gathering!


GET 21 QUICK & EASY LOW-CALORIE MEAL PLANS


Refreshing Caprese Skewers With Balsamic Glaze

Caprese skewers with cherry tomatoes, mozzarella balls, and basil drizzled with balsamic glaze on a serving platter.

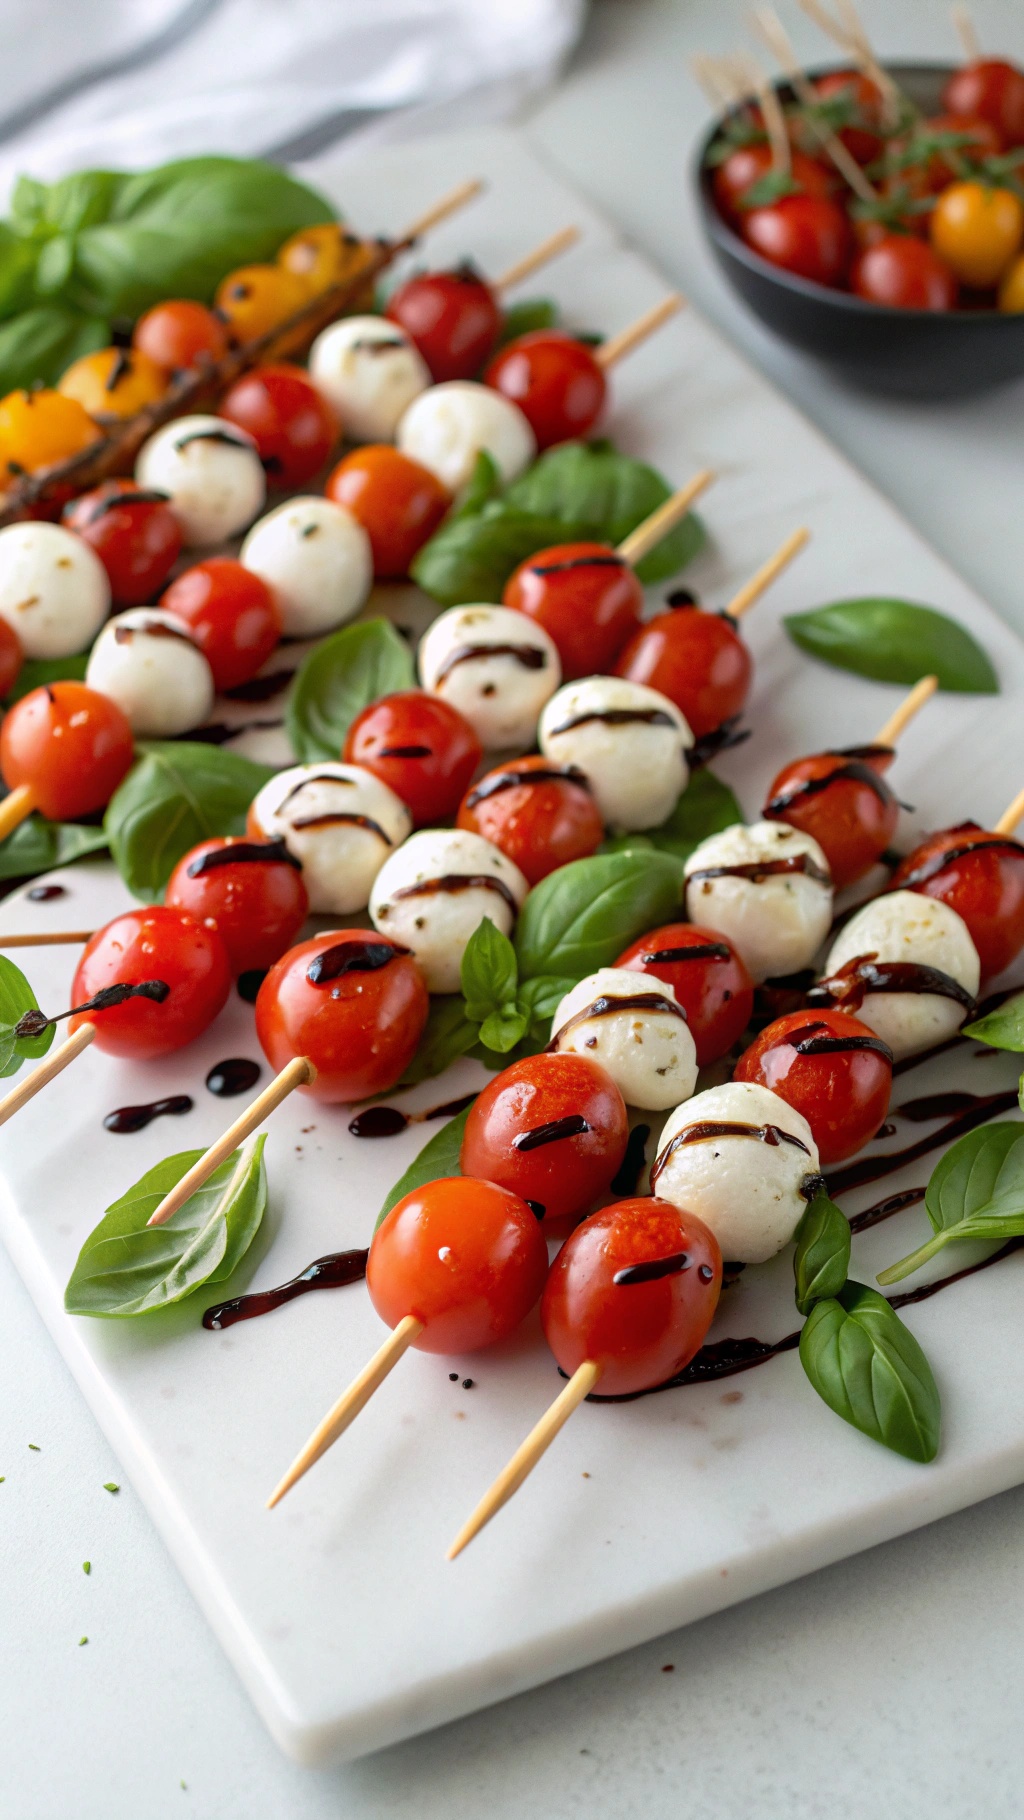
Caprese skewers are a delightful and easy appetizer that brings a burst of freshness to your Thanksgiving table. These skewers combine juicy cherry tomatoes, creamy mozzarella balls, and fragrant basil leaves, all drizzled with a rich balsamic glaze. They are not only visually appealing but also incredibly simple to prepare, making them perfect for busy kitchens.

The vibrant colors of the tomatoes and basil create a festive look, while the balsamic glaze adds a sweet and tangy kick. These skewers can be made ahead of time, allowing you to focus on other dishes as your guests arrive. Plus, they are a great finger food option, making them easy to enjoy while mingling.

To make these refreshing Caprese skewers, gather your ingredients and follow the simple steps below. They are sure to be a hit at your Thanksgiving gathering!

Ingredients

  • 1 pint cherry tomatoes (red and yellow)
  • 8 oz fresh mozzarella balls
  • 1 bunch fresh basil leaves
  • 1/2 cup balsamic glaze
  • Salt and pepper to taste
  • Skewers (6-inch or 8-inch)

Instructions

  1. Prepare the Skewers: Start by threading a cherry tomato onto a skewer, followed by a basil leaf, and then a mozzarella ball. Repeat this pattern until the skewer is filled, leaving some space at the ends for easy handling.
  2. Season: Once all the skewers are assembled, drizzle them with balsamic glaze. Sprinkle with a pinch of salt and pepper to enhance the flavors.
  3. Serve: Arrange the skewers on a platter and garnish with extra basil leaves. Serve immediately or refrigerate until ready to enjoy.

Zesty Avocado And Shrimp Cocktail

A refreshing avocado and shrimp cocktail served in a glass, garnished with lime and cilantro.

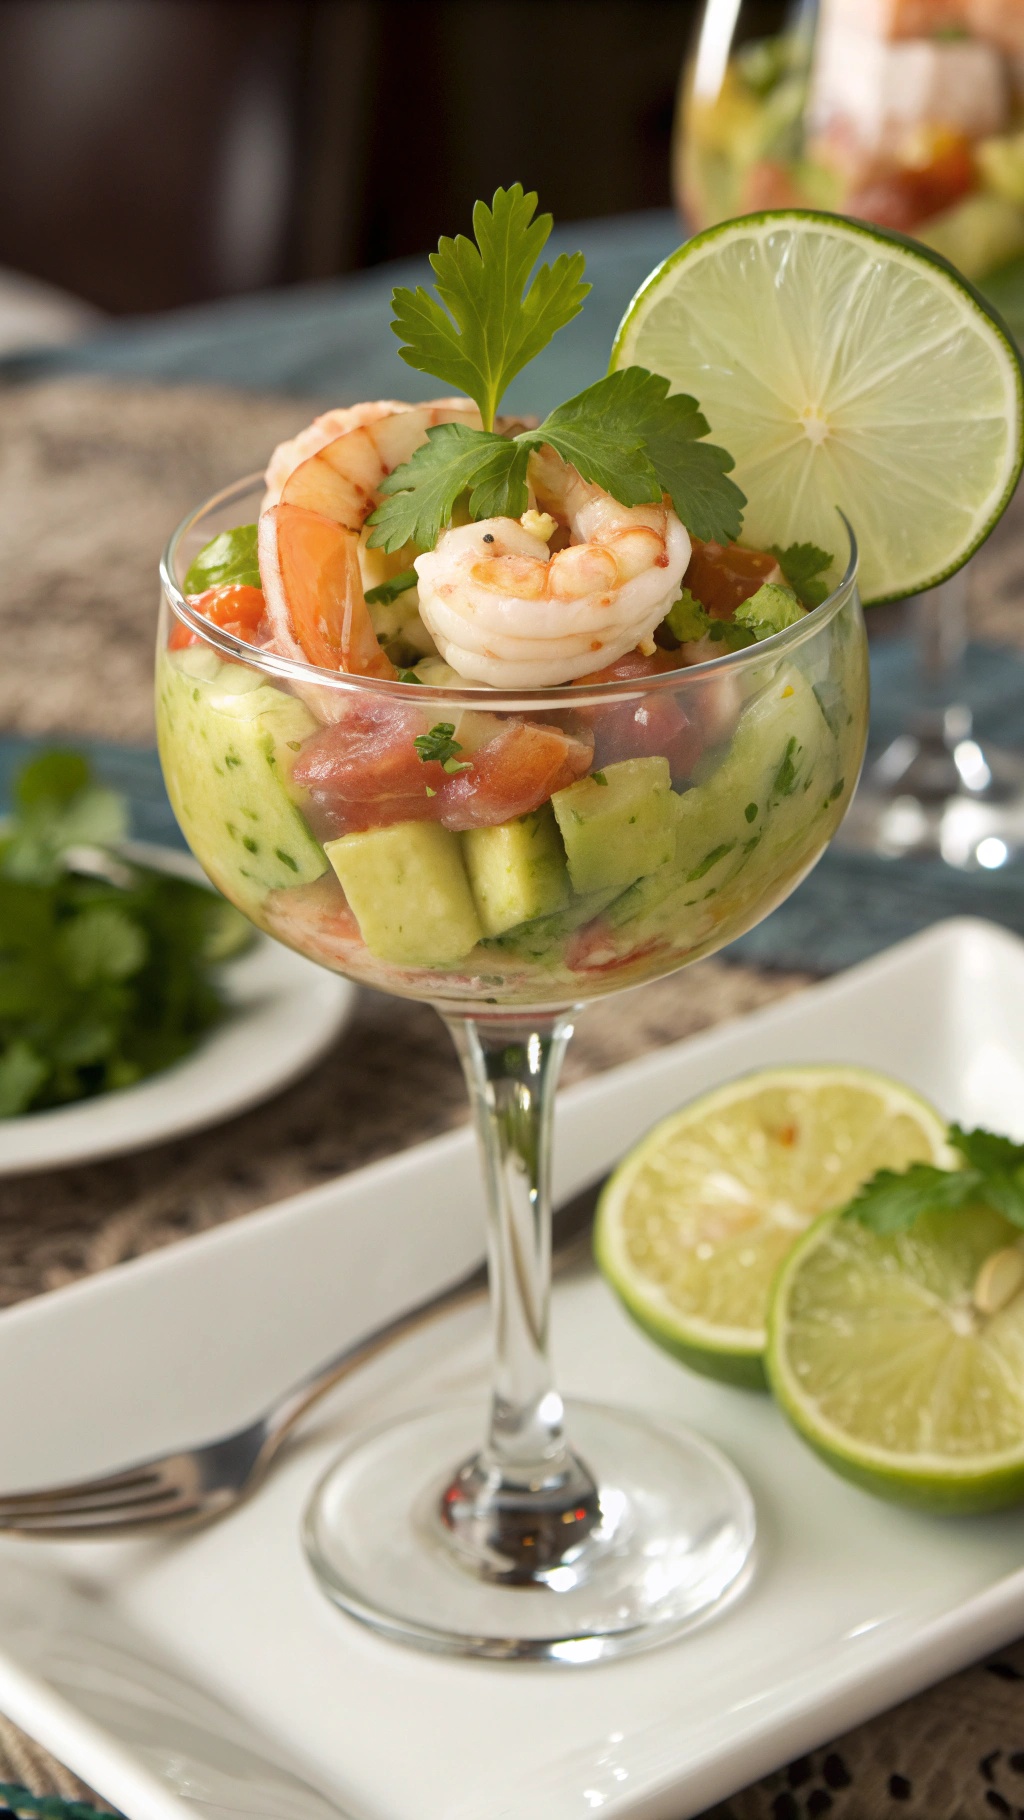
This zesty avocado and shrimp cocktail is a perfect no-oven appetizer for your Thanksgiving gathering. It’s light, refreshing, and packed with flavor, making it a delightful start to your meal. The bright colors of the shrimp, avocado, and tomatoes create an inviting presentation that will catch everyone’s eye.

To make this dish, you’ll need fresh shrimp, ripe avocados, juicy tomatoes, and a splash of lime juice. The combination of these ingredients brings a burst of freshness that complements the rich flavors of the shrimp. Plus, it’s super easy to prepare, which is a win for busy kitchens!

Simply mix everything together, and you’ll have a dish that’s not only tasty but also healthy. Serve it in individual cups or glasses for a fun touch. Your guests will love the vibrant flavors and the ease of enjoying this delicious appetizer.

Ingredients

  • 1 pound cooked shrimp, peeled and deveined
  • 2 ripe avocados, diced
  • 1 cup cherry tomatoes, halved
  • 1/4 cup red onion, finely chopped
  • 1/4 cup fresh cilantro, chopped
  • Juice of 2 limes
  • Salt and pepper to taste

Instructions

  1. In a large bowl, combine the shrimp, diced avocados, cherry tomatoes, red onion, and cilantro.
  2. Drizzle the lime juice over the mixture and gently toss to combine.
  3. Season with salt and pepper to taste.
  4. Serve immediately in individual cups or glasses, garnished with extra cilantro and lime wedges if desired.

Creamy Spinach Artichoke Dip With Tortilla Chips

Creamy spinach artichoke dip in a bowl surrounded by tortilla chips, set in a cozy living room with a fireplace.

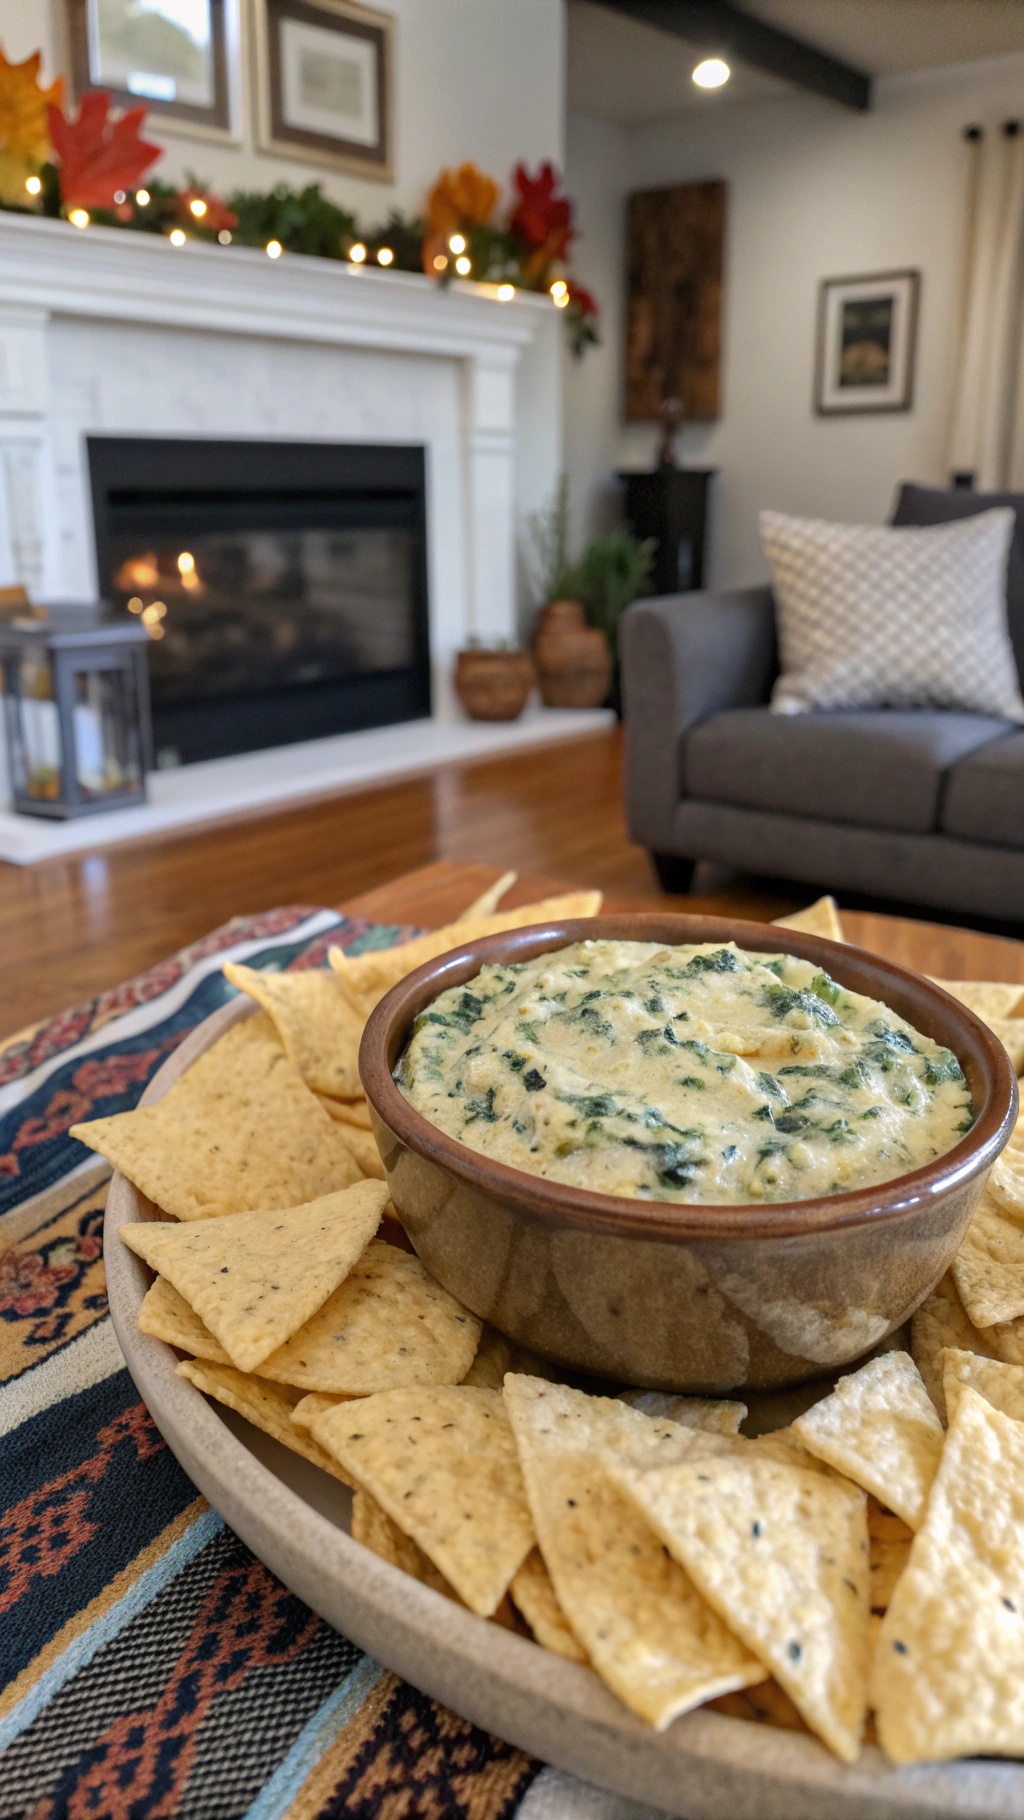
This creamy spinach artichoke dip is a perfect appetizer for your Thanksgiving gathering. It’s rich, cheesy, and pairs wonderfully with crunchy tortilla chips. The warm, inviting dip sits in a rustic bowl, surrounded by a generous portion of crispy chips, making it easy for guests to dig in. The cozy setting, complete with a softly glowing fireplace in the background, adds to the charm, creating an inviting atmosphere for everyone to enjoy.

Making this dip is simple and quick, so you can focus on other dishes or enjoy time with family. Just mix your ingredients, bake until bubbly, and serve with those tortilla chips. It’s a crowd-pleaser that everyone will love!

Ingredients

  • 1 cup frozen spinach, thawed and drained
  • 1 can (14 oz) artichoke hearts, drained and chopped
  • 1 cup cream cheese, softened
  • 1/2 cup sour cream
  • 1/2 cup mayonnaise
  • 1 cup shredded mozzarella cheese
  • 1/2 cup grated Parmesan cheese
  • 1 teaspoon garlic powder
  • 1/2 teaspoon salt
  • 1/4 teaspoon black pepper
  • Tortilla chips for serving

Instructions

  1. Preheat your oven to 350°F (175°C).
  2. In a large bowl, combine the softened cream cheese, sour cream, and mayonnaise. Mix until smooth.
  3. Add the chopped spinach, artichoke hearts, mozzarella cheese, Parmesan cheese, garlic powder, salt, and pepper. Stir until well combined.
  4. Transfer the mixture to a baking dish and spread it evenly.
  5. Bake for 25-30 minutes, or until the dip is hot and bubbly.
  6. Serve warm with tortilla chips for dipping.

Sweet And Spicy Bacon-Wrapped Dates

A platter of sweet and spicy bacon-wrapped dates garnished with rosemary, set against a backdrop of autumn leaves and a pumpkin.

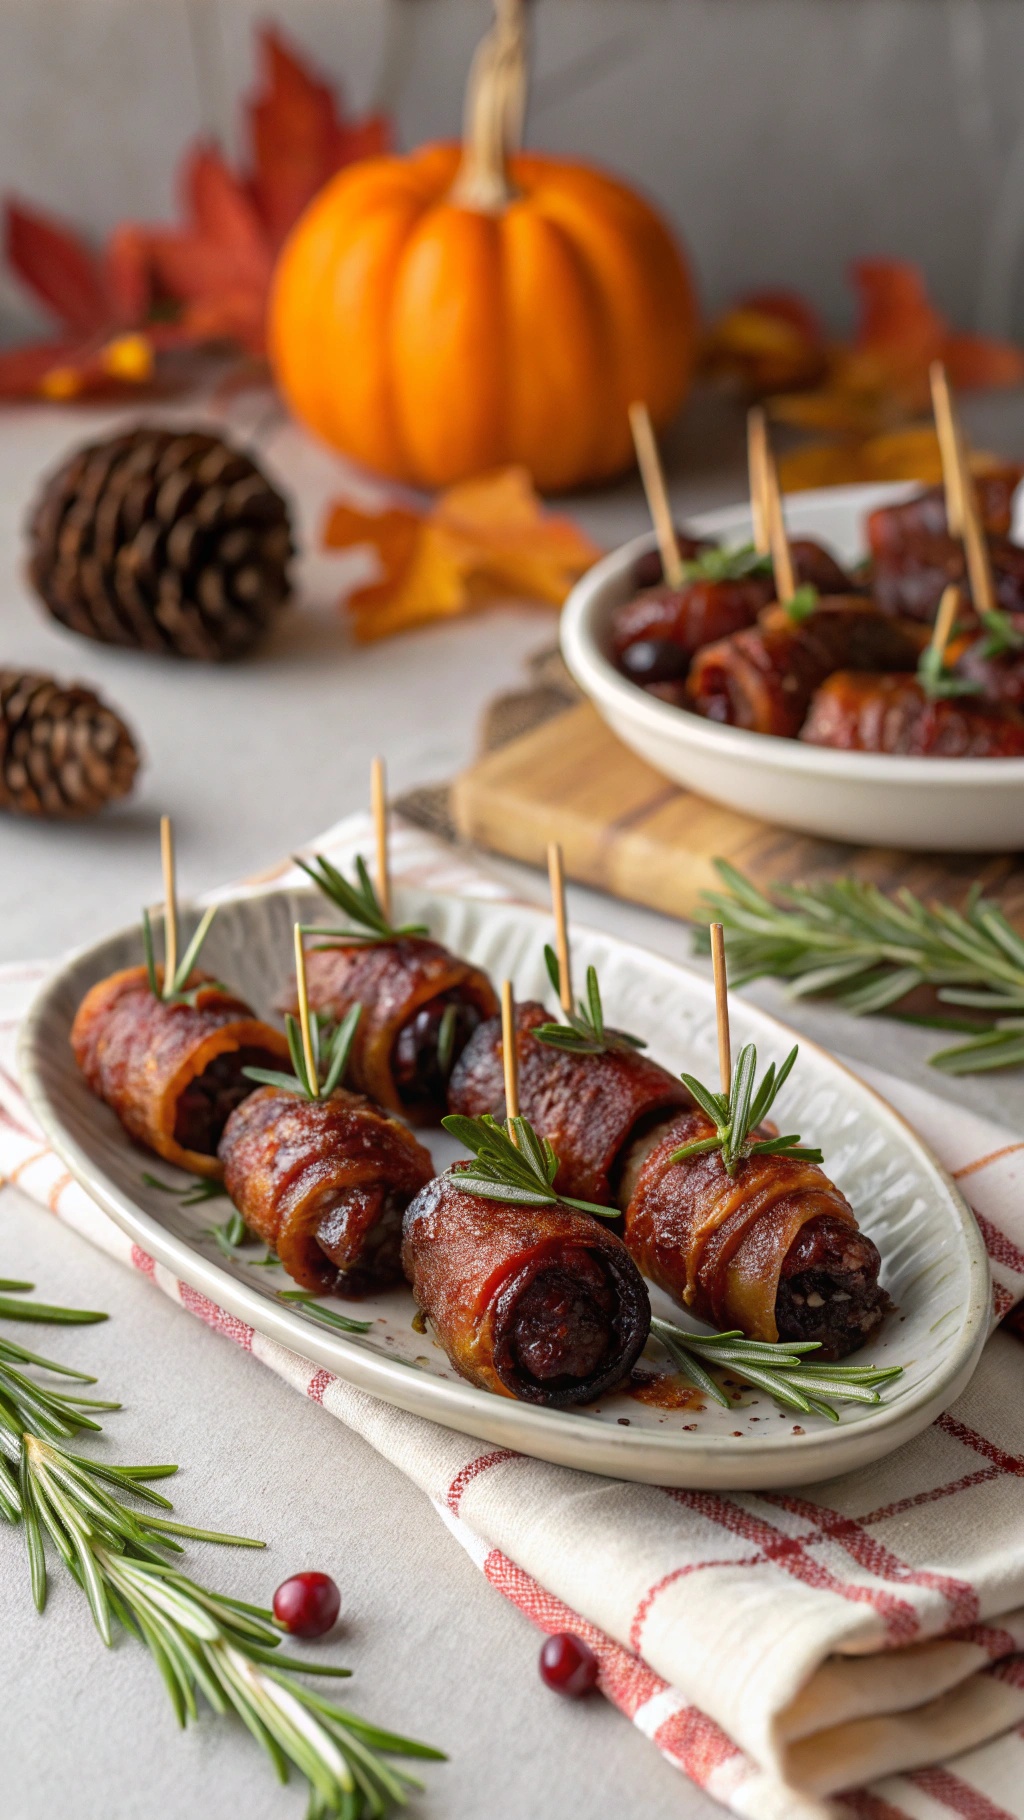
Sweet and spicy bacon-wrapped dates are a perfect appetizer for Thanksgiving gatherings. They combine the rich flavor of bacon with the sweetness of dates, creating a delightful bite that everyone will love. The image shows these tasty treats arranged beautifully on a platter, garnished with fresh rosemary for a pop of color. The warm autumn tones in the background, like the pumpkin and colorful leaves, set a cozy mood, making them ideal for a festive occasion.

These bites are not only delicious but also easy to prepare, making them a great choice for busy kitchens. You can whip them up quickly without needing an oven, allowing you to focus on other dishes. Plus, they can be made ahead of time and served warm or at room temperature.

Ingredients

  • 20 pitted dates
  • 10 slices of bacon, cut in half
  • 1/4 cup honey
  • 1 teaspoon cayenne pepper (adjust to taste)
  • Fresh rosemary sprigs for garnish
  • Toothpicks

Instructions

  1. Preheat your grill or stovetop grill pan over medium heat.
  2. In a small bowl, mix honey and cayenne pepper. Set aside.
  3. Wrap each date with half a slice of bacon, securing it with a toothpick.
  4. Brush the bacon-wrapped dates with the honey-cayenne mixture.
  5. Place the dates on the grill and cook for about 10-12 minutes, turning occasionally, until the bacon is crispy.
  6. Remove from the grill and let cool slightly. Garnish with fresh rosemary before serving.


GET 8-WEEKS OF WORKOUTS TO LOSE INCHES


Mini Stuffed Peppers With Cream Cheese And Herbs

Mini stuffed peppers filled with cream cheese and herbs on a white platter

Mini stuffed peppers are a colorful and tasty option for Thanksgiving appetizers. These little bites are not only easy to make, but they also add a pop of color to your table. The combination of cream cheese and fresh herbs creates a creamy filling that pairs perfectly with the sweet crunch of the peppers.

To prepare these delightful appetizers, start by selecting a mix of mini bell peppers in vibrant colors. Cut them in half and remove the seeds. Then, whip up a filling using cream cheese, your choice of herbs like chives or parsley, and a pinch of salt and pepper. Fill each pepper half with the creamy mixture and sprinkle some extra herbs on top for garnish.

These mini stuffed peppers can be made ahead of time, making them perfect for busy kitchens. Just pop them in the fridge until you're ready to serve. They are a hit with guests and can be enjoyed by everyone, making them a great addition to your Thanksgiving spread.

Ingredients

  • 12 mini bell peppers (red, yellow, green)
  • 8 oz cream cheese, softened
  • 1/4 cup fresh chives, chopped
  • 1/4 cup fresh parsley, chopped
  • 1/2 teaspoon garlic powder
  • Salt and pepper to taste
  • Olive oil (optional, for drizzling)

Instructions

  1. Prepare the Peppers: Preheat your oven to 350°F (175°C). Cut the mini bell peppers in half lengthwise and remove the seeds.
  2. Make the Filling: In a mixing bowl, combine the softened cream cheese, chopped chives, parsley, garlic powder, salt, and pepper. Mix until smooth and well combined.
  3. Stuff the Peppers: Using a spoon or a piping bag, fill each pepper half with the cream cheese mixture. Make sure to pack it in well.
  4. Arrange and Bake: Place the stuffed peppers on a baking sheet. If desired, drizzle with a little olive oil for extra flavor. Bake for about 15-20 minutes until the peppers are tender.
  5. Serve: Remove from the oven and let cool slightly before serving. Enjoy these tasty bites warm or at room temperature!

Savory Cheese And Charcuterie Board

A beautifully arranged cheese and charcuterie board with various cheeses, cured meats, nuts, and fruits, perfect for Thanksgiving appetizers.

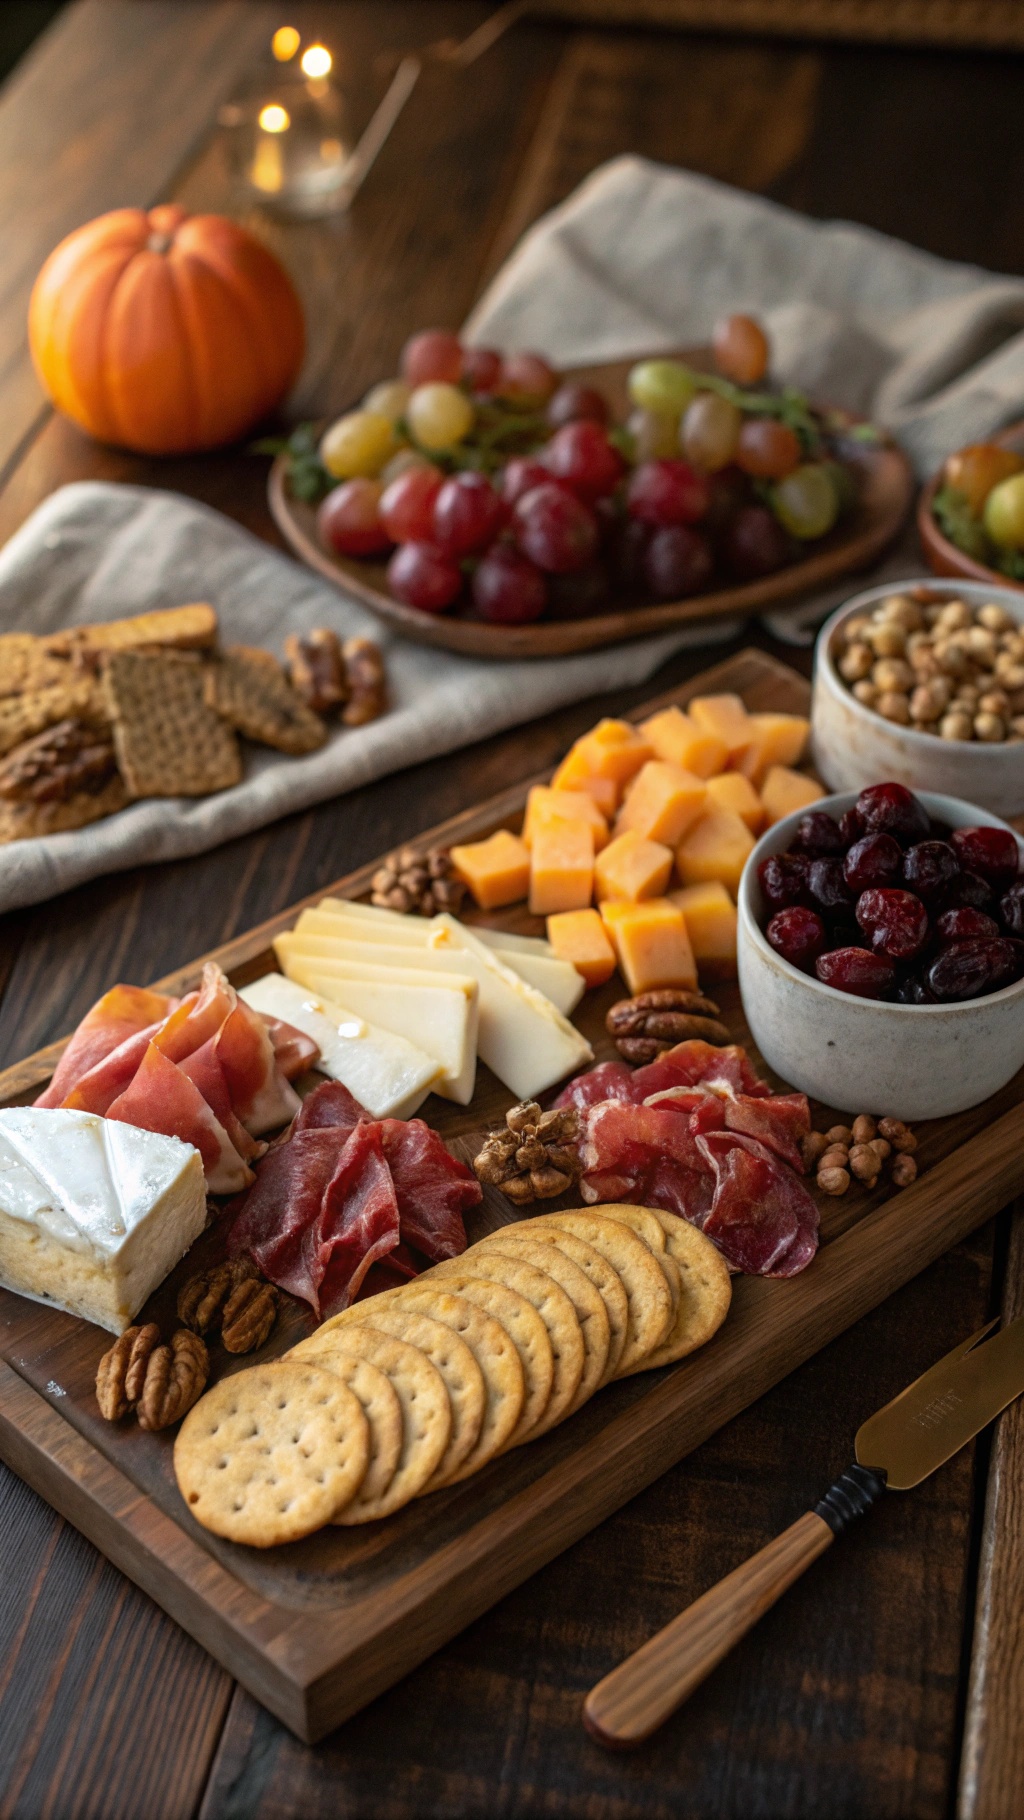
Creating a savory cheese and charcuterie board is a fantastic way to kick off your Thanksgiving gathering without turning on the oven. This spread is not only visually appealing but also offers a variety of flavors and textures that everyone will enjoy.

The image showcases a beautifully arranged board filled with an assortment of cheeses, cured meats, nuts, and fruits. You can see creamy brie, sharp cheddar, and delicate slices of prosciutto, all paired with crunchy crackers and sweet grapes. This combination makes for a delightful appetizer that’s easy to assemble and perfect for mingling.

To make your own cheese and charcuterie board, gather your favorite cheeses and meats. Add some nuts for crunch and fresh or dried fruits for sweetness. Don't forget to include a variety of crackers or bread to complement the flavors. This board is not just a treat for the taste buds; it also adds a festive touch to your table.

Ingredients

  • 1 wheel of brie cheese
  • 8 ounces sharp cheddar cheese, cubed
  • 4 ounces prosciutto, thinly sliced
  • 4 ounces salami, thinly sliced
  • 1 cup mixed nuts (walnuts, pecans, almonds)
  • 1 cup grapes (red and green)
  • 1 cup dried cranberries
  • 1 box of assorted crackers
  • 1 small pumpkin for decoration (optional)

Instructions

  1. Start by selecting a large wooden board or platter to arrange your ingredients.
  2. Place the wheel of brie cheese in one corner of the board.
  3. Arrange the cubed cheddar cheese next to the brie, creating a colorful contrast.
  4. Layer the prosciutto and salami in a fan shape for easy serving.
  5. Fill small bowls with mixed nuts and dried cranberries, placing them around the board.
  6. Add clusters of grapes for a fresh touch and a pop of color.
  7. Finally, fill in the gaps with an assortment of crackers, ensuring everything is easily accessible.
  8. For a festive look, you can add a small pumpkin or other seasonal decorations around the board.

Flavorful Hummus Trio With Fresh Veggies

A colorful platter featuring three types of hummus and fresh vegetables, perfect for Thanksgiving appetizers.

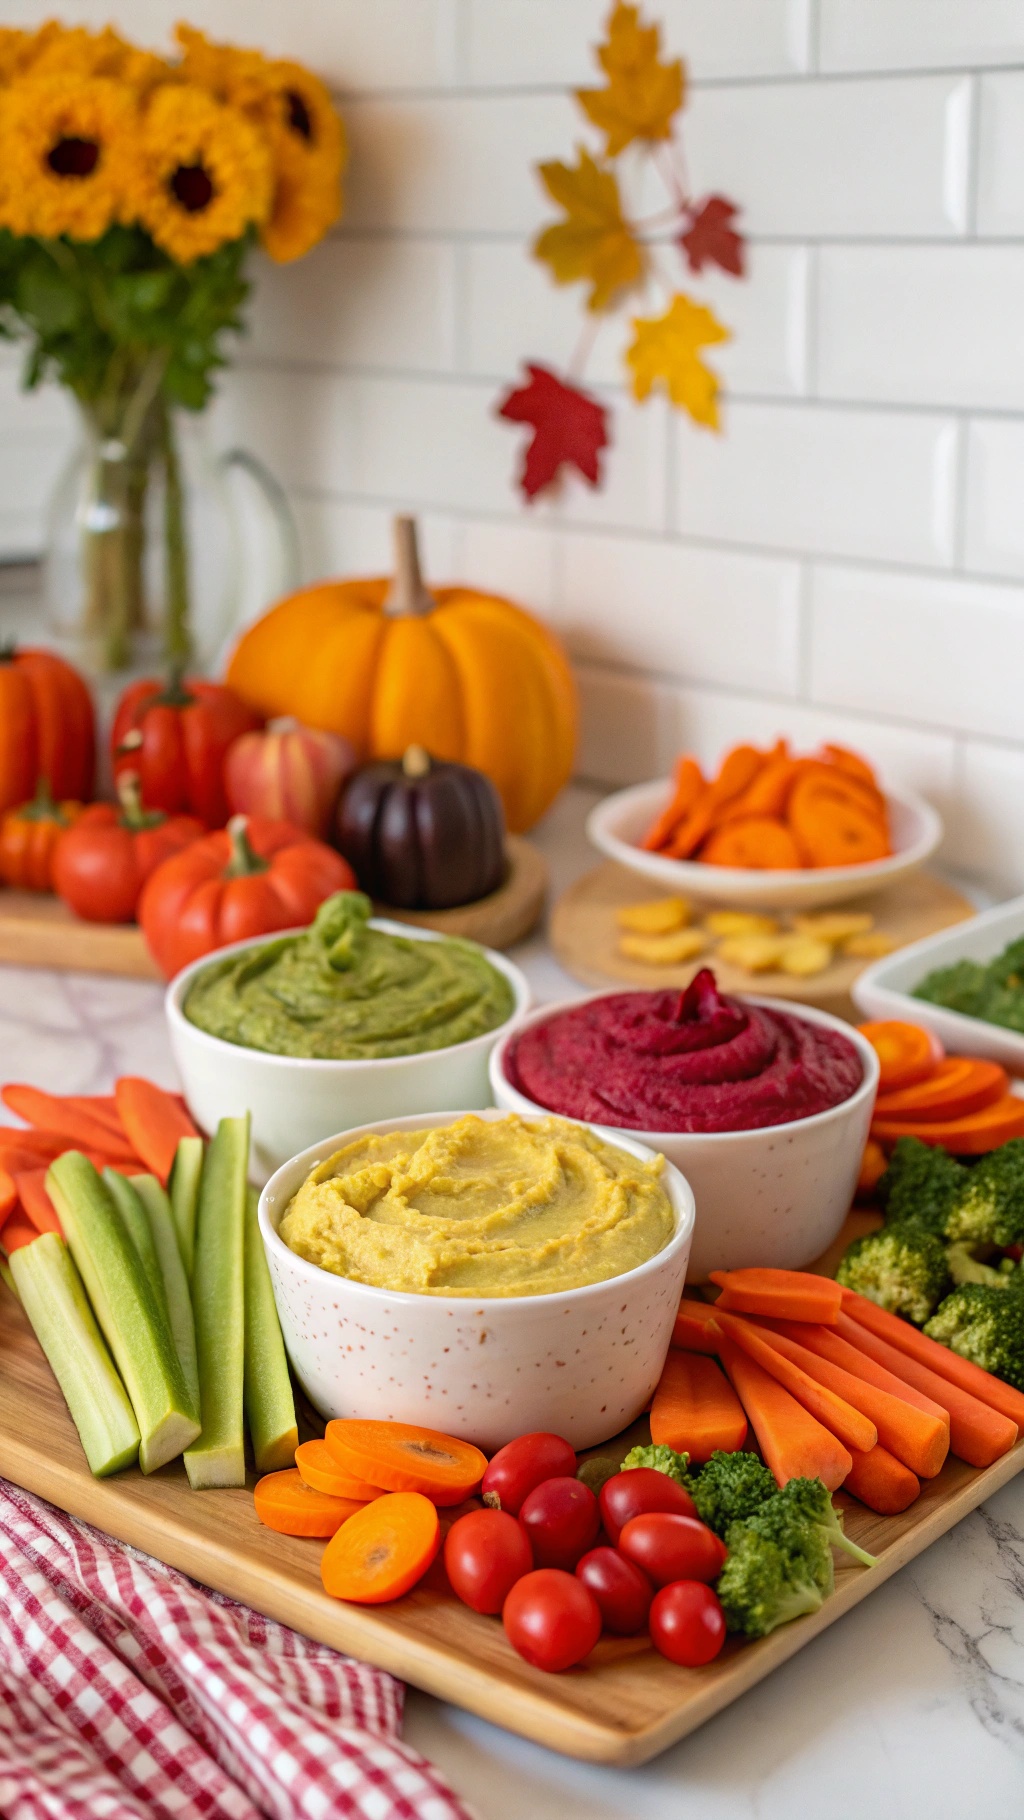
This colorful platter of hummus and fresh veggies is perfect for a no-oven Thanksgiving. The trio of hummus flavors—classic, beet, and spinach—adds a fun twist to your appetizer spread. Each dip is paired with vibrant veggies like carrots, celery, and cherry tomatoes, making it not only tasty but also visually appealing.

Serving a variety of dips allows guests to mix and match, keeping everyone happy. Plus, it’s a great way to sneak in some healthy options during the holiday feast. The bright colors of the veggies and the dips create a festive atmosphere, perfect for the season.

Here’s how to whip up this delightful hummus trio:

Ingredients

  • 1 can chickpeas, drained and rinsed
  • 1/4 cup tahini
  • 2 tablespoons olive oil
  • 2 tablespoons lemon juice
  • 1 garlic clove
  • Salt to taste
  • 1 small beet, cooked and peeled
  • 1 cup fresh spinach
  • Fresh veggies for dipping (carrots, celery, cherry tomatoes, broccoli)

Instructions

  1. Classic Hummus: In a food processor, blend chickpeas, tahini, olive oil, lemon juice, garlic, and salt until smooth. Adjust seasoning to taste.
  2. Beet Hummus: In the same food processor, add the classic hummus and the cooked beet. Blend until you achieve a vibrant pink color.
  3. Spinach Hummus: Again, use the classic hummus as a base and add fresh spinach. Blend until smooth and green.
  4. Serve: Transfer the hummus into bowls and arrange fresh veggies around them on a platter. Enjoy!

Savory Garlic And Herb Cheese Ball

A savory garlic and herb cheese ball surrounded by crackers and grapes on a wooden platter.

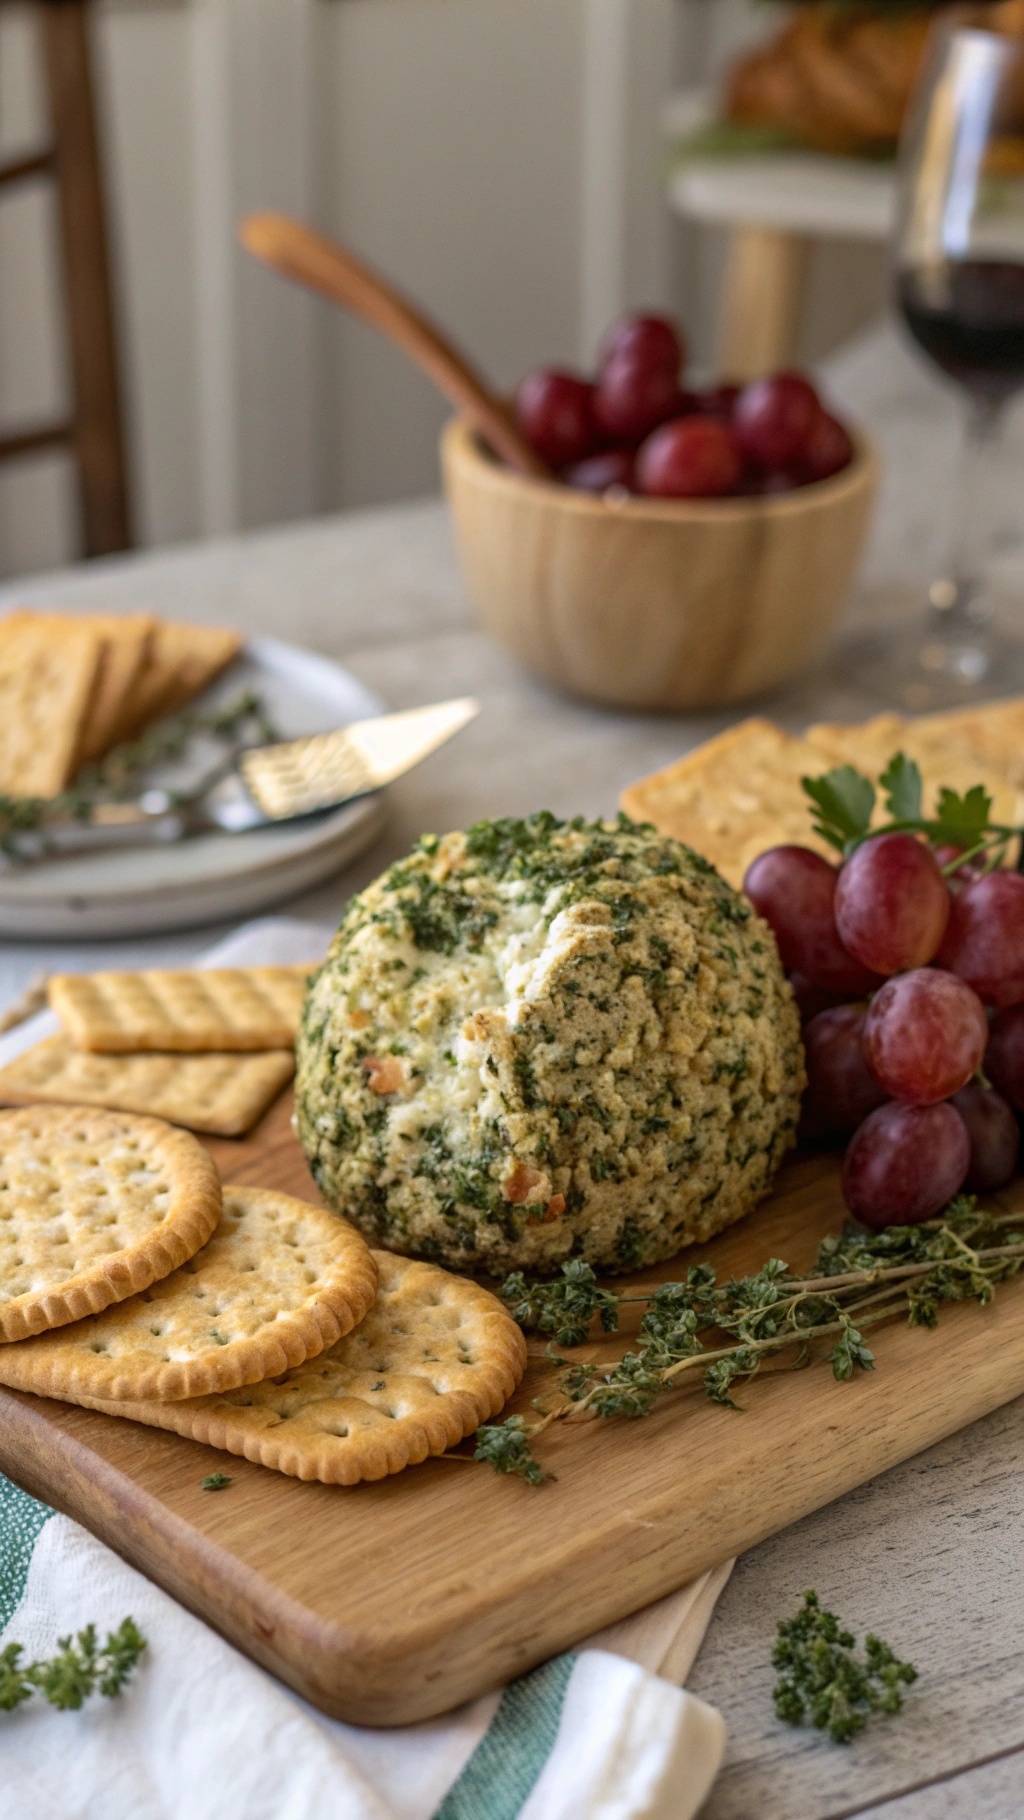
The Savory Garlic and Herb Cheese Ball is a delightful appetizer that brings a burst of flavor to your Thanksgiving table. This cheese ball is beautifully coated in fresh herbs, making it not only tasty but also visually appealing. Surrounded by crunchy crackers and juicy grapes, it’s a perfect choice for busy kitchens during the holiday season.

Making this cheese ball is simple and requires minimal effort. It’s a great way to impress your guests without spending hours in the kitchen. Just mix the ingredients, shape it into a ball, and let it chill. Serve it with your favorite crackers for a delicious bite that pairs well with wine.

Here’s how to make it:

Ingredients

  • 8 oz cream cheese, softened
  • 1 cup shredded cheddar cheese
  • 1/4 cup grated Parmesan cheese
  • 2 cloves garlic, minced
  • 1 tablespoon fresh parsley, chopped
  • 1 tablespoon fresh chives, chopped
  • 1 teaspoon onion powder
  • 1/2 teaspoon salt
  • 1/4 teaspoon black pepper
  • 1/4 cup chopped nuts (optional)

Instructions

  1. In a mixing bowl, combine the softened cream cheese, cheddar cheese, Parmesan cheese, minced garlic, parsley, chives, onion powder, salt, and pepper. Mix until well combined.
  2. Shape the mixture into a ball and wrap it in plastic wrap. Chill in the refrigerator for at least 2 hours to firm up.
  3. If using nuts, spread them on a plate. Once the cheese ball is chilled, roll it in the nuts to coat the outside.
  4. Serve with an assortment of crackers and fresh grapes for a delightful appetizer.

Delicious Sweet Potato Bites With Marshmallow Cream

Sweet potato bites topped with marshmallow cream and pecans on a wooden platter.

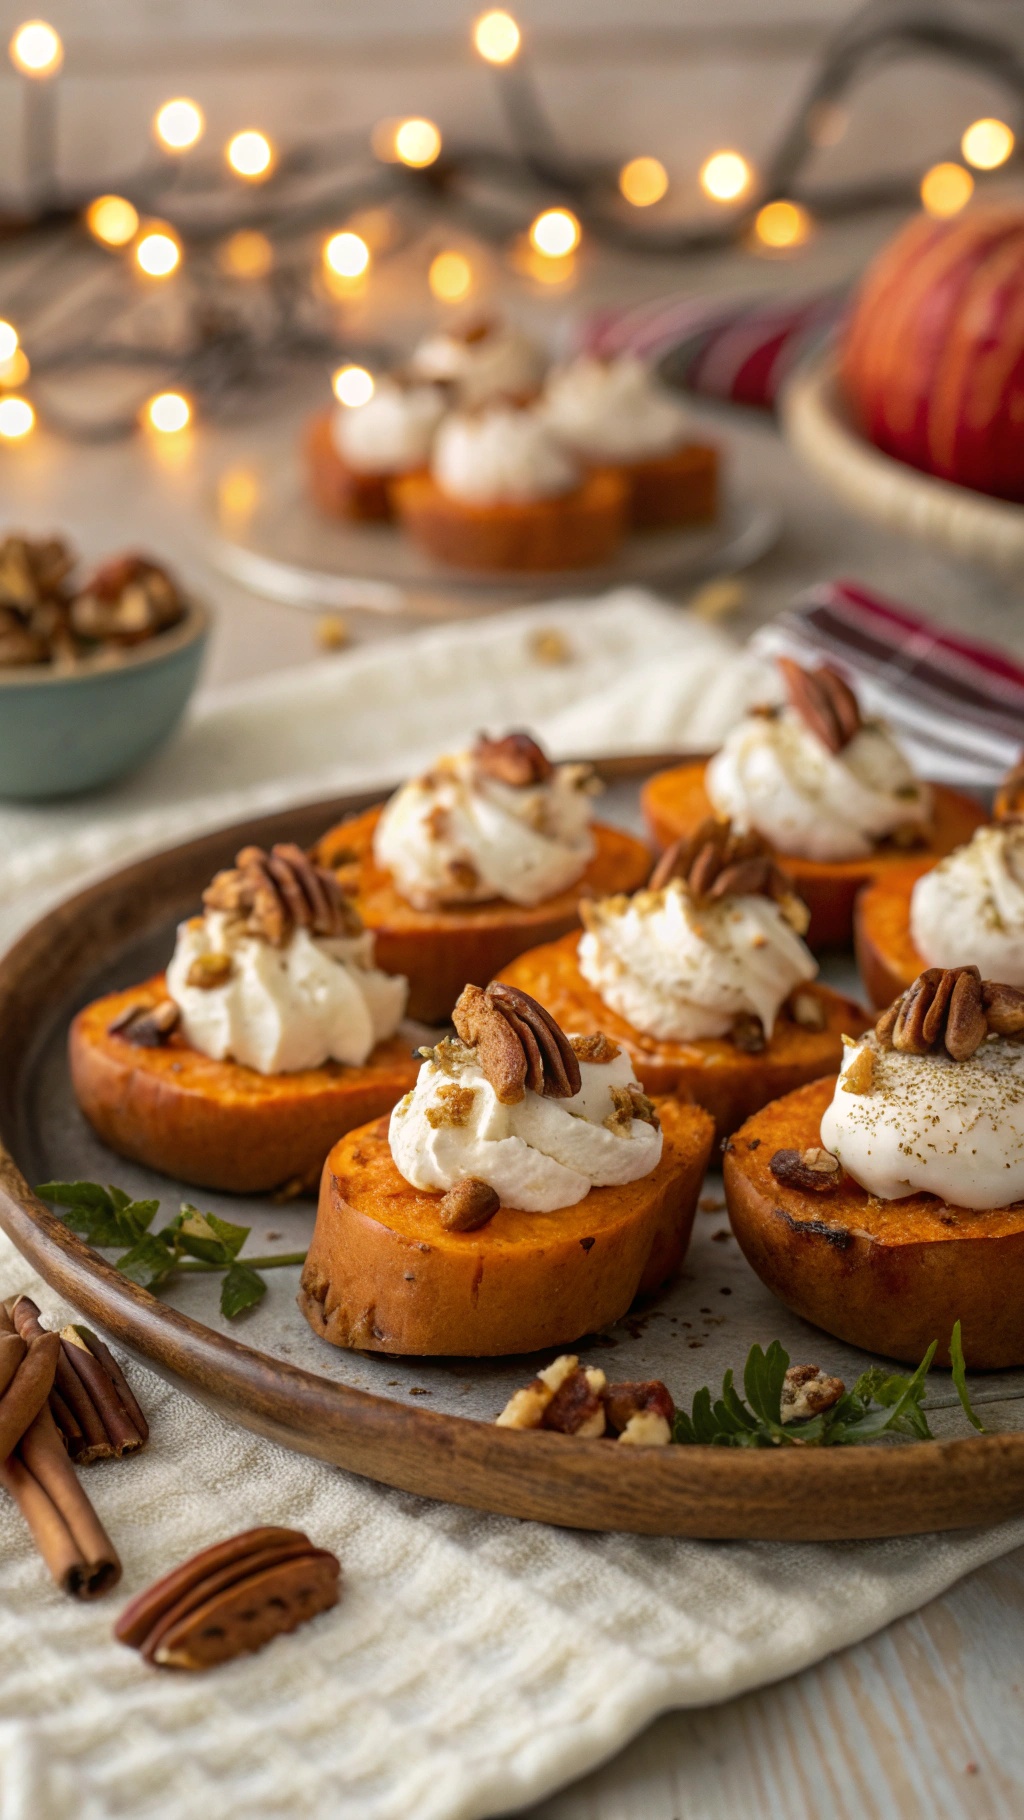
Sweet potato bites topped with marshmallow cream are a delightful addition to any Thanksgiving table. These little treats are not only visually appealing but also packed with flavor. The warm, earthy sweetness of the sweet potatoes pairs perfectly with the light, fluffy marshmallow cream. Topped with crunchy pecans, they offer a satisfying texture that everyone will love.

These bites are easy to prepare and don’t require an oven, making them perfect for busy kitchens during the holiday rush. You can whip them up in no time, allowing you to focus on other dishes or enjoy time with family and friends.

Gather your ingredients and get ready to impress your guests with these tasty appetizers!

Ingredients

  • 2 large sweet potatoes
  • 1 cup marshmallow fluff
  • 1/2 cup cream cheese, softened
  • 1/4 cup powdered sugar
  • 1 teaspoon vanilla extract
  • 1/2 cup chopped pecans
  • 1 teaspoon cinnamon
  • Pinch of salt

Instructions

  1. Prepare the Sweet Potatoes: Peel and slice the sweet potatoes into rounds about 1 inch thick. Steam or microwave them until tender, about 10 minutes.
  2. Make the Cream: In a bowl, mix the marshmallow fluff, cream cheese, powdered sugar, vanilla extract, and a pinch of salt until smooth and creamy.
  3. Assemble the Bites: Once the sweet potato rounds are cool, place a dollop of the marshmallow cream on each slice.
  4. Top with Pecans: Sprinkle the chopped pecans and a dash of cinnamon on top of the cream for added crunch and flavor.
  5. Serve: Arrange the sweet potato bites on a platter and enjoy!

Classic Bruschetta With Tomato And Basil

Classic bruschetta topped with diced tomatoes and basil on toasted bread.

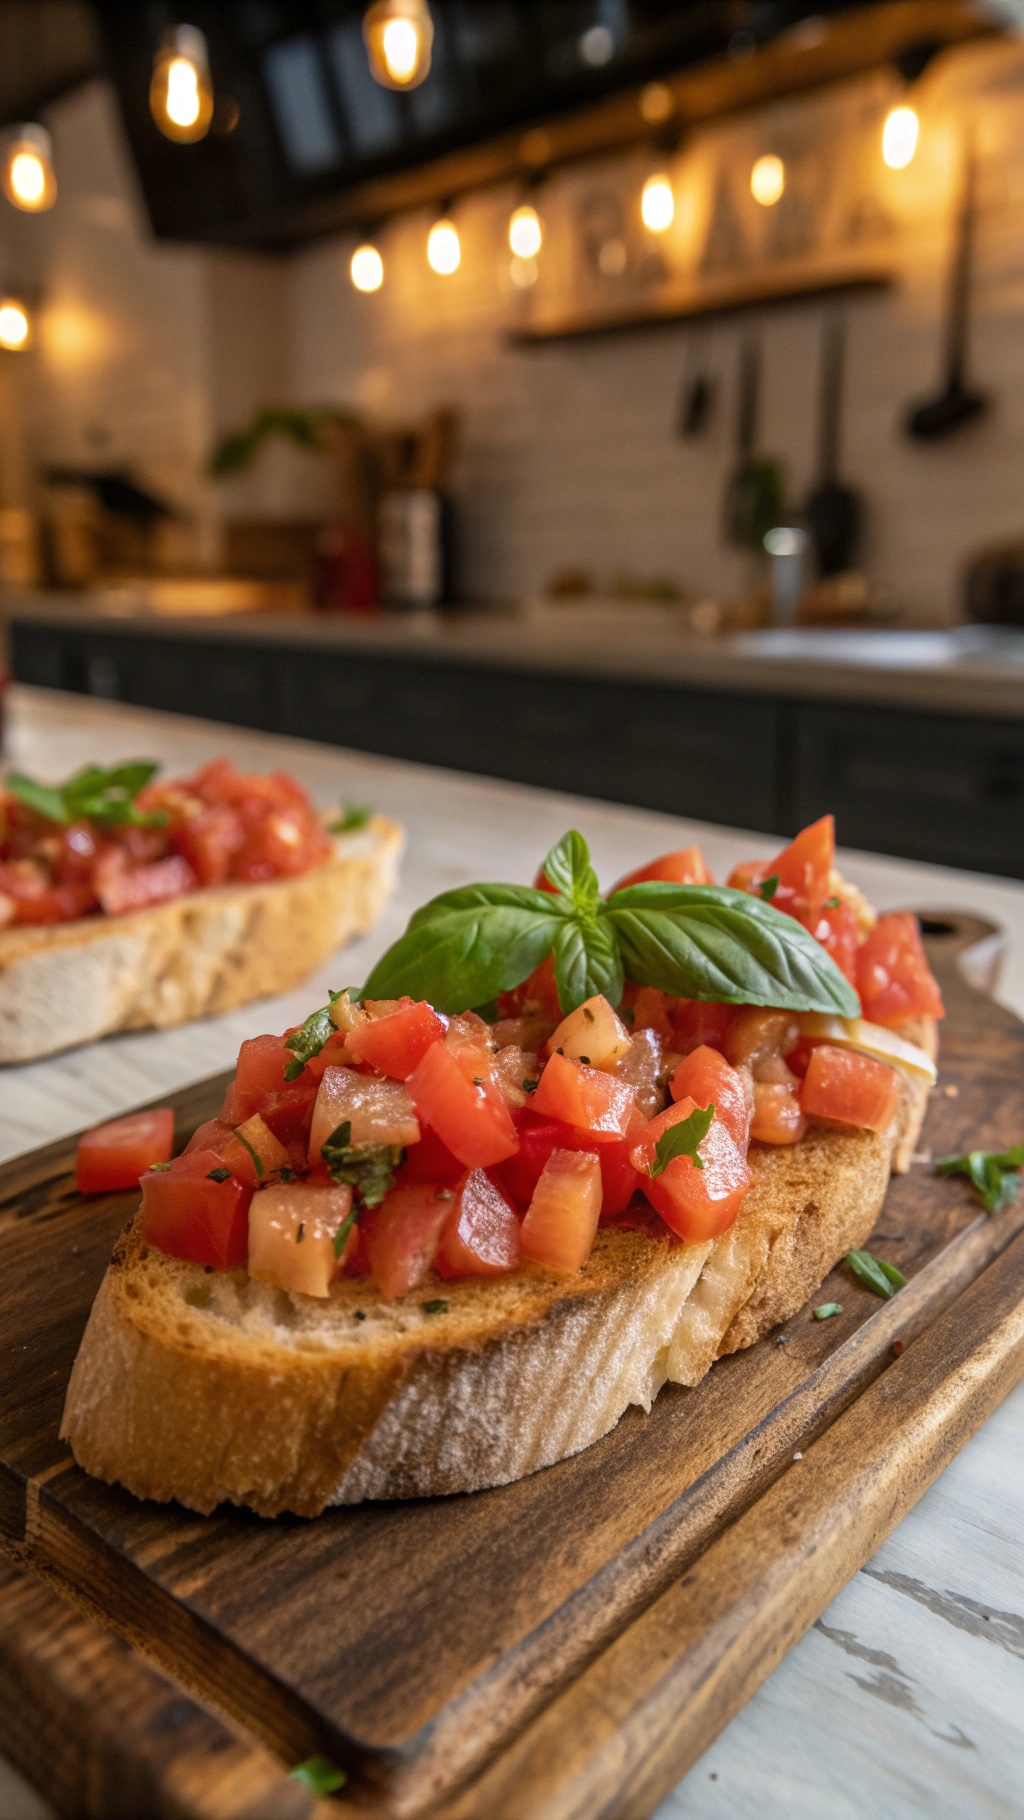
Bruschetta is a timeless appetizer that brings a burst of freshness to any gathering. The image showcases beautifully toasted bread topped with a vibrant mix of diced tomatoes and fresh basil. This dish is not only easy to prepare but also a crowd-pleaser, making it perfect for busy kitchens during the Thanksgiving rush.

The combination of juicy tomatoes and aromatic basil creates a delightful flavor profile. Each bite is a perfect balance of crunch and freshness. Plus, it requires no oven, which is a huge win when your kitchen is bustling with holiday cooking.

To make this classic bruschetta, you’ll need just a few simple ingredients. It’s quick to assemble, allowing you to focus on other dishes while still impressing your guests. Let’s get into the details!

Ingredients

  • 1 baguette or crusty bread
  • 4 ripe tomatoes, diced
  • 1/4 cup fresh basil, chopped
  • 2 cloves garlic, minced
  • 2 tablespoons olive oil
  • Salt and pepper to taste
  • Balsamic glaze (optional, for drizzling)

Instructions

  1. Prepare the Topping: In a bowl, combine the diced tomatoes, chopped basil, minced garlic, olive oil, salt, and pepper. Mix well and let it sit for about 10 minutes to allow the flavors to meld.
  2. Toast the Bread: Slice the baguette into 1/2-inch thick pieces. You can toast them in a skillet over medium heat or on a grill until they are golden brown and crispy.
  3. Assemble: Spoon the tomato mixture generously onto each slice of toasted bread. If desired, drizzle with balsamic glaze for an extra touch of flavor.
  4. Serve: Arrange the bruschetta on a platter and enjoy immediately. They are best served fresh!

Sweet And Savory Fig And Goat Cheese Crostini

A plate of sweet and savory fig and goat cheese crostini drizzled with honey, garnished with fresh herbs.

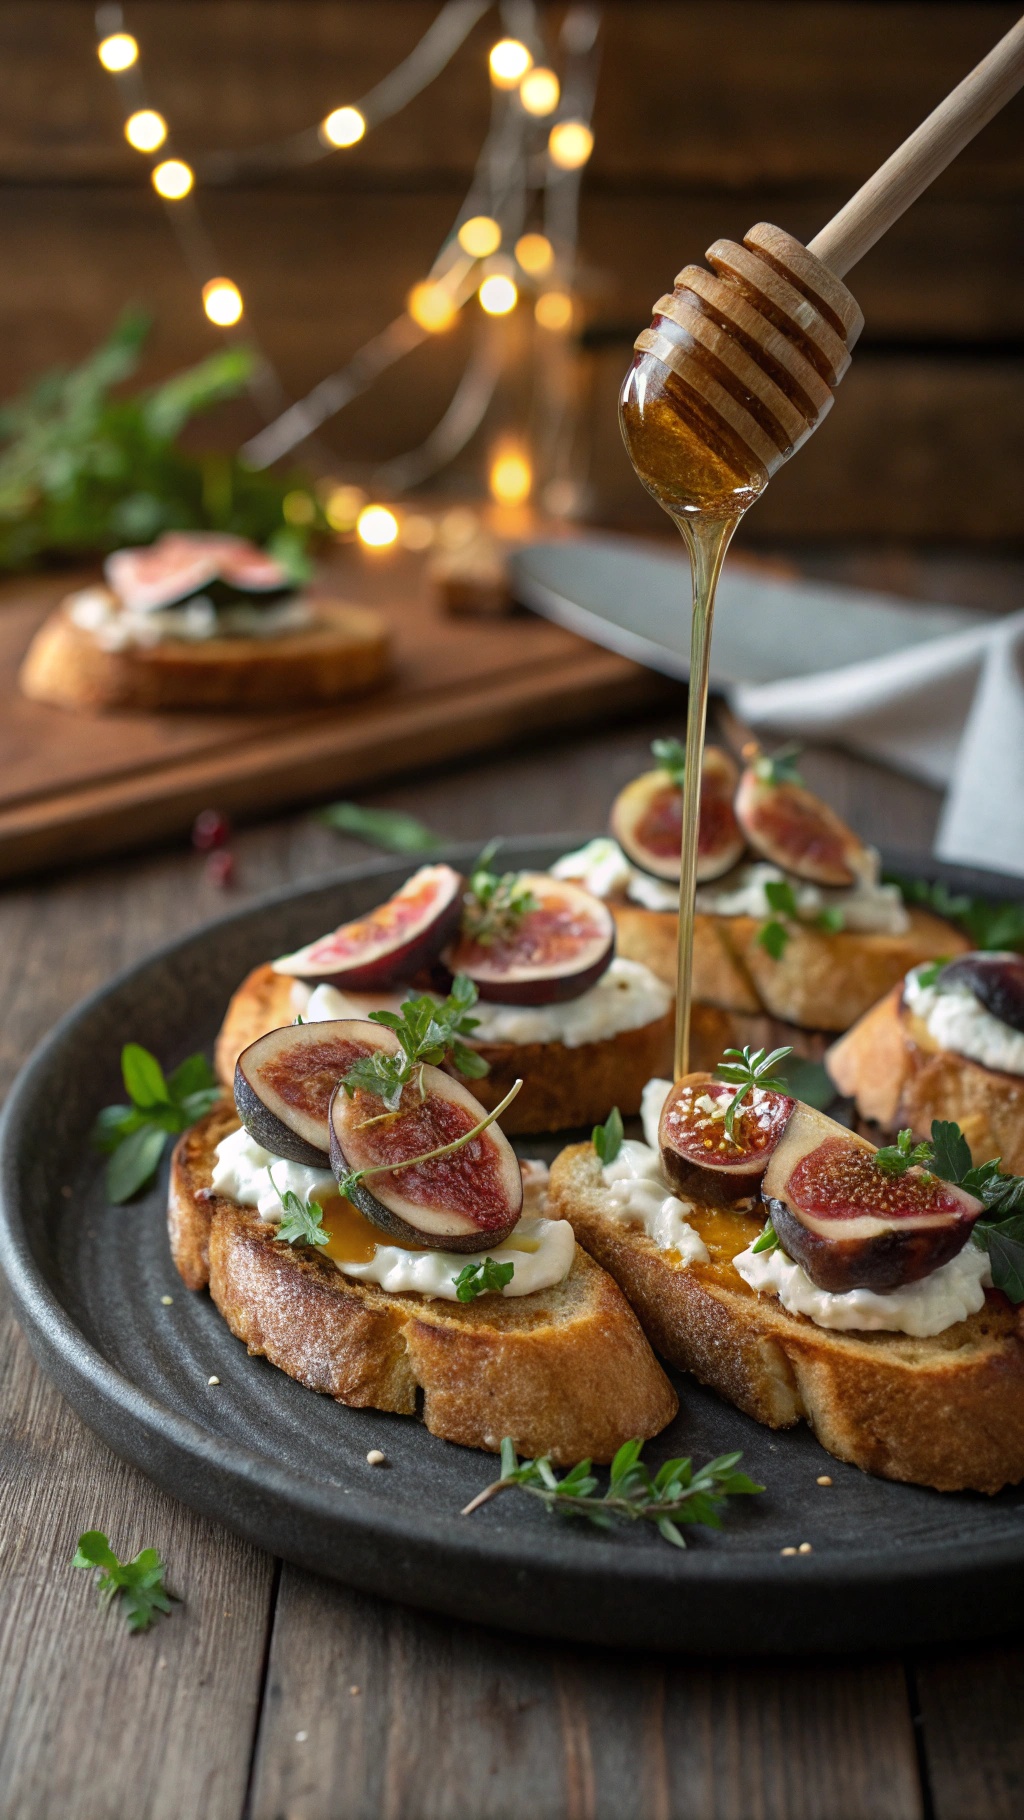
These Sweet and Savory Fig and Goat Cheese Crostini are a delightful addition to any Thanksgiving spread. The image showcases beautifully arranged crostini topped with creamy goat cheese, fresh figs, and a drizzle of honey. The contrast of flavors and textures makes these bites irresistible. Perfect for busy kitchens, they require no oven and can be prepared quickly, allowing you to focus on other dishes.

The combination of sweet figs and tangy goat cheese creates a harmonious balance. Adding a touch of honey enhances the sweetness while fresh herbs add a pop of color and flavor. These crostini are not just appetizers; they are a conversation starter at your holiday gathering.

Ingredients

  • 1 baguette, sliced into 1/2-inch pieces
  • 8 oz goat cheese, softened
  • 8-10 fresh figs, sliced
  • Honey, for drizzling
  • Fresh thyme or parsley, for garnish
  • Olive oil, for drizzling
  • Salt and pepper, to taste

Instructions

  1. Prepare the Baguette: Arrange the baguette slices on a serving platter. Drizzle lightly with olive oil and season with salt and pepper.
  2. Spread the Cheese: Evenly spread the softened goat cheese on each slice of baguette.
  3. Add the Figs: Top the goat cheese with sliced figs, arranging them nicely for presentation.
  4. Drizzle with Honey: Finish by drizzling honey over the figs for added sweetness.
  5. Garnish: Sprinkle fresh thyme or parsley on top for a burst of color and flavor.
  6. Serve: Enjoy immediately or let them sit for a few minutes to allow the flavors to meld.


Struggling to Stay on Track with Your Eating?

You’re not alone. One of the biggest obstacles I see people face is not knowing what to eat. Between busy schedules, endless diet advice online, and trying to cook healthy meals that actually taste good—it’s easy to feel stuck or overwhelmed.

That’s why I created my 21 Quick & Easy Custom Low-Calorie Meal Plans Program. These plans are built specifically for you—your goals, your lifestyle, and your food preferences. You won’t find any cookie-cutter diets here. Just real, satisfying meals that help you stay full, energized, and on track without the stress.

No more guessing.
No more skipping meals or eating diet food you hate.
Just a clear, doable plan that fits your life.

👉 Ready to eat better, feel better, and finally make progress? [Click here to get your custom meal plans today.]


Not Seeing the Inches Drop No Matter What You Do?

If you’re working out but still not seeing the results in the mirror, I hear you. So many people come to me after months of doing cardio or random workouts—and still struggling to lose inches or tone up. The truth is, your body needs more than just movement. It needs a proven strategy.

My 8-Week Workout Program to Lose Inches is designed to do just that—burn fat, tighten up, and give you visible results. These workouts are fun, effective, and designed for real people with real lives. Whether you’re getting back into fitness or ready to take it to the next level, this program gives you a clear path to success.

Just 8 weeks to build strength, confidence, and a fitter shape.
No endless cardio.
No gym required (unless you want it).

👉 If you're ready to drop inches and feel amazing in your own skin, [click here to start the 8-Weeks Workout Program].


Comments